
Single Sign-On Secrets: Seamlessly Embed BI Dashboards with SSO
Why Getting SSO Right Is the Hardest Part of Embedded Analytics
Embed BI dashboards with SSO is how modern SaaS teams deliver secure, seamless analytics to their customers — without forcing users to log in twice or manage separate BI credentials.
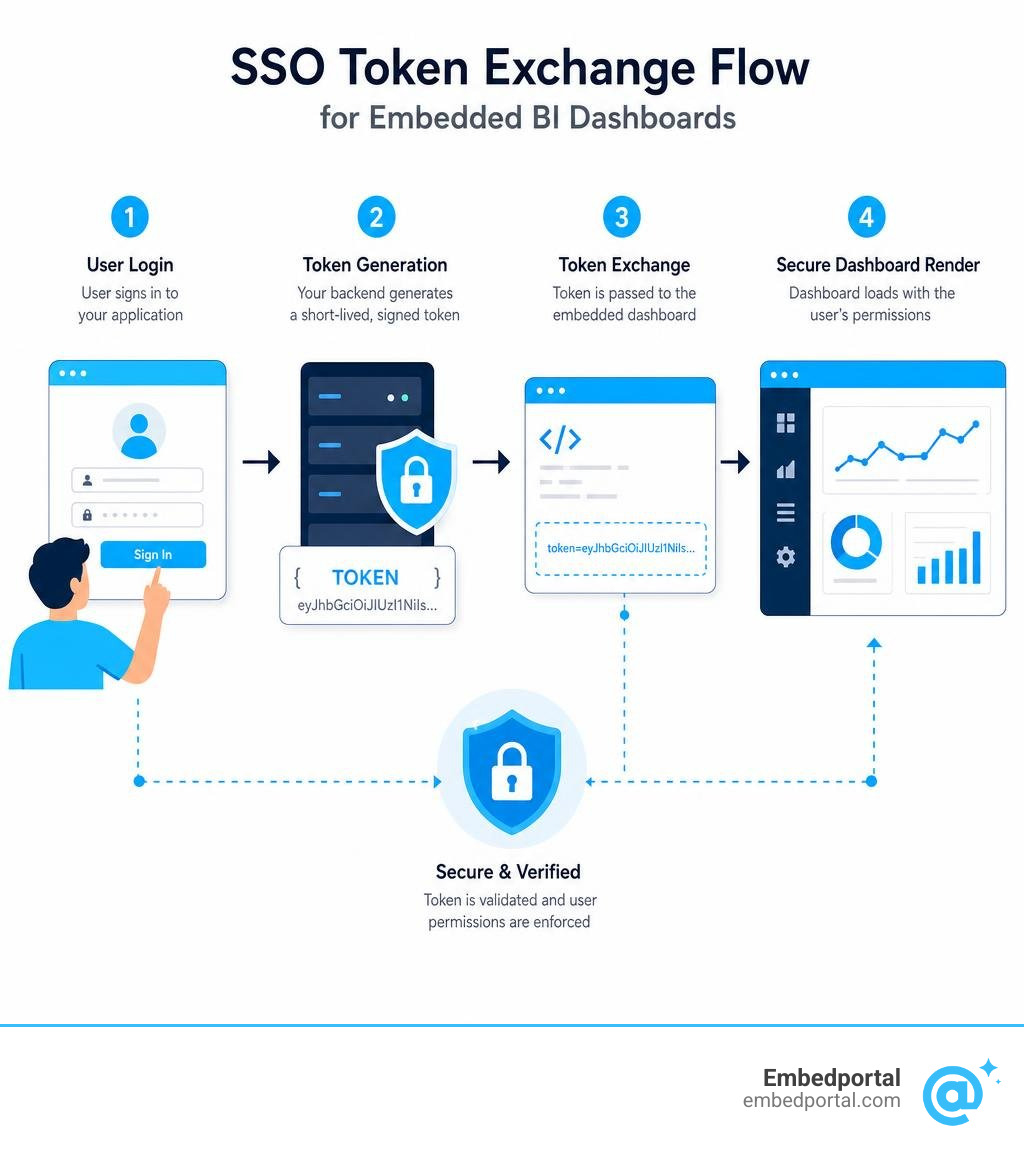
Here’s the short answer on how it works:
- Your app authenticates the user via your existing identity provider (Azure AD, Okta, Google, etc.)
- Your backend generates a short-lived signed token (JWT or HMAC signature) containing the user’s identity and data permissions
- The token is passed to the embedded iframe or JavaScript SDK so the BI tool can verify who the user is
- The dashboard loads — no second login required — showing only the data that user is allowed to see
That’s the core loop. But getting every step right, especially across multiple BI vendors and dozens of tenants, is where teams run into real trouble.
Consider a scenario many product teams know too well: you build a portal, embed your dashboards, and then your customers hit a login wall every time they click into a new report. Or worse — one tenant accidentally sees another’s data because the row-level security wasn’t wired into the SSO token correctly.
These aren’t edge cases. They’re the default outcome when SSO and BI embedding are bolted together as an afterthought.
This guide covers exactly how to get it right — from Azure AD app registration and service principal setup, to JWT generation, RLS integration, and multi-vendor SSO across tools like Power BI, Tableau, and QuickSight.
App Owns Data vs. User Owns Data: How SSO Applies to Power BI Embedding
When we look at the architecture of modern analytics, particularly within the Microsoft ecosystem, we must first address a fundamental architectural fork in the road. In Power BI Embedding, this division is known as the difference between “User Owns Data” and “App Owns Data”.
Choosing the wrong model for your target audience is the single most common reason embedding projects fail before they even start.
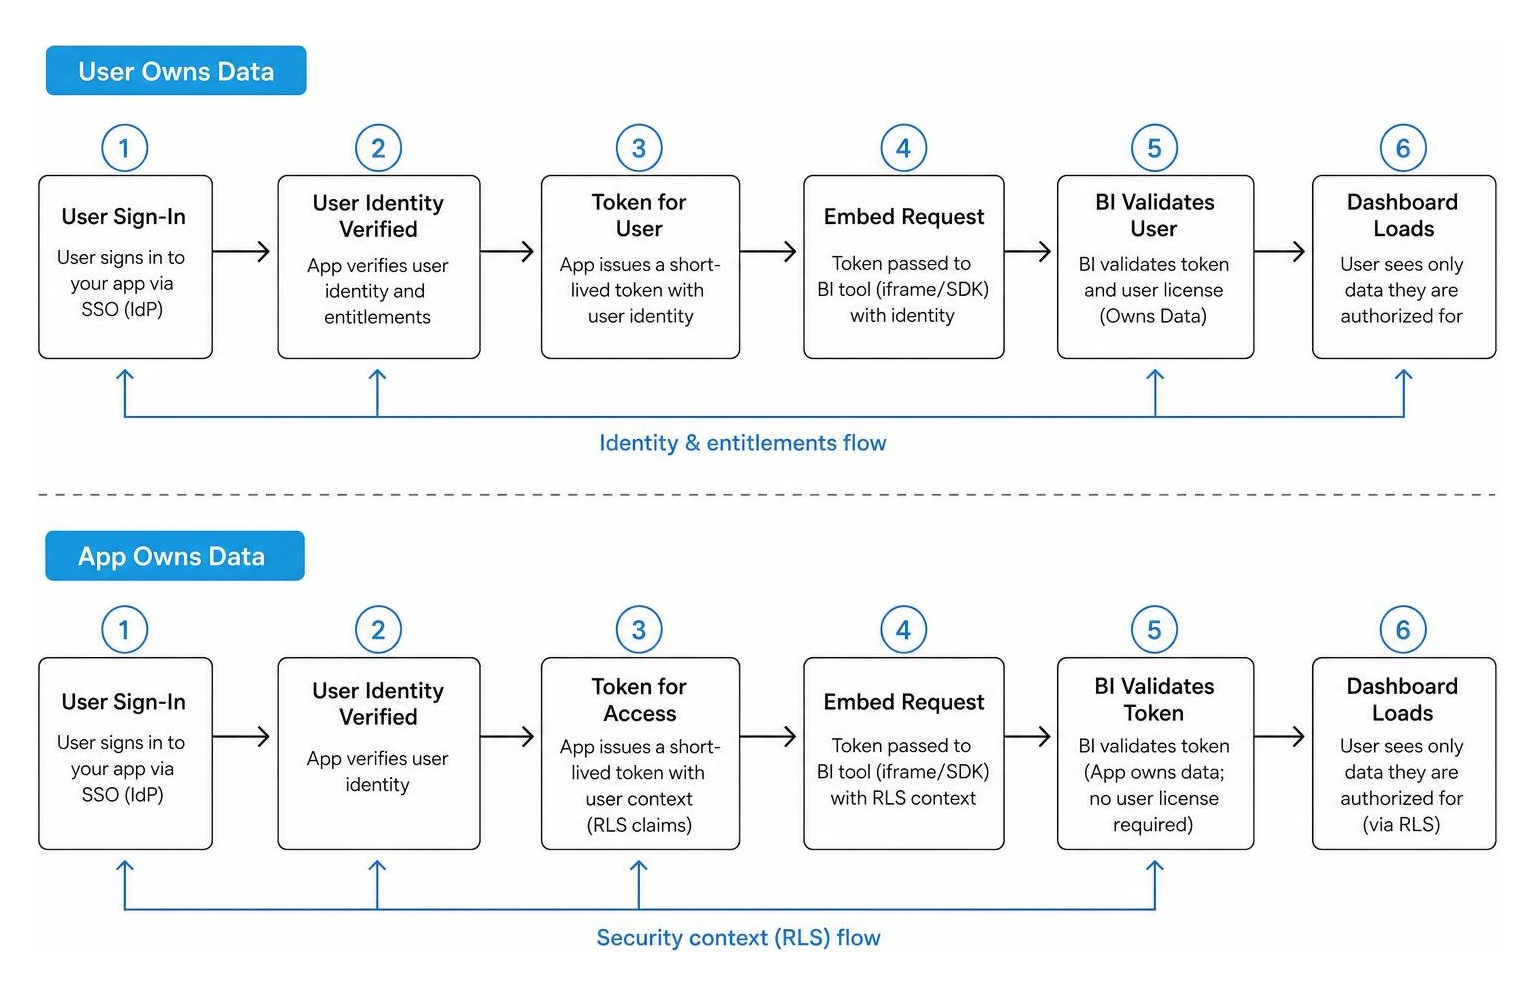
To understand how single sign-on applies to each, we must look at who owns the identity and who pays for the privilege of viewing the report. This distinction is detailed extensively in our guide on App Owns Data vs User Owns Data.
User Owns Data: SSO for Internal Organization Portals
The “User Owns Data” scenario is designed specifically for internal organization portals. In this model, every single viewer who accesses the embedded dashboard must have their own individual BI license and a corresponding identity in your company’s Microsoft Entra ID (formerly Azure Active Directory).
When embedding for your internal team, the single sign-on flow relies entirely on the user’s active browser session. If a user logs into your internal company SharePoint, intranet, or custom portal, the embedded report expects to quietly inherit that Azure AD session.
To make this work seamlessly, developers often use the secure embed code method described in Microsoft’s documentation on how to Embed a report in a secure portal or website – Power BI . When configured correctly, the browser checks for an active Microsoft 365 token. If found, it bypasses the login screen completely and renders the report. If not, the user is prompted to log in.
Because of this, you must keep a close eye on Power BI Licensing costs. If you have 500 internal employees viewing a dashboard, every single one of those 500 employees needs a Power BI Pro or Premium Per User (PPU) license.
App Owns Data: How to Embed BI Dashboards SSO for External Customers
For software-as-a-service (SaaS) companies, customer-facing portals, and external applications, the “User Owns Data” approach is a non-starter. You cannot ask your external customers to buy Microsoft licenses just to view their usage charts inside your SaaS product.
This is where the “App Owns Data” model comes in. It is the foundation of Embedded Analytics for SaaS.
In this model, your application acts as the master gatekeeper. Your users log into your application using whatever identity provider you choose (Okta, Auth0, custom database, etc.). They have no idea that Power BI is running in the background. They do not have Microsoft accounts, and they do not need individual BI licenses. Instead, your application uses a single master identity (a Service Principal) to communicate with the Power BI Service API.
When an external user requests a dashboard, your backend application makes a secure call to the Power BI REST API. It says, “I am the master application, and I need a temporary, short-lived embed token for User X, who belongs to Tenant Y.” The Power BI Service generates this token and passes it back to your backend. Your app then passes this token to the frontend iframe, which uses it to securely render the dashboard.
This process handles External User Access without forcing you to deal with complex Power BI Guest Access setups or inviting external clients directly into your corporate tenant.
Prerequisites and Azure AD Configuration for Power BI SSO
Before you can write a single line of code to generate SSO tokens, you need to configure the underlying identity infrastructure in Microsoft Azure. Think of this as laying the concrete foundation before trying to build a custom house.

Essential Prerequisites: Licenses, Capacity, and App Registration
To run a production-grade embedded BI application using SSO, you cannot rely on free developer accounts. You must secure the following pieces:
- Microsoft Entra ID (Azure AD) Tenant: A corporate tenant where you have administrative access to register applications.
- Power BI Pro or Premium Per User (PPU) License: Required for the developer or administrator who will publish the reports and manage the workspace.
- Dedicated Cloud Capacity: To move beyond a free developer trial and serve dashboards to external users without licensing them individually, you must purchase dedicated capacity. This can be an Azure Power BI Embedded SKU (A-series SKUs) or a Microsoft Fabric capacity (F-series SKUs). Understanding Power BI Embedded Pricing and general Embedded Analytics Pricing is critical here, as running these capacities 24/7 can impact your cloud budget if not managed efficiently.
- A Power BI Workspace: A modern V2 workspace containing the reports and datasets you want to embed.
Once these are in place, the very first technical step is to register an application within Microsoft Entra ID. This registration establishes the identity of your application and gives it the authority to call the Power BI REST APIs, as discussed in the community thread Solved: How to use powerbi dashboard embeded – Microsoft Fabric Community .
Step-by-Step Microsoft Entra ID Setup for SSO
Configuring Microsoft Entra ID for embedded SSO requires precision. A single misconfigured permission will result in a generic 403 Forbidden error. Here is the step-by-step path to success, which we also cover in The Developers Guide to SSO Analytics Embedding:
- Register the Application: Navigate to the Azure Portal, open Microsoft Entra ID, and select App Registrations. Click “New Registration”, name your application (e.g., “SaaSBIEmbed_Service”), select the appropriate account type (typically “Accounts in this organizational directory only”), and click Register.
- Acquire Credentials: Once the app is registered, copy the Application (Client) ID and the Directory (Tenant) ID. Save these immediately in your secure environment variables.
- Generate a Client Secret: Go to “Certificates & secrets” in the left sidebar, click “New client secret”, provide a description, select an expiration period, and click Add. Copy the secret’s Value immediately. This value is permanently masked once you navigate away from the page.
- Configure API Permissions: Go to “API permissions”, click “Add a permission”, and select “Power BI Service”. Choose “Application permissions” (or “Delegated permissions” depending on your authentication model) and select the necessary scopes, such as Report.Read.All and Workspace.Read.All. Click “Grant admin consent for your tenant” to authorize these permissions.
- Enable Power BI Service Principal Access: Log into the Power BI Admin Portal as an administrator. Go to Tenant Settings and scroll down to Developer Settings. Enable the setting “Allow service principals to use Power BI APIs”. For security, restrict this setting to a specific security group that contains only your newly registered Azure AD application.
- Grant Workspace Access: Go to the Power BI workspace containing your reports. Click “Manage access” and add your Service Principal (by the name of your Azure AD app registration) as an Admin or Member of the workspace. Without this step, your application will not be able to generate embed tokens for content inside that workspace.
Authentication Methods: Service Principal vs. Master User
When implementing SSO, you must choose between two primary authentication methods: Service Principal or Master User.
Microsoft strongly recommends using a Service Principal for almost all modern embedding scenarios. A Service Principal is an app-only identity managed entirely within Azure AD. It does not require a dedicated Power BI Pro license, and it supports highly secure certificate-based authentication.
A Master User, on the other hand, relies on the credentials (username and password) of a real Power BI Pro user account. Using a Master User introduces massive security vulnerabilities, such as managing hardcoded passwords in configuration files, and it breaks down completely if Multi-Factor Authentication (MFA) is enforced on the corporate domain.
For a deeper dive into managing these identities safely, refer to The Developers Guide to Power BI Embedded RLS and Token Identities.
How to Implement Token-Based SSO and Best Practices
Once your identity provider is configured, the next step is the actual software implementation. Securely embedding dashboards requires a two-step token exchange mechanism to prevent exposing master secrets to the public internet.

Generating Secure JWTs and HMAC Signatures Server-Side
To keep your master credentials secure, all authentication logic must run on your backend server. Never expose client secrets, database passwords, or master API tokens to the client browser.
For custom applications, token-based SSO typically relies on generating JSON Web Tokens (JWTs) or HMAC-signed URLs. When an authenticated user loads a page containing an embedded dashboard, your backend constructs a payload containing the user’s identity, role, tenant ID, and a timestamp.
To prevent tampering, your backend signs this payload using a secure hashing algorithm, such as HMACSHA256, combined with an embed secret key. This process is common across modern analytics tools, as documented in the Embedded Analytics & SSO – White-label BI Solution documentation.
To prevent replay attacks — where a malicious user intercepts a valid embed URL and attempts to reuse it later — you should always include a unique cryptographic “nonce” (a random GUID generated for each request) and a strict expiration timestamp in your token payload. This ensures that each generated URL is single-use and valid only for a very narrow window of time (e.g., 5 minutes). This is a critical element of secure Embedded BI architectures.
Passing Tokens to the Frontend via JavaScript SDKs
Once your backend generates the secure token, it sends it back to the client application. While you can simply append the token as a query parameter to an iframe’s source URL, this approach offers very little control over the user experience.
Instead, the best practice is to load the dashboard dynamically using a JavaScript SDK, such as the Power BI JavaScript API.
By using an Embedded Analytics Platform SDK, your frontend code can initialize the embed container, pass the token securely in the request headers, listen to events (such as page changes or button clicks), and inject custom CSS styling to make the dashboard blend seamlessly with your application’s UI. This eliminates the standard, unbranded look of basic iframes, which we discuss in The iFrame is the Easy Part What Embedded Analytics Needs.
Securing the Token Lifecycle and Restricting Allowed Origins
Securing your embedded dashboards doesn’t stop at token generation. You must also manage the entire lifecycle of that token and restrict where it can be used:
- Short Token Lifespans: Set your embed tokens to expire quickly (between 10 and 60 minutes). The token is only needed to authorize the initial handshake and load the dashboard; once the session is established, standard browser cookies maintain the connection.
- Configure Allowed Origins: In your BI service and Azure AD settings, explicitly define the domains that are permitted to embed your reports. If an attacker steals a token, they should be blocked from loading the dashboard on any unauthorized domain.
- Use Read-Only Database Credentials: Ensure the database user used by your BI tool has read-only access to prevent any accidental or malicious data modification through the embedded interface.
These layers of security are essential when designing systems capable of handling The Enterprise Guide to Embedding BI Dashboards at Scale and are detailed in our guide on Securely Embedding Multi-Tenant Dashboards for Fun and Profit. For additional security guidelines, check out our RLS Best Practices.
Integrating Row-Level Security (RLS) with SSO
Single Sign-On ensures that users can access your embedded dashboards securely, but Row-Level Security (RLS) ensures they only see the specific rows of data they are authorized to view.
| Feature | Static RLS | Dynamic RLS |
|---|---|---|
| Setup Complexity | Low (roles defined manually in BI Desktop) | Medium to High (requires user mapping tables) |
| Scalability | Poor (requires a separate role for every tenant) | Excellent (one role handles infinite tenants) |
| SSO Integration | Hardcoded role mapping | Dynamic username/email passed via SSO token |
| Maintenance | High (must update BI files when tenants change) | Low (data-driven filters update automatically) |
Integrating RLS with your SSO flow is the holy grail of multi-tenant analytics. It allows you to build a single master report and safely share it with thousands of different clients, secure in the knowledge that Tenant A will never see Tenant B’s data.
To understand how to implement this, check out our core guide on Row Level Security.
Mapping User Identities to RLS Roles via SSO Tokens
In a standard Power BI Row Level Security setup, you define roles and rules within Power BI Desktop using DAX (Data Analysis Expressions) filters. For example, you might create a rule like: [TenantId] = USERNAME().
When your backend application requests an embed token from the Power BI REST API, it must pass an object known as “Effective Identities”. This object tells the Power BI Service which identity and roles to apply to the session.
Instead of relying on static mappings, your application dynamically maps the logged-in user’s email, username, or tenant ID directly into the token request. For instance, when Jane from Acme Corp logs in, your server requests an embed token with the effective identity of “jane@acme.com” and the role “TenantUser”.
When the report renders, the USERNAME() function in your DAX queries evaluates to “jane@acme.com”, instantly filtering the entire database to only show Acme Corp’s rows. For a deep dive into this setup, see The Ultimate Guide to Dynamic Row Level Security in Power BI and our tutorial on Power BI Row Level Security Based on Username.
For larger enterprise deployments, you can also explore The Easy Way to Map AD Groups to Power BI Roles.
Multi-Tenant Isolation and Dynamic RLS Filters
When building a SaaS product, maintaining strict multi-tenant isolation is a non-negotiable security requirement. If a customer discovers they can modify a URL parameter to view another company’s financial data, your company’s reputation is instantly ruined.
By passing the tenant ID or user email inside the cryptographically signed SSO token, you place the filtering logic on the server side. The client browser has absolutely no control over the filters applied to the database queries. Even if an advanced user attempts to intercept the network requests or modify the frontend JavaScript, the BI server will reject any requests for data outside the scope of the signed token.
This ironclad security model is the standard for modern SaaS applications, as we explain in How to Build a Secure Multi-Tenant Dashboard for Your SaaS and Multi-Tenant Row Level Security.
Overcoming Common Challenges When You Embed BI Dashboards SSO
Even with a perfect theoretical understanding, developers frequently run into practical roadblocks when implementing SSO in the real world.
Resolving Double Login Prompts in WordPress and Power Pages
One of the most frustrating issues occurs when users are logged into a master portal (like WordPress or Microsoft Power Pages) but are still prompted to sign in with a second login screen when they reach the embedded BI dashboard.
This “double login” prompt happens because of a session context mismatch. Your portal and your BI service run on completely different domains with separate cookie jars. If you are using a standard iframe embed link, the browser treats the BI iframe as a third-party site and blocks its cookies, triggering a fresh login prompt.
To resolve this issue in WordPress, many teams turn to dedicated integration plugins, such as the PowerBI Embed Reports plugin, which handles the Azure AD OAuth handshake in the background.
For custom web applications or Power Pages, the solution is to implement silent authentication using MSAL.js (Microsoft Authentication Library). Your portal code acquires an access token silently in the background and passes it directly to the iframe initialization code, bypassing the second login screen entirely.
This architecture is covered in detail in our guide on how to Embed Power BI Report and The No-Nonsense Guide to Power BI Multi-Tenant Security.
Handling Token Expiration and Silent Re-authentication
By default, an embed token generated by the Power BI REST API is only valid for one hour. If a customer leaves your application open on a tablet or dashboard monitor in their office, the report will eventually freeze or display an “Expired Token” error.
To prevent this bad user experience, you must implement a silent token refresh mechanism.
Using the Power BI JavaScript SDK, your frontend code can listen for the “tokenExpiration” event. When this event fires (typically 5 to 10 minutes before the token actually expires), your frontend makes an asynchronous fetch request to your backend API to request a fresh token. Once received, your frontend calls the setAccessToken() method on the embedded report object. The dashboard updates its credentials silently in the background without interrupting the user’s view or forcing a page reload.
This advanced token management is a core part of keeping live-query dashboards running smoothly, as detailed in our guide DirectQuery RLS and SSO in Power BI Demystified.
Frequently Asked Questions about SSO Dashboard Embedding
What is the difference between Service Principal and Master User for SSO?
A Service Principal is an app-only identity registered in Azure AD that does not require a paid Power BI license, making it highly secure and recommended for production. A Master User is a real user account with a username and password that requires a Power BI Pro license and is prone to security risks and MFA login failures.
How do I prevent double login prompts when I embed bi dashboards sso?
You must avoid simple iframe links and instead use token-based embedding (App Owns Data) where your backend generates an embed token and passes it to the frontend via a JavaScript SDK, or implement silent authentication (like MSAL.js) to share the session context.
Can I use SSO with multi-vendor BI tools like Tableau and Power BI?
Yes, but doing this natively requires building and maintaining separate identity pipelines, token generators, and iframe wrappers for each BI tool, which can take months of engineering time. We discuss these challenges in The Challenges of Multi-Vendor Reporting and How to Solve Them.
Conclusion: The Shortcut to Secure, Unified SSO Embedding
Building a secure, multi-tenant single sign-on integration for your embedded BI dashboards is a massive engineering undertaking. It requires deep expertise in identity protocols, server-side cryptography, token lifecycle management, and complex vendor-specific security rules.
And if your company uses more than one BI tool — say, Tableau for marketing reports and Power BI for operational data — you have to build, test, and maintain that entire complex identity pipeline multiple times over.
That is why we built Embedportal.
Based in California, USA, Embedportal is a white-label embedding platform designed to solve this exact headache. Instead of spending months writing custom token exchange code, managing Azure AD secrets, and debugging iframe cookie issues, our platform lets your team connect your BI tools, define your tenant security rules, and deploy a fully branded, secure analytics portal with unified SSO and row-level security in under an hour.
No data pipelines to build. No security loopholes to worry about. Just beautiful, secure dashboards delivered seamlessly to your users.
Ready to see how easy it can be? Read our guide on how to go from Zero to Embedded Analytics in Under an Hour or explore our Multi-Tenant Analytics solutions today.