The Ultimate Guide to Dynamic Row Level Security in Power BI
Why Dynamic Row Level Security in Power BI Is Essential for Secure Data Sharing
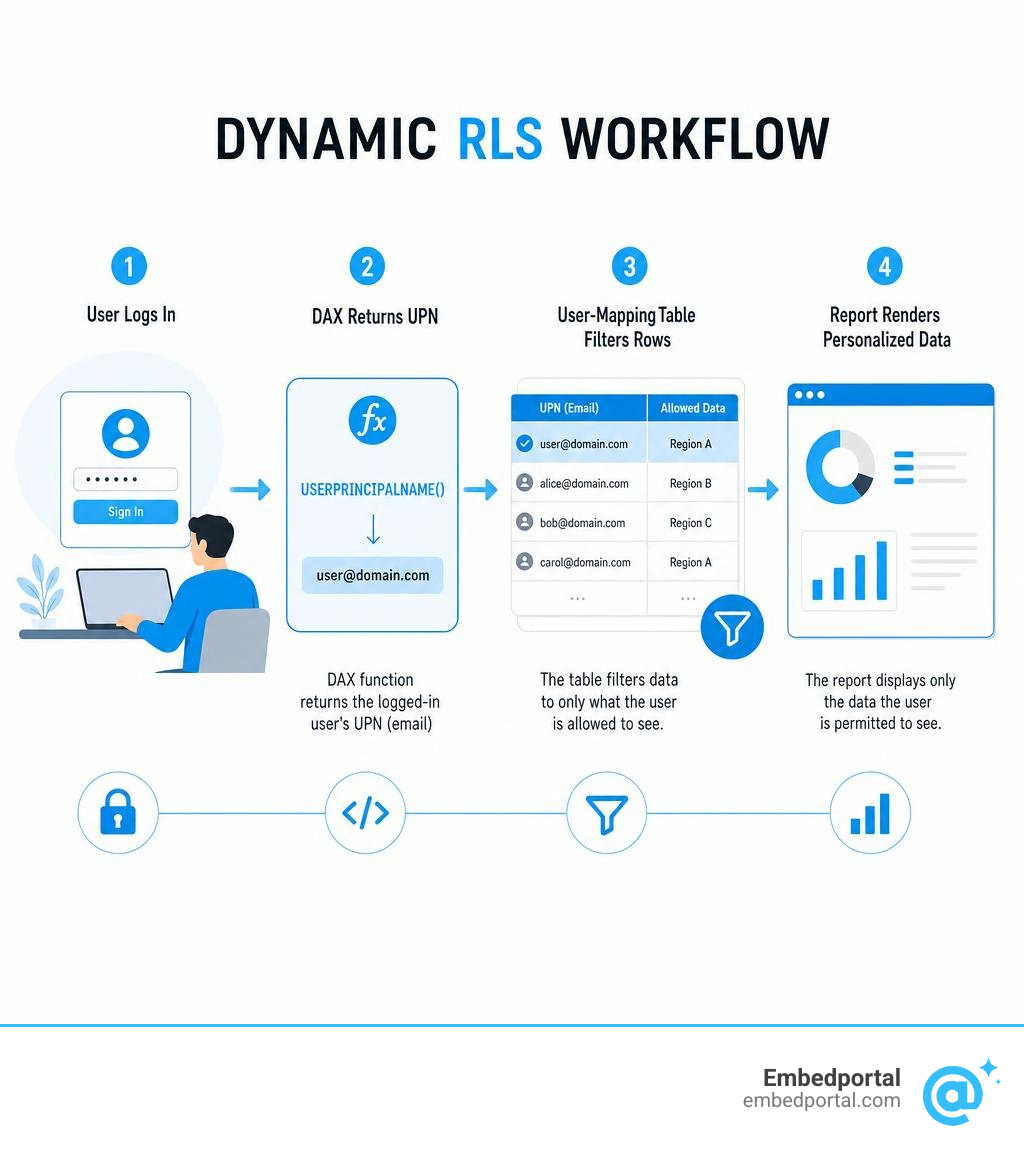
Dynamic row level security in Power BI is a method of restricting what data each user sees in a report — automatically — based on who is logged in.
Here’s the quick answer to how it works:
- Create a user-mapping table in your data model that links each user’s email address to the data they’re allowed to see.
- Create a single RLS role in Power BI Desktop using the DAX expression
[Email] = USERPRINCIPALNAME(). - Publish to the Power BI Service and assign users (or Azure AD groups) to that role.
- Every user who opens the report sees only the rows that match their login email — no extra roles needed.
This is fundamentally different from static RLS, where you’d have to create a separate role for every user or group. With dynamic RLS, one role definition handles thousands of users automatically.
If you manage a SaaS product with embedded dashboards, this distinction matters a lot. Imagine building a payroll report for 10,000 employees using static RLS — you’d need to create and maintain 10,000 individual roles. That’s not a security strategy, that’s a full-time job.
Dynamic RLS solves this by tying the filter logic to the signed-in user’s identity at query time, using DAX functions like USERPRINCIPALNAME() that return the logged-in user’s email automatically.
The result: one role, one filter expression, and every user sees only their data.
Simple guide to dynamic row level security power bi terms:
Dynamic RLS vs. Static RLS: Core Concepts and Architecture
To design a secure, high-performance reporting environment, we must understand how dynamic row-level security handles data access behind the scenes compared to its static counterpart.
Why Choose Dynamic Row Level Security Power BI Over Static RLS?
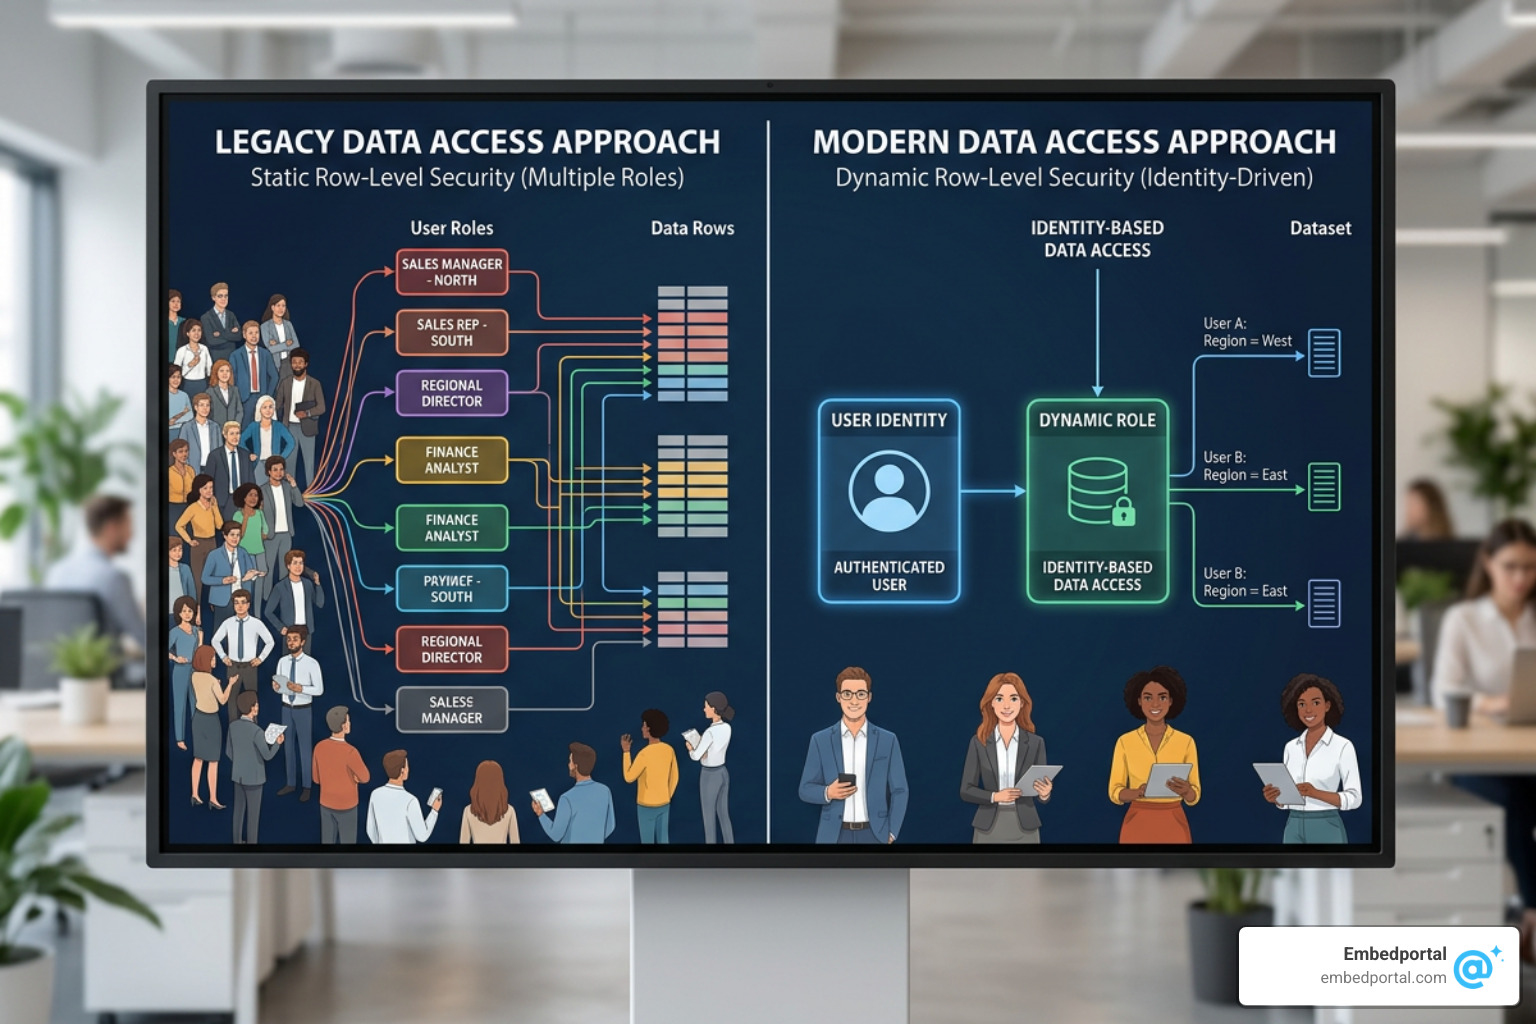
In static RLS, we define specific roles inside Power BI Desktop using hardcoded DAX filters—for example, [Region] = "West" or [Department] = "Finance". This works perfectly fine if we only have a handful of regions or departments.
However, static row-level security quickly becomes a maintenance nightmare when managing thousands of roles. Consider a large enterprise hosting a payroll report for 10,000 users. Attempting to manage this with static RLS means building and maintaining thousands of distinct roles, which is practically impossible.
By contrast, dynamic row level security power bi uses DAX functions to capture environmental values from the logged-in user’s session. Instead of defining a role for every possible permutation of access, we build a single role that dynamically filters data based on the user’s identity. To explore how to configure these rules out-of-the-box, you can read Microsoft’s official guide on restricting model data.
| Feature | Static RLS | Dynamic RLS |
|---|---|---|
| Number of Roles | Many (one per distinct security group/region) | Typically one (or very few) |
| Filter Values | Hardcoded constants (e.g., "West") |
Dynamic DAX functions (e.g., USERPRINCIPALNAME()) |
| Scalability | Extremely low; manual updates required | High; scales automatically as users are added to database |
| Data Model Needs | Standard star schema | Requires a user-mapping (security) table |
| Maintenance | High overhead in Power BI Desktop | Managed upstream in the data source or directory |
How DAX Functions Enable Dynamic Filtering
Dynamic RLS relies on two primary DAX functions to identify who is looking at the report: USERPRINCIPALNAME() and USERNAME().
USERPRINCIPALNAME(): This function returns the User Principal Name (UPN) of the current logged-in user in the format of an email address (e.g.,grace@yourcompany.com). In the Power BI Service, this is always the email address of the authenticated account. Because of its consistency, it is the industry-standard function for cloud-based RLS.USERNAME(): In Power BI Desktop, this function returns the local domain and username (e.g.,DOMAIN\username). Once published to the Power BI Service, however, it typically resolves to the user’s UPN.
To bridge the gap between these environmental variables and our actual business data, we introduce a user-mapping table into our data model. This table stores the association between user emails (matching their UPNs) and the dimension keys they are authorized to view.
If we are embedding reports within a software-as-a-service (SaaS) application where the end-users do not have individual Power BI licenses, we often use CUSTOMDATA(). This function retrieves a custom string passed securely via the application’s embed token API, allowing us to enforce highly flexible Embedded BI setups without requiring every application user to exist in our Microsoft Entra ID.
Data Model Requirements for Dynamic RLS
To make dynamic RLS work reliably and fast, the underlying data model must follow strict relationship guidelines:
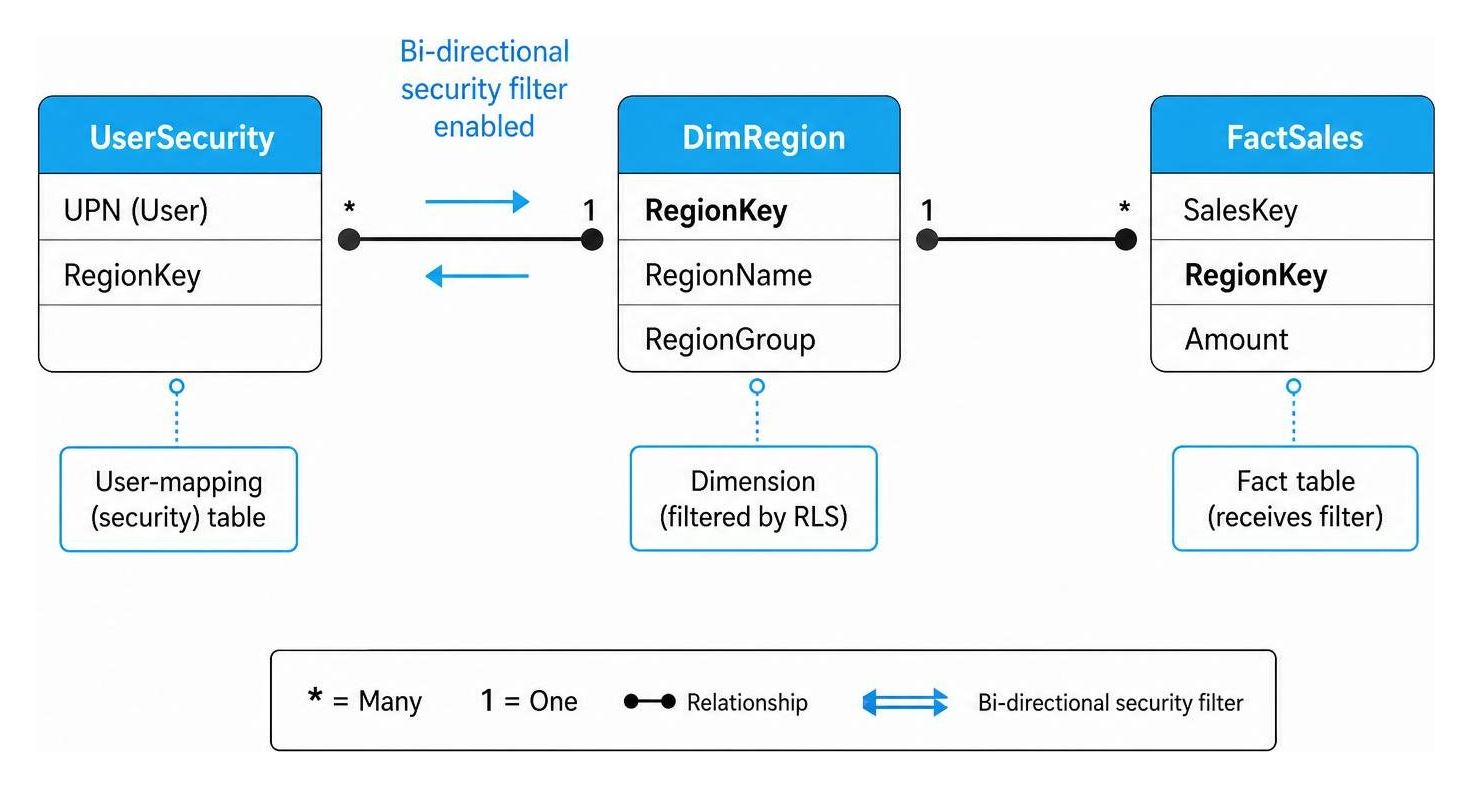
- Star Schema Design: Ensure your model uses clear dimension tables (like
DimEmployeesorDimRegions) and fact tables (likeFactSales). - User-Mapping Table: Introduce a table (e.g.,
UserSecurity) containing at least two columns: the user’s UPN/email and the security key (such asRegionKeyorStoreKey). - Relationship Cardinality: Establish a relationship between your user-mapping table and the dimension table you want to filter. A many-to-one relationship from the security table to the dimension table is standard.
- Bi-directional Filtering: For RLS filters to propagate from the security table to the dimension table (and ultimately down to the fact table), we must enable bi-directional cross-filtering on the relationship, checking the option to “Apply security filter in both directions.”
How to Implement Dynamic Row Level Security Power BI: A Step-by-Step Tutorial
Let’s walk through the end-to-end implementation of dynamic row level security power bi in a real-world scenario.
Creating the Security Role in Power BI Desktop
First, we need to set up the role and its associated DAX filter inside Power BI Desktop.

- Open your Power BI Desktop model and navigate to the Modeling tab in the top ribbon.
- Click on Manage Roles.
- Click Create to add a new security role. Let’s name this role
UserAccess. - Select your user-mapping table (e.g.,
UserSecurity) from the list of tables. In the Table filter DAX expression box, enter the following formula:
[Email] = USERPRINCIPALNAME()Click Save.
This single DAX filter acts as our security gate. When a user logs in, Power BI evaluates USERPRINCIPALNAME(), matches it against the [Email] column in the UserSecurity table, and filters that table down to only the row(s) corresponding to that user. Because we enabled bi-directional cross-filtering with security filters applied, this filter cascades seamlessly to our dimension tables, which in turn restrict the rows visible in our fact tables.
If you are building multi-tenant software products, integrating this type of dynamic filtering is a core requirement for secure Embedded Analytics for SaaS.
Assigning Users and Security Groups in the Power BI Service
Creating the role in Power BI Desktop only defines the logic. To actually enforce it, we must publish the report and assign members to the role in the cloud.
- Publish your report to your designated Power BI workspace.
- In the Power BI Service, navigate to the workspace and locate the Semantic Model associated with your report.
- Click the three dots (…) next to the semantic model name and select Security.
- You will see the
UserAccessrole we created in Desktop. - Under Members, add the users, security groups, or Microsoft Entra ID (formerly Azure AD) groups who should be governed by this security rule.
- Click Save.
Crucial Warning: Even though our DAX logic is dynamic, users must still be explicitly assigned to the RLS role in the Power BI Service for the security rules to activate. If a user has Viewer access to the workspace or report but is not assigned to the RLS role (or an Entra group mapped to the role), they may encounter data access errors or see no data at all. For detailed administrative guidelines, consult the Microsoft Fabric RLS documentation.
Advanced Patterns, Testing, and Best Practices
Once you have mastered the basics of dynamic row level security power bi, you can implement advanced patterns to handle complex organizational hierarchies, optimize performance, and validate your setup.
Implementing Hierarchical Security
In many organizations, managers must see data for themselves and all of their direct and indirect reports. We can achieve this dynamic hierarchical security by utilizing parent-child DAX functions.
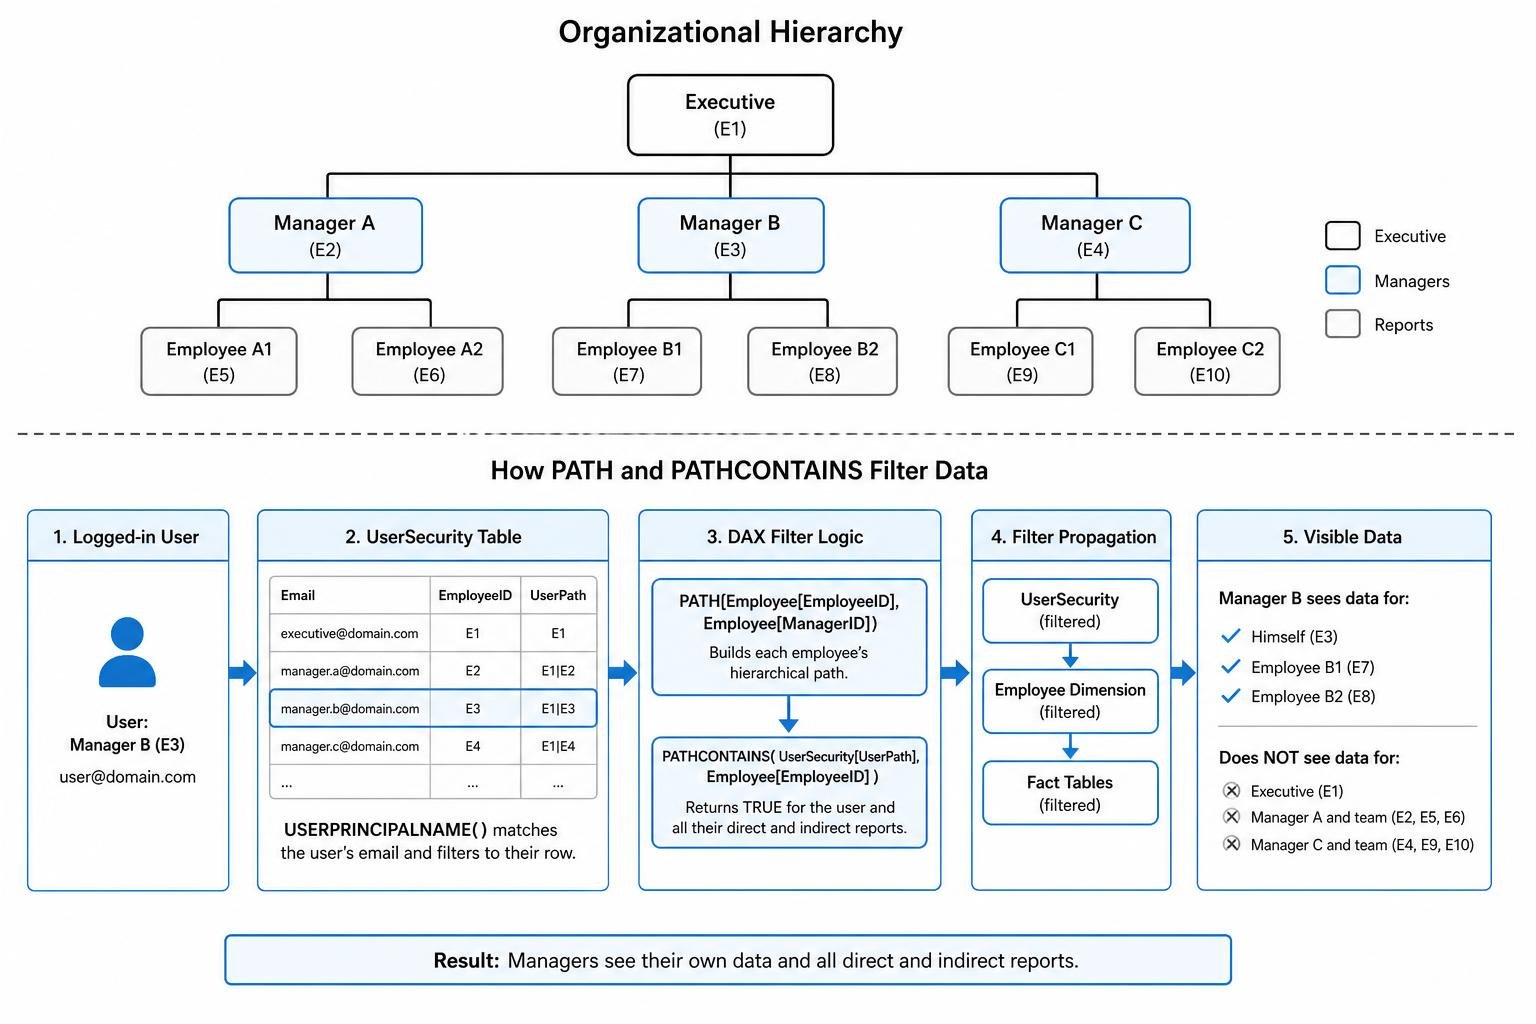
To set this up:
- In your Employee table, ensure you have an
EmployeeIDcolumn and aManagerIDcolumn. - Create a new calculated column to generate the complete organizational path for each row:
UserPath = PATH(Employee[EmployeeID], Employee[ManagerID])
This returns a delimited string of IDs representing the hierarchy chain (e.g., 101|105|112).
- Create your RLS role and apply a filter on your Employee table using
PATHCONTAINS:
PATHCONTAINS(Employee[UserPath], MAXX(FILTER(Employee, Employee[Email] = USERPRINCIPALNAME()), Employee[EmployeeID]))
This expression identifies the logged-in user’s EmployeeID by matching their UPN, and then retains any row where that ID exists within the UserPath. This ensures managers automatically inherit visibility into their entire reporting line.
For complex B2B scenarios where you need to manage access across multiple corporate clients, combining these hierarchical filters with Multi-Tenant Analytics ensures absolute data isolation with minimal management overhead.
Best Practices for Managing Dynamic Row Level Security Power BI in Production
To keep your production environments running smoothly, follow these proven security and performance guidelines:
- Avoid Many-to-Many Relationships for RLS: In a many-to-one bidirectional relationship setup for dynamic RLS, the total DAX query time is roughly 11 ms and the overall execution time is 94 ms. This is significantly faster and more resource-efficient than many-to-many unidirectional setups, which can degrade report responsiveness under heavy user concurrency.
- Manage Roles via Entra ID Security Groups: Instead of manually adding individual users to your RLS roles in the Power BI Service, assign Microsoft Entra ID security groups. This allows you to manage report permissions automatically as employees join or leave the company.
- Handle B2B Guest Users Carefully: External Azure Active Directory B2B guest users often have UPNs formatted with
#EXT#(e.g.,john_externaldomain.com#EXT#@yourtenant.onmicrosoft.com). To prevent access issues, ensure your user-mapping table stores the exact UPN format returned byUSERPRINCIPALNAME()for these guest accounts, or assign them directly to the RLS role by their email addresses. - Direct Lake and Fixed Identity: If you are using Direct Lake semantic models in Microsoft Fabric, default single sign-on (SSO) can fail if users lack direct permissions to the underlying Lakehouse. In these scenarios, configure a Fixed Identity connection in your semantic model settings to safely query the data source under a unified service account while letting Power BI RLS handle row-level filtering.
Validating and Testing Your Dynamic RLS Setup
Never deploy security changes to production without thorough validation.
- Use “View As” in Power BI Desktop: Navigate to the Modeling tab and click View as. Check the box for your dynamic RLS role, select Other user, and enter the email address of a target user to preview the report exactly as they would see it.
- Validate in the Power BI Service: Go to your semantic model’s security settings, click the three dots next to your role, and choose Test as role. This lets you test the live cloud environment.
- Audit with SQL Server Profiler: For on-premises Analysis Services tabular models connected via live connection, use SQL Server Profiler to capture the
EffectiveUserNameproperty. This confirms that Power BI is passing the correct authenticated UPN back to your database to trigger the RLS rules. You can learn more about configuring gateways for this in the on-premises Analysis Services tabular model tutorial. - Create Validation Measures: Build a temporary card visual in your report displaying
USERPRINCIPALNAME(). This simple sanity check helps verify that UPNs are resolving exactly as expected across different tenants and devices. Refer to the comprehensive community guide on RLS best practices for more advanced testing scripts.
Frequently Asked Questions about Power BI RLS
Can a user belong to multiple RLS roles in Power BI?
Yes, a user can be assigned to multiple RLS roles. When this happens, Power BI treats the roles as additive. The filters are combined using a logical OR operator, meaning the user will see the union of the data permitted by all assigned roles. For example, if Role A grants access to “West Coast” and Role B grants access to “East Coast”, a user in both roles will see both regions.
Why does my external B2B guest user see no data?
This is almost always due to a mismatch in UPN resolution. When external guest users log in, Power BI evaluates their identity using their tenant-specific UPN (which often includes #EXT# syntax). If your user-mapping table only contains their standard business email (e.g., partner@external.com), the DAX filter [Email] = USERPRINCIPALNAME() will fail to find a match, resulting in a blank report. To fix this, update your mapping table with their exact UPN or assign them directly to the role.
Does dynamic RLS work with DirectQuery and Direct Lake?
Yes. For DirectQuery sources, you can enable single sign-on (SSO) to let the underlying database enforce its own row-level security policies. For Direct Lake models, you can implement dynamic RLS directly in the semantic model. If your users do not have direct access to the Lakehouse, configure a Fixed Identity connection to ensure uninterrupted data rendering while maintaining secure row-level filtering.
Conclusion
Mastering dynamic row level security power bi is the key to building scalable, secure, and maintenance-free analytics. By replacing hundreds of static roles with a single dynamic role powered by USERPRINCIPALNAME(), you protect sensitive business data while delivering a personalized user experience.
However, setting up and maintaining RLS, gateways, and Entra ID groups can still be a heavy engineering lift—especially when embedding dashboards into customer-facing applications.
This is where Embedportal comes in. As a white-label embedding platform, Embedportal allows teams to embed multi-vendor analytics (including Power BI, Tableau, QuickSight, and Metabase) with unified branding, robust row-level security, and single sign-on (SSO) in under an hour. We handle the complex security handshakes and multi-tenant isolation behind the scenes so your developers can focus on building your core product.
Ready to streamline your dashboard security? Explore how we simplify data access by reading our guide on Row-Level Security in Power BI.