Power BI Row Level Security: Making Your Reports Username-Specific
Why Power BI Row Level Security Based on Username Is the Scalable Way to Lock Down Your Data
Power BI row level security based on username lets you control exactly which rows of data each person sees — automatically — based on who is logged in.
Here’s the quick answer for how it works:
- Create a user mapping table — a table in your data model that links each user’s email to the data they’re allowed to see.
- Write a DAX filter — use
USERPRINCIPALNAME()to match the logged-in user’s email to that mapping table. - Create a role in Power BI Desktop — apply the DAX filter to the relevant table inside Manage Roles.
- Publish and assign users — in the Power BI Service, assign users or security groups to that role.
- Test it — use the “View As” or “Test as Role” feature to confirm each user sees the right data.
That’s the core of it. Everything else — hierarchy filtering, B2B guests, performance tuning — builds on this foundation.
Now, here’s why this matters at scale.
Imagine you have 10,000 employees. Each one should see only their own payroll data, or only the sales region they manage. Creating a separate static role for every single user is not just tedious — it’s completely unmanageable.
Dynamic RLS solves this with a single role definition that filters differently for every user, based on their identity. No manual role per user. No duplicate reports. Just one report that adapts to whoever is viewing it.
For analytics and product teams embedding dashboards into customer portals, this is especially critical. Your customers expect to see their data, not someone else’s. Row-level security is the mechanism that makes that guarantee possible — and getting it right from the start saves enormous headaches later.
Static vs. Dynamic Row-Level Security in Power BI
To understand why dynamic filtering is such a game-changer, we have to look at how it compares to the traditional, static approach.
Static row-level security relies on fixed rules. If you have five sales regions, you create five distinct security roles in Power BI Desktop (e.g., “North Region”, “South Region”, etc.). For each role, you write a static DAX filter like: [Region] = “North”. After publishing, you must manually go into the Power BI Service and assign specific users to each of those five roles.
This works fine if you only have a few categories that rarely change. But what happens when your organization grows? If you expand to 120+ entities and have over 4,500 employees, managing static roles becomes an administrative nightmare. Every time a new entity is created, you have to open the Power BI Desktop file, create a new role, write a new static filter, republish, and reassign users.
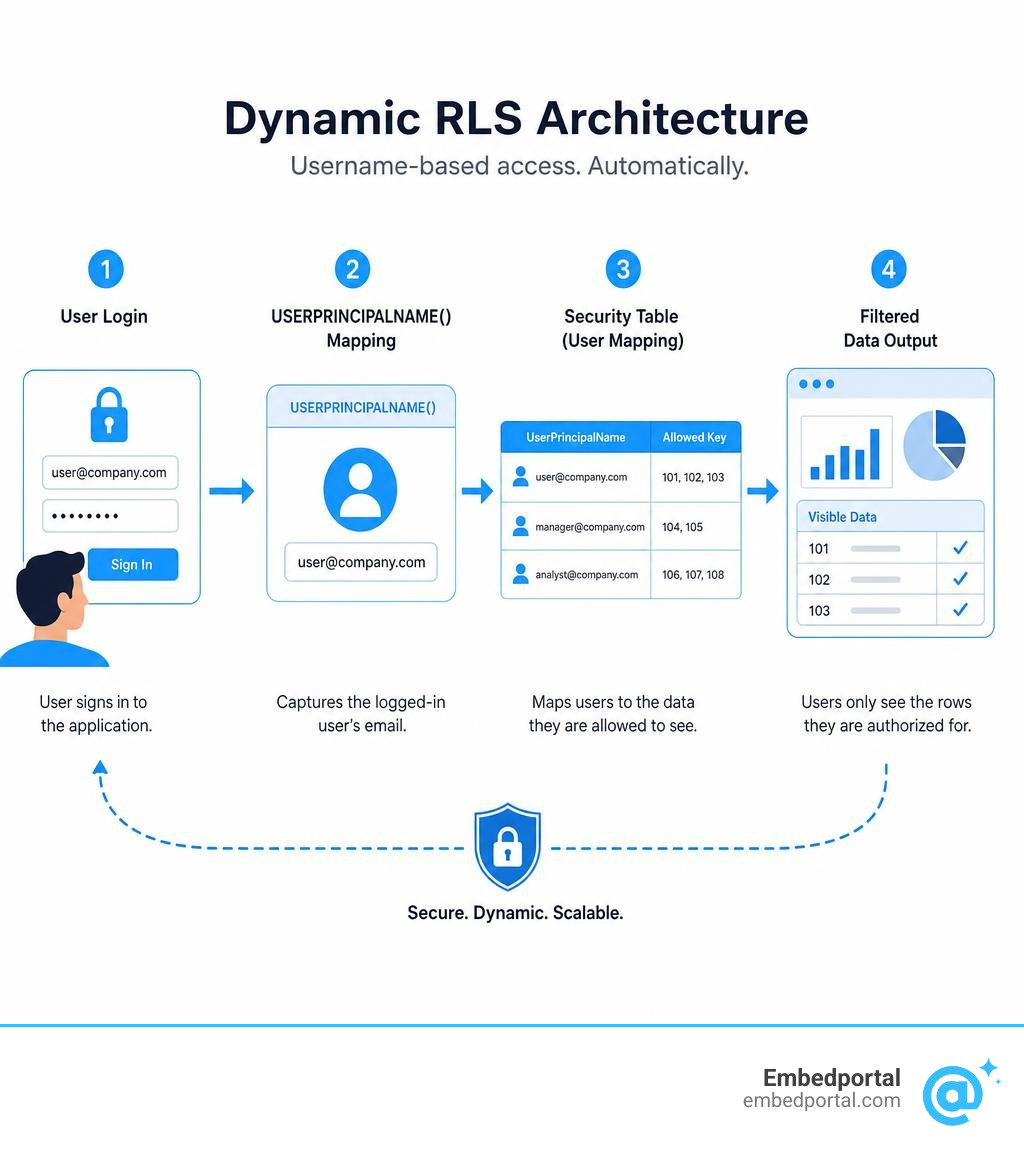
Dynamic row-level security, on the other hand, shifts the security logic into the data model itself. Instead of hardcoding values inside your DAX roles, you write a single, dynamic DAX rule that checks who is currently viewing the report. This user’s identity is matched against a security mapping table in your dataset, instantly filtering the report to show only their permitted rows.
Here is a quick comparison of the two approaches:
| Feature | Static Row-Level Security | Dynamic Row-Level Security |
|---|---|---|
| Number of Roles | One role per data slice (e.g., 50 roles for 50 states) | Exactly one role for the entire organization |
| Maintenance | High; requires desktop updates and service re-assignments | Low; security updates happen automatically via data refreshes |
| Scalability | Poor; fails when dealing with thousands of users | Excellent; supports thousands of users out of the box |
| Data Source | Hardcoded DAX constants | Driven dynamically by a database security table |
| Complex Hierarchies | Extremely difficult to manage | Easily handled using parent-child DAX patterns |
By adopting a dynamic architecture, you treat security as a data-driven system. If an employee changes departments or a new business entity is added, you simply update your central database security table. The next time your Power BI semantic model refreshes, the security rules update automatically without you ever having to touch the Power BI Desktop file.
To learn more about the foundational concepts of row-level security, check out our comprehensive guide on Power BI Row Level Security and explore the official Microsoft Learn Guide on Restricting Access.
Step-by-Step Guide: Power BI Row Level Security Based on Username
Implementing dynamic security requires a clean dataset structure and a clear plan. We will walk through the entire workflow, from setting up your database tables to writing the DAX filter and publishing the finished report.
First, let us outline the basic workflow:
- Design your data model following star schema principles.
- Build a dedicated user security mapping table.
- Establish relationships between your security table and your dimension tables.
- Create a security role in Power BI Desktop using dynamic DAX.
- Publish the report to the Power BI Service and map users to the role.
For a deeper dive into how this looks in practice, you can read our detailed walkthrough on Row Level Security Power BI or follow along with the classic RADACAD Dynamic RLS Tutorial.
Designing the Security Table and Relationships
The foundation of any dynamic RLS setup is the security table (often called a user-mapping or user-access table). This table acts as the bridge between your users’ login identities and your business data.
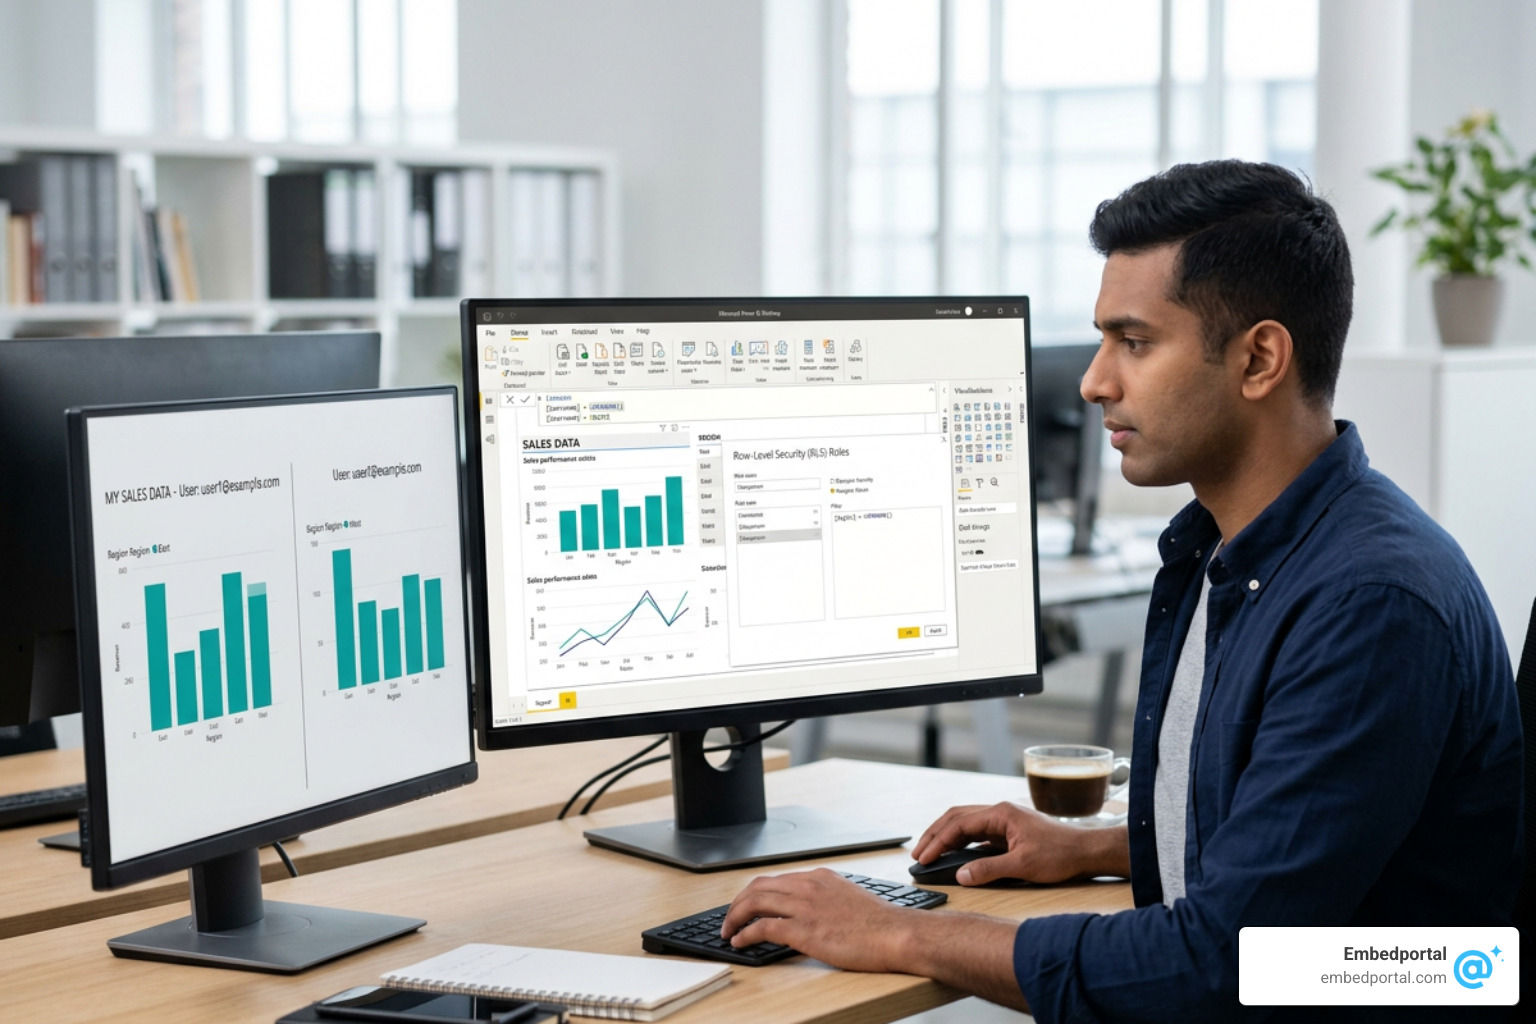
In a standard star schema, you have fact tables (like Sales or Transactions) and dimension tables (like Geography, Products, or Customers). To implement power bi row level security based on username, we introduce a User Access table into the model.
At its simplest, this table must contain at least two columns:
- UserEmail: The Microsoft Entra ID (formerly Azure Active Directory) email address of the user (e.g., employee@company.com).
- AccessKey: The identifier of the data slice they are allowed to see (e.g., Region ID, Department ID, or Entity ID).
When setting up your relationships, the golden rule is to filter your dimension tables first. Do not link your security table directly to your massive fact tables. Instead, connect your User Access table to your dimension table (for example, linking User Access [Region ID] to DimRegion [Region ID]). Because Power BI filters propagate through relationships, filtering the DimRegion table will automatically filter your Sales fact table.
When configuring the relationship between your User Access table and your dimension table, you have two main options:
- Many-to-One (M-1) Bi-directional Relationship: You connect your User Access table to your dimension table and enable bi-directional cross-filtering with the security filter applied in both directions. This is highly performant and easy to set up, as the filter flows directly from your security table to your dimension, and then down to your fact tables.
- Many-to-Many (M-M) Relationship: If a user can see multiple regions, and multiple regions can have multiple users, you might end up with a many-to-many relationship. While Power BI supports this, it can introduce performance overhead. Where possible, we recommend flattening your relationships or using a bridge table to keep your relationships clean.
To learn more about structuring your model for security, read about Centralized Row Level Security.
Writing the DAX Filter for Power BI Row Level Security Based on Username
Once your tables are in place and the relationships are defined, it is time to write the DAX expression that powers the dynamic security filter.
Power BI provides two key DAX functions to identify the logged-in user: USERNAME() and USERPRINCIPALNAME().
While both functions return identity strings, they behave differently depending on where they are evaluated. In Power BI Desktop, USERNAME() typically returns the local domain and computer name (like DOMAIN\username), whereas USERPRINCIPALNAME() always returns the user’s cloud email address (like username@company.com).
In the Power BI Service, both functions will return the user’s User Principal Name (UPN) email address. Because of this, we strongly recommend always using USERPRINCIPALNAME() in your RLS DAX filters. It ensures consistent behavior between your local desktop testing environment and the cloud service.
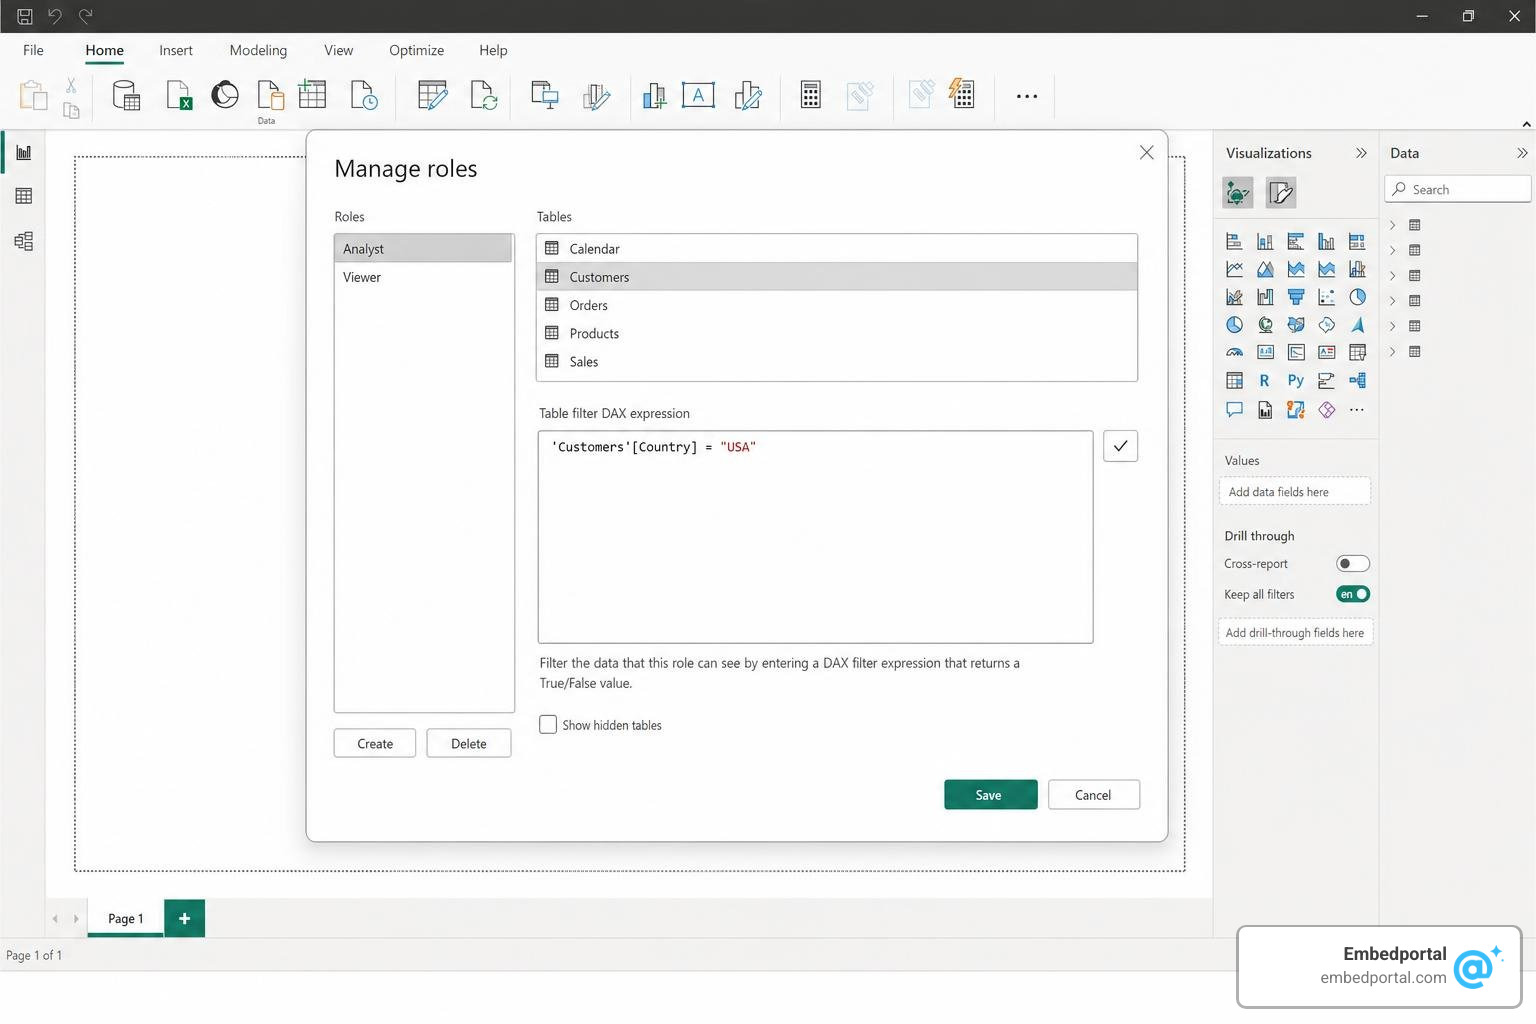
To apply the filter, follow these steps in Power BI Desktop:
- Go to the Modeling tab in the top ribbon.
- Click Manage Roles.
- Create a new role (e.g., “DynamicUserRole”).
- Select your User Access table from the list of tables.
- In the Table Filter DAX Expression editor, write your boolean filter expression.
Your DAX filter expression should look like this:
[UserEmail] = USERPRINCIPALNAME()
This simple expression checks the logged-in user’s email against the UserEmail column in your security table. If a match is found, Power BI filters the security table to only show that user’s row. That filter then flows through your relationships to restrict the rest of your data model.
If you need to handle more complex scenarios — such as allowing some users to see all data while others are restricted — you can use a conditional DAX expression with LOOKUPVALUE() or create multiple roles. For a deep dive into advanced dynamic DAX patterns, check out the Microsoft Fabric Community Blog on Dynamic RLS.
Creating Roles in Desktop and Assigning Users in the Service
With your DAX filter written, you are ready to move from Power BI Desktop to the cloud.
First, save your Power BI Desktop file and publish it to your workspace in the Power BI Service. Remember: RLS only applies to users with Viewer permissions in the workspace. If users are assigned as Admin, Member, or Contributor, they will bypass all RLS rules and see all data.
Once your semantic model is published, follow these steps to assign users to your security role:
- In the Power BI Service, navigate to your workspace and locate your semantic model.
- Click the three dots (…) next to the semantic model and select Security.
- You will see the role you created in Power BI Desktop (e.g., “DynamicUserRole”).
- Under Members, add the users who should be bound by this security role.
Instead of adding thousands of individual email addresses manually, the best practice is to assign Microsoft Entra ID security groups to the role. For example, you can create a security group called “All Staff” or “Sales Team”, add all your employees to that group in Entra ID, and then add that single security group to your Power BI RLS role.
This approach dramatically reduces administration. When a new employee joins your company, your IT department simply adds them to the Entra ID security group, and they instantly inherit the correct Power BI security filters without any manual intervention in Power BI.
For more information on grouping and managing your security roles, read our article on Category Row Level Security.
Testing, Validating, and Troubleshooting Dynamic RLS
Setting up security is only half the battle; you must thoroughly test it to ensure there are no data leaks. A small syntax error or an incorrect relationship can lead to a security breach where users see data they should not, or a frustrating scenario where users open a report and see nothing but blank visuals.
When troubleshooting dynamic RLS, if a user’s logged-in email does not exist in your security mapping table, the DAX filter will evaluate to false for all rows. As a result, that user will see completely empty reports. Always ensure your mapping tables are kept up to date via automated ETL pipelines.
For an in-depth list of validation strategies, review our checklist of RLS Best Practices.
Validating Roles with ‘View As’ and ‘Test as Role’
Power BI provides excellent tools to simulate user identities and verify that your filters are working correctly before you share your reports.
In Power BI Desktop, you can use the View as feature:
- Go to the Modeling tab and click View as.
- Check the box for the role you want to test (e.g., “DynamicUserRole”).
- Check the Other user box and type in the email address of a specific employee (e.g., manager@company.com).
- Click OK.
Your entire report canvas will now filter to show exactly what that specific employee would see. You can navigate through different pages and click on visuals to confirm the data is properly restricted.
In the Power BI Service, you can perform cloud-based validation:
- Go to the Security settings of your semantic model.
- Hover over your role, click the three dots (…), and select Test as role.
- The report will open in a special test mode. At the top of the screen, you will see a bar indicating which role is active.
- Click Change user in the top bar, type in a colleague’s email, and click Apply to simulate their cloud identity.
This cloud-based testing is essential because it evaluates security in the actual production environment, taking into account tenant settings and Entra ID configurations. For more details on cloud validation, refer to the official Microsoft Learn RLS Documentation.
Handling External B2B Guest Users and UPN Resolution
Sharing reports with external partners or clients via Azure AD Business-to-Business (B2B) introduces unique identity resolution challenges.
When an external guest user logs into your Power BI tenant, their User Principal Name (UPN) may not match their standard email address. Depending on your tenant configuration, Power BI might resolve an external guest’s UPN using a special format containing #EXT# (for example, john.doe_externaldomain.com#EXT#@yourtenant.onmicrosoft.com).
If your security mapping table only contains their standard email address (john.doe@externaldomain.com), the dynamic DAX filter [UserEmail] = USERPRINCIPALNAME() will fail to find a match, and the guest user will see no data.
To resolve this issue:
- Option A: Populate your security table with the actual UPN values returned for guest users in your tenant, rather than their standard email addresses.
- Option B: Use a custom DAX pattern to clean the UPN string before matching, or assign external users directly to roles by email in the Power BI Service to ensure correct identity resolution.
For a comprehensive guide on modern cloud identity patterns and B2B security, check out the M365 FM Dynamic RLS Architecture.
Enterprise Best Practices and Performance Optimization
Implementing dynamic security at an enterprise scale requires careful attention to performance. Because RLS filters are evaluated for every single row in your tables, inefficient DAX formulas or poor model designs can cause report load times to skyrocket.
To keep your reports snappy, read our architectural guide on Multi Tenant Row Level Security.
Avoiding Common Anti-Patterns with USERPRINCIPALNAME()
When writing dynamic security rules, simplicity is your best friend. A common mistake is writing overly complex DAX expressions inside your RLS roles.
Here are the top anti-patterns to avoid:
- Using Calculated Columns for Security: Never use calculated columns to store security logic. Calculated columns are computed during data refresh and are static. If organizational hierarchies change, your security rules can break or fail to update. Always use dynamic DAX measures or relationships instead.
- Putting Quotes Around Functions: A classic syntax error is writing [UserEmail] = “USERPRINCIPALNAME()” with quotation marks. This instructs Power BI to look for a literal email address named “USERPRINCIPALNAME()”, locking everyone out of the report. Always write the function without quotes: [UserEmail] = USERPRINCIPALNAME().
- Complex Multi-Column Matching in DAX: Writing complex DAX expressions with multiple LOOKUPVALUE() or CONTAINS() functions to match users across several columns can triple your report execution times. Instead, combine your security keys into a single composite key column using Power Query during the ETL phase, then use a simple, single-column relationship in your model.
For a detailed performance comparison of different security rules, read the Towards Data Science RLS Rules Guide.
Optimizing Power BI Row Level Security Based on Username for Large Datasets
When dealing with large datasets, your data modeling choices will directly impact how quickly your reports render.

To optimize your model:
- Flatten Parent-Child Hierarchies: If you have an organizational hierarchy (such as employees reporting to managers), do not use recursive DAX queries to calculate permissions at runtime. Instead, use the DAX PATH() and PATHCONTAINS() functions to flatten the hierarchy into static columns in your dimension table during data refresh.
- Minimize Bi-directional Filtering: While bi-directional cross-filtering is useful for propagating security filters, enabling it across too many tables can cause performance degradation. Keep your relationships simple, and only enable security filtering on the specific paths required to secure your data.
- Keep Security Tables Lean: Your user-mapping table should only contain the columns necessary for security. Keep it as small and narrow as possible to ensure fast scanning during query execution.
For more optimization tips, check out our core guide on Row Level Security.
Frequently Asked Questions about Power BI RLS
Can a user belong to multiple RLS roles in Power BI?
Yes. In Power BI, RLS roles are additive. If a user is assigned to multiple roles, they will see the union of the data permitted by those roles. For example, if Role A grants access to the “West” region and Role B grants access to the “East” region, a user in both roles will see data for both “West” and “East”. This makes it easy to handle overlapping permissions in large organizations.
What is the difference between USERNAME() and USERPRINCIPALNAME()?
In Power BI Desktop, USERNAME() returns your local Windows domain and username (DOMAIN\user), while USERPRINCIPALNAME() returns your cloud email address (user@company.com). In the Power BI Service, both functions return your cloud email address. We recommend always using USERPRINCIPALNAME() to ensure your security rules behave identically during local development and cloud deployment.
Does RLS work with workspace Admins, Members, or Contributors?
No. Row-level security only applies to users who are assigned the Viewer role in a workspace, or those who access the report via an App or an embedded portal. Workspace Admins, Members, and Contributors have edit permissions on the underlying semantic model, which automatically bypasses all RLS rules, allowing them to see all data.
Conclusion
Implementing power bi row level security based on username is the ultimate way to deliver personalized, secure reports to thousands of users without administrative overhead. By moving your security rules out of static code and into a dynamic, data-driven model, you ensure your reports remain fast, scalable, and easy to maintain as your business grows.
But what if you are building a customer-facing application and need to share these secured reports with external clients?
That is where Embedportal comes in.
Embedportal is a SaaS company providing a white-label embedding platform for BI dashboards. Our platform allows teams to embed multi-vendor analytics (including Power BI, Tableau, QuickSight, and Metabase) directly into their own applications in under an hour.
With Embedportal, you get:
- Unified Branding: Completely customize the look and feel of your embedded reports to match your application.
- Seamless SSO Integration: Authenticate your users once and securely pass their identities to Power BI.
- Robust Row-Level Security: Ensure each customer only sees their own data, backed by the robust dynamic security models you have built.
Whether you are based in California or managing a global user base, we help you simplify your embedded analytics pipeline. Ready to see how easy it is to deliver secure, branded dashboards to your clients? Explore our platform and learn more about Row Level Security with Embedportal today!