Power BI Report Level Security: The Essential Guide for Beginners
Why Power BI Report Level Security Matters for Every Data Team
Power BI report level security is the set of features that control which users can see which data inside your Power BI reports and dashboards. At its core, it means one report can show different data to different people — automatically, based on who is logged in.
Here is a quick summary of what it involves:
- Row-Level Security (RLS) — filters rows of data so each user only sees records they are authorized to view
- Object-Level Security (OLS) — hides entire tables or columns from specific users
- Column-Level Security (CLS) — restricts access to specific columns within a table
- Static RLS — rules built with fixed values (e.g., Region = “West”)
- Dynamic RLS — rules that use the logged-in user’s identity to filter data automatically
Think about this scenario: a sales organization has managers in five regions. Every manager needs the same report, but each one should only see their own region’s numbers. Without report-level security, you’d need five separate reports — a maintenance nightmare.
With Power BI’s security features, you build one report and let the rules do the filtering. The right data reaches the right person, every time.
This matters even more if you’re embedding Power BI dashboards into a customer-facing product. Your customers should never see each other’s data. Getting this wrong isn’t just a UX problem — it’s a serious trust and compliance issue.
One important note: RLS is bypassed entirely for users who have edit or admin permissions on the underlying dataset. Security only applies to viewers. Keep this in mind when designing your access model.
What is Row-Level Security (RLS) in Power BI?
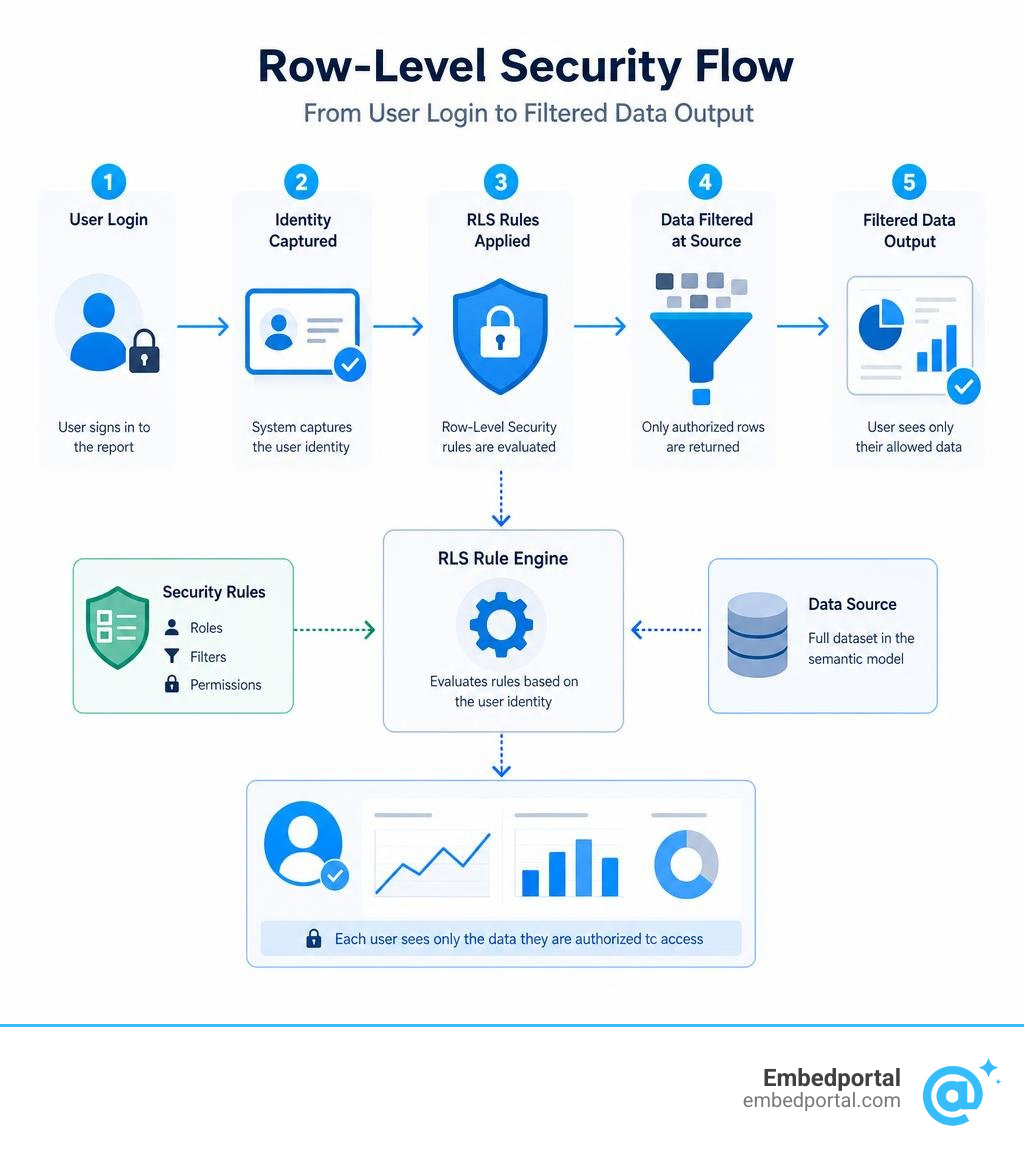
To understand how to protect your data, we must first look at the foundation: Row-Level Security (RLS). In Power BI, RLS is a security feature that restricts data access at the row level. Instead of hiding entire pages or visuals, RLS filters the actual data rows returned by the underlying semantic model.
When a user opens a report, Power BI applies these filters before rendering any visual. This means if a user is restricted to seeing data from California, any query sent to the semantic model is automatically modified to include a filter for California. The user cannot bypass this restriction because the filtering happens at the data model level, not the visual level.
Properly implementing RLS requires a solid understanding of star schema design principles. RLS filters are applied directly to tables (usually dimension tables like Users, Geography, or Departments) and then naturally propagate through your model relationships to the fact tables (such as Sales or Transactions). If your relationships are not set up correctly, or if you rely heavily on bidirectional cross-filtering without careful planning, your security filters might not propagate as expected, or worse, they could cause performance bottlenecks.
To learn more about restricting access to model data, you can read the official training module on how to Restrict access to Power BI model data – Training | Microsoft Learn. Implementing a robust security design is essential for maintaining trust within your organization, and mastering Row Level Security will save you countless hours of rebuilding reports down the road.
Static vs. Dynamic Row-Level Security
When designing your security model, you will have to choose between two primary approaches: Static RLS and Dynamic RLS.
Static RLS involves creating specific roles in Power BI Desktop and hardcoding the filter values directly into the DAX rules. For example, you might create a role named “USWestManager” and write a DAX filter like [Region] = "West". While this is straightforward to set up for a handful of regions, it quickly becomes unmanageable if you have dozens of territories, departments, or individual store managers. Every time a new region is added, you must open Power BI Desktop, add a new role, write the DAX rule, republish the report, and assign users to that role in the cloud.
Dynamic RLS, on the other hand, uses DAX functions to identify the logged-in user at runtime and dynamically filter the data based on a security mapping table built into your data model. Instead of creating fifty different roles for fifty managers, you create a single role (e.g., “UserRole”) and write a dynamic DAX expression such as [Email] = USERPRINCIPALNAME(). Power BI looks up the email of the logged-in user, finds their assigned region in your security table, and filters the rest of the model accordingly.
Below is a comparison of these two approaches to help you decide which one fits your project:
| Feature | Static Row-Level Security | Dynamic Row-Level Security |
|---|---|---|
| Setup Complexity | Very Low (Great for small teams) | Moderate (Requires a security mapping table) |
| Maintenance Effort | High (Requires republishing for new roles) | Low (Managed entirely via data updates) |
| Scalability | Poor (Becomes cluttered with many roles) | Excellent (Handles thousands of unique users easily) |
| Role Assignment | Manual mapping of users to each role | Single role assignment for all restricted users |
| Best Use Case | Fixed organizational structures (e.g., North America vs Europe) | Rapidly changing structures or multi-tenant applications |
For a deeper dive into choosing the right strategy, check out our detailed guides on Row Level Security Power BI and Row Level Security Power BI 2.
Implementing Power BI Report Level Security: Step-by-Step
Now that we understand the theory, let’s walk through the actual implementation of power bi report level security using Power BI Desktop and the Power BI Service.
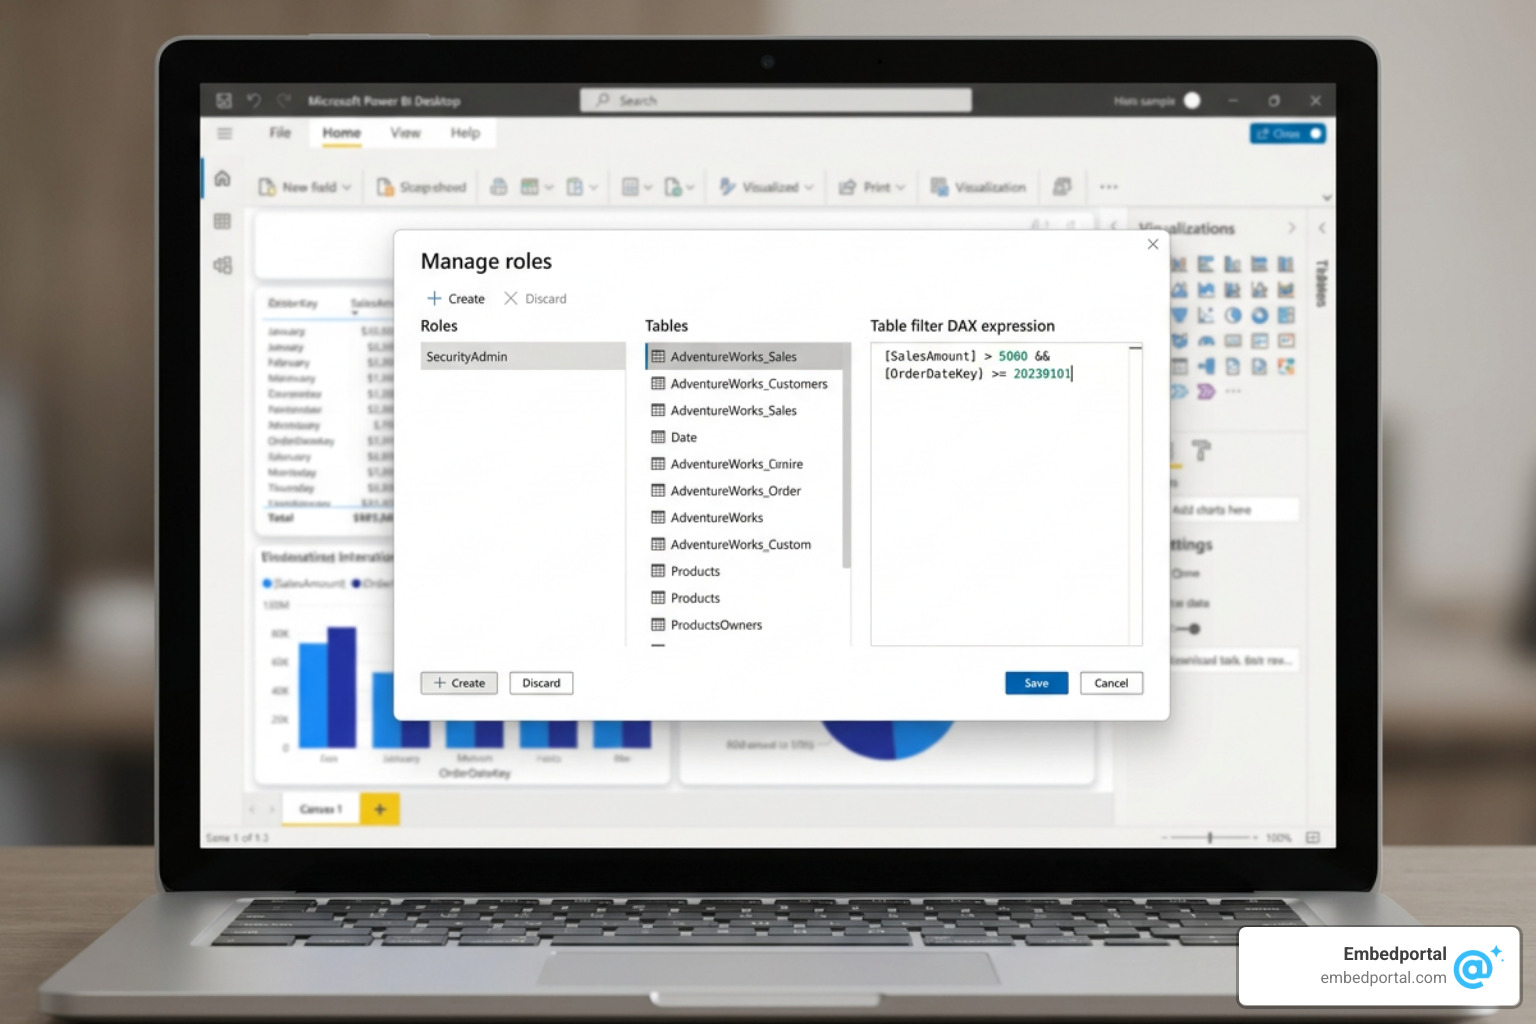
Defining Roles and Rules for Power BI Report Level Security
The first step of the configuration process always takes place in Power BI Desktop before you publish your report.
- Open your report in Power BI Desktop.
- Navigate to the Modeling tab in the top ribbon.
- Click on Manage roles.
- In the Manage Roles window, click Create to add a new role. Give your role a descriptive name (e.g.,
Sales_Viewer). Note: Avoid using commas in your role names, as this can cause parsing issues during deployment. - In the Tables list, select the table you want to filter (for example,
Geography). - In the Table filter DAX expression box, enter your filtering rule. For a static rule, you might write:
[Country] = "United States" - If you want to use the advanced DAX editor, you can switch to the DAX editor to write more complex logic.
- Click Save to apply the role.
For dynamic security setups, you will often need to enable bidirectional cross-filtering on the relationships connecting your security mapping table to the rest of your model. To do this, go to the Model view, double-click the relationship, and check the box that says Apply security filter in both directions. This ensures that the filter applied to your user security table successfully flows upstream to restrict other tables. For more details on configuring these data-level rules, see the guide on Data-Level Security in Power BI.
To streamline this process, we recommend reading through our step-by-step tutorial on Power BI Row Level Security.
Testing and Validating Roles in Power BI Desktop
Never publish a secured report without testing it first! Power BI Desktop provides a built-in testing environment that lets you impersonate your roles before uploading the file to the cloud.
- In the Modeling tab, click on View as.
- In the View as roles dialog box, check the box next to the role you want to test (e.g.,
Sales_Viewer). - If you are testing dynamic RLS, check the Other user box and type in the User Principal Name (UPN) of the user you want to impersonate (e.g.,
manager@yourcompany.com). - Click OK.
- You will see a yellow bar appear at the top of your report canvas indicating that you are currently viewing the report as the selected role. Verify that all visuals update to show only the data that the impersonated user is authorized to see.
- To return to your normal authoring view, click Stop viewing in the yellow bar.
Following these validation steps is one of the most critical Row Level Security Best Practices to prevent accidental data leaks.
Managing RLS Across Connection Types and Environments
Implementing RLS can vary significantly depending on where your data lives and how Power BI connects to it.

In Import Mode, all data is loaded into the Power BI semantic model, and RLS is fully managed within the Power BI Service using the DAX rules you defined in Desktop.
In DirectQuery Mode, queries are sent directly to the underlying database in real time. If your DirectQuery connection uses stored credentials, Power BI will apply your RLS DAX rules locally before sending the filtered query to the database. However, if you configure DirectQuery with integrated security (Single Sign-On or SSO), RLS is typically disabled within Power BI, and the underlying database is responsible for enforcing its own security rules.
For Live Connections to an on-premises Analysis Services (SSAS) tabular model, you cannot configure RLS within the Power BI Service. Instead, you must define your security roles and DAX rules directly inside the Analysis Services model. When a user views the report, Power BI passes their identity to the on-premises gateway using the EffectiveUserName property, allowing SSAS to filter the data.
For organizations utilizing an on-premises deployment, you can read the comprehensive guide on Row-level security (RLS) in Power BI Report Server – Power BI | Microsoft Learn to understand how to handle local security policies.
Leveraging User Functions for Dynamic Power BI Report Level Security
To make RLS dynamic, you will rely on two key DAX functions: USERNAME() and USERPRINCIPALNAME().
USERNAME(): In Power BI Desktop, this function typically returns the user’s domain and local login name in the formatDOMAIN\username. However, once published to the Power BI Service or Power BI Report Server, it will return the User Principal Name (UPN), which is usually the user’s email address.USERPRINCIPALNAME(): This function consistently returns the user’s UPN (e.g.,user@company.com) in both Power BI Desktop and the cloud service. Because of this consistency, it is highly recommended to useUSERPRINCIPALNAME()for most dynamic security models.
If you are working with an on-premises SSAS database, you can learn how to map these functions by following the tutorial on Dynamic row-level security with Analysis services tabular model – Power BI | Microsoft Learn. Building a Centralized Row Level Security framework ensures that your user rules remain consistent across all your organizational dashboards.
Assigning Users and Groups in Power BI Service and Report Server
After publishing your report to the Power BI Service, you must map actual users or security groups to the roles you defined in Power BI Desktop.
- Go to your workspace in the Power BI Service.
- Locate the semantic model associated with your report, click the three dots (…), and select Security.
- Select the role you want to manage.
- Enter the email addresses of the individual users or, preferably, the names of your Microsoft Entra ID (formerly Azure Active Directory) security groups.
- Click Add and then Save.
If you are using Power BI Report Server, role assignments through group memberships are supported, but only when the Report Server is configured with NTLM or Kerberos authentication. Also, keep in mind that report authors do not automatically have access to view report data in Power BI Report Server until they have explicitly assigned themselves to the appropriate roles after uploading.
Managing access for external parties requires careful planning. If you are sharing data with vendors or partners, read our strategies on managing Power BI External Users and setting up Power BI Guest Access securely.
Advanced Scenarios: Paginated Reports, Embedding, and Fabric Integration
As your data ecosystem grows, you may need to implement security across different report formats and deployment models.
For Paginated Reports (.rdl files), RLS does not run on the Power BI Analysis Services engine. Instead, it uses the SQL Server Reporting Services (SSRS) engine. To set up RLS here, you must create a parameter in your report and assign it the built-in field UserID. You can then use this parameter inside your dataset queries (e.g., in a SQL WHERE clause) or report filters to restrict the data returned to the user. For a detailed walkthrough, refer to Set Up Row-Level Security in Power BI Paginated Reports – Power BI | Microsoft Learn.
When dealing with embedded analytics (where you embed reports inside custom applications for your customers), you must pass the user’s identity securely from your app to Power BI. This is done by generating an embed token using the Power BI REST API and passing “Effective Identities” that specify the username and the corresponding roles. For paginated reports, you can find the developer documentation on powerbi-docs/developer/embedded/paginated-reports-row-level-security.md.
If you are building a modern SaaS application and need to share dashboards with external users without forcing them to buy individual Power BI licenses, read about Power BI Embedding and how to Embed Power BI Report.
Integrating RLS with Object-Level Security (OLS) and Column-Level Security (CLS)
While RLS restricts which rows of a table are visible, you might also need to restrict access to entire columns or tables. This is where Object-Level Security (OLS) and Column-Level Security (CLS) come into play.
For example, you might want your sales representatives to see all sales transactions (RLS), but you want to completely hide the “Profit Margin” column (CLS) or the “Employee Salaries” table (OLS) from everyone except HR and senior leadership.
Unlike RLS, which can be configured natively in Power BI Desktop’s default editor, configuring OLS and CLS requires using external tools like Tabular Editor. Once configured, if an unauthorized user attempts to query a secured table or column, Power BI will return an error for that specific visual, or the visual will simply not display.
To understand how these security layers integrate within modern cloud architectures, you can review the guide on Row-level security (RLS) with Power BI.
Frequently Asked Questions about Power BI Security
Can I use RLS to restrict access to specific columns or measures?
No, standard row-level security cannot be used to restrict access to specific columns or measures. If a user is granted access to a row of data via RLS, they can see every single column and measure associated with that row. To restrict access to specific columns or measures, you must implement Object-Level Security (OLS) using an external tool like Tabular Editor.
Does RLS apply to users with edit or admin permissions in the workspace?
No. RLS rules are only enforced for users who have Viewer permissions on the workspace or report. Any user with Admin, Member, or Contributor roles in the workspace has edit permissions on the underlying semantic model, which bypasses RLS entirely. They will always see all the data. To ensure your security rules are respected, always assign end-users to the Viewer role and manage their licenses accordingly. You can read more about licensing tiers in our guide to Power BI Licensing.
Is it possible to achieve report level security in power bi?
Yes, although native page-level or report-level security (hiding specific tabs or pages based on user roles) is not directly supported in Power BI Desktop, you can achieve this behavior using creative workarounds. One common method is to use dynamic RLS rules that return FALSE() for certain tables, combined with conditional navigation buttons that only show up for authorized users. To explore community workarounds and discussion on this topic, check out Is it possible to achieve report level security in power bi?.
Conclusion
Enforcing strict data governance is no longer optional. Implementing power bi report level security ensures that your sensitive data remains in the right hands, whether you are distributing reports internally or embedding dashboards for external customers.
If managing complex DAX security tables, setting up gateway connections, and configuring Entra ID roles feels overwhelming, we can help. At Embedportal, we provide a white-label embedding platform for BI dashboards. Our platform enables teams to embed Power BI and other BI dashboards with unified branding, robust Row Level Security, and seamless SSO integration in under an hour.
With our team operating out of California, USA, we help businesses secure and scale their customer-facing analytics with ease. Reach out to us today to see how we can simplify your analytics deployment!