The Secure Way to Embed QuickSight Dashboards in Your App
Why Embedding QuickSight Dashboards Securely Is Harder Than It Looks
To embed quicksight dashboards securely in your app, you need more than just copying an iframe. Here’s the short answer:
The secure way to embed QuickSight dashboards:
- Use the API — call
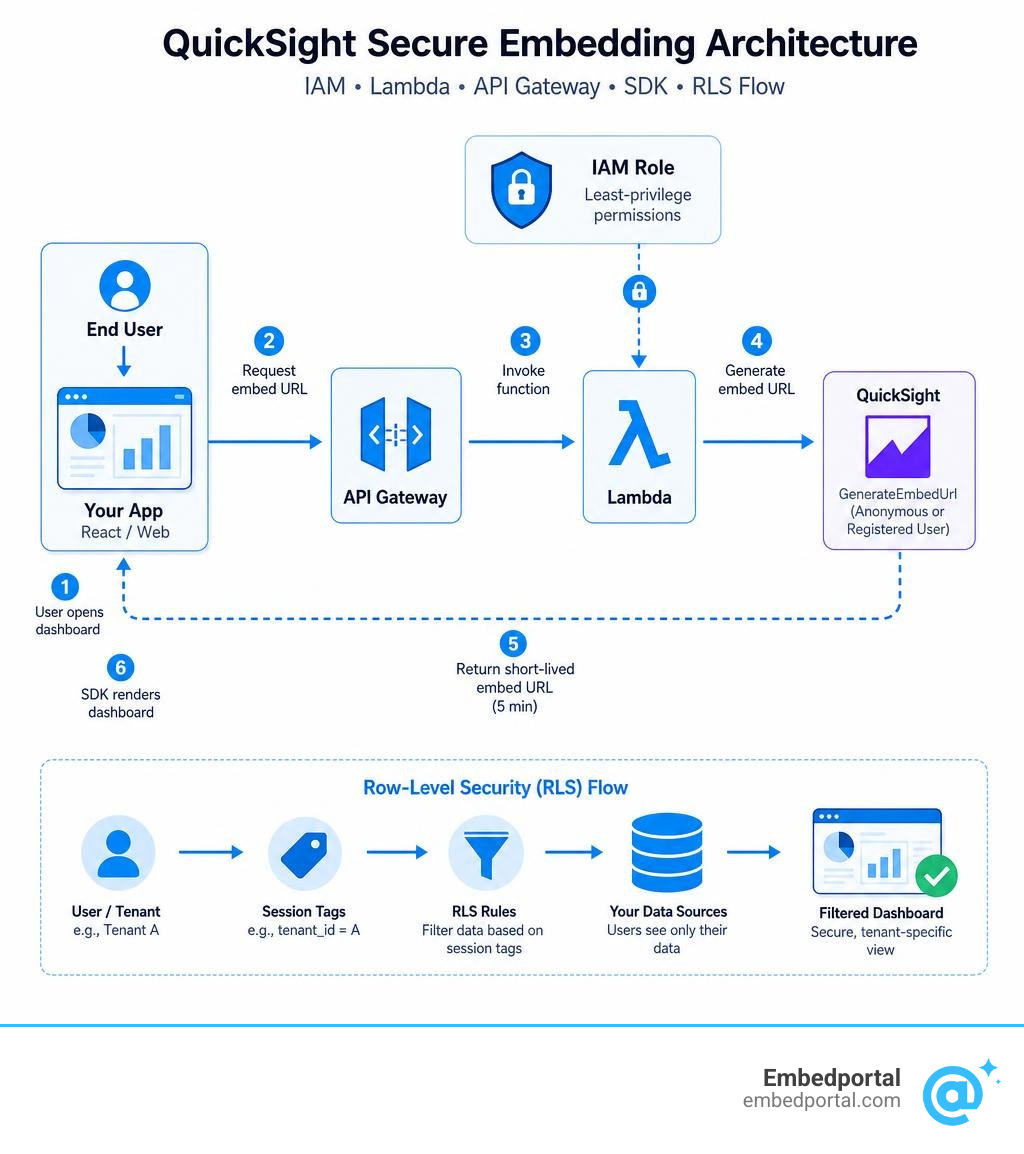
GenerateEmbedUrlForAnonymousUserorGenerateEmbedUrlForRegisteredUserfrom your backend (never the client) - Set up an IAM role — grant only the permissions needed to generate embed URLs
- Generate a short-lived URL — embed URLs expire in 5 minutes; sessions last up to 10 hours
- Allowlist your domain — restrict which domains can host your embedded dashboard
- Add Row-Level Security (RLS) — use session tags to filter data per user or tenant
- Use the QuickSight Embedding SDK — render dashboards in React or any frontend with proper event handling
QuickSight’s 1-click embed code looks tempting. Grab an iframe, paste it in, done. But it exposes your dashboard publicly, with no user filtering, no tenant isolation, and no control over who sees what data.
For a SaaS product with real customers, that’s a non-starter.
The API-based approach is what actually works in production. It keeps AWS credentials off the client, enforces domain restrictions, and lets you filter data per tenant without provisioning individual AWS accounts for every user. The tradeoff? It takes real setup — IAM roles, a serverless backend, domain allowlisting, and RLS configuration.
One developer described the core challenge well: how do you prevent a savvy user from changing URL parameters to view another tenant’s data? The answer isn’t URL parameters at all — it’s server-side session tags baked into the embed URL before it ever reaches the browser.
This guide walks through every layer of that setup, from IAM policies to React SDK integration.
Why You Must Embed QuickSight Dashboards Securely via APIs
When you want to show data to your users, you have two primary paths in Amazon QuickSight: the 1-click copy-paste iframe code, or API-driven secure embedding. Let’s look at why relying on the 1-click method for anything containing sensitive data is a major security risk.
The 1-click embed code is designed for public or internal-only environments where everyone has the same clearance level. For registered users, it forces them to log in to AWS or QuickSight in a separate popup before they can see anything. For anonymous users, you have to make the dashboard entirely public. This means anyone who inspects your page’s source code can steal the iframe URL and share it with the world. There is no middle ground, no dynamic filtering, and zero tenant isolation.
API-based embedding, using the Enterprise Edition of QuickSight, solves this by acting as a secure gatekeeper. Your backend server talks to AWS using secure IAM credentials, verifies who the current logged-in user is, and requests a customized, time-bound URL. The user never sees your AWS credentials, and they can’t tamper with the URL parameters because the data access limits are baked into the signed token itself.
To make API-based embedding work for anonymous users, you must enable session capacity pricing. This pricing model lets you purchase reader sessions in bulk, which is perfect for multi-tenant applications where you don’t want to manage or pay for individual AWS accounts for thousands of SaaS clients.
Here is a breakdown of how the two methods stack up:
| Feature | 1-Click Embed Code | API-Based Embedding (Recommended) |
|---|---|---|
| Authentication | Prompted login or fully public | Handled silently by your backend |
| Data Security | None (public) or rigid (AWS login) | Strict, server-controlled access |
| Multi-Tenancy | Impossible without separate dashboards | Seamless via Row-Level Security (RLS) |
| URL Lifespan | Infinite | Valid for 5 minutes only |
| User Experience | Clunky login popups or exposed data | Seamless, native-feeling integration |
| Developer Control | Extremely limited | High (via event callbacks and SDK) |
Using APIs is the only way to achieve true enterprise-grade security for Embedded Analytics. It ensures that your company, based in California USA, meets strict data privacy compliance standards.
Step-by-Step Guide to Embed QuickSight Dashboards Securely for Anonymous Users
Anonymous embedding is ideal when you want to show dashboards to external users who log into your own app, but whom you do not want to register as individual users inside AWS QuickSight.
To set this up, your application server must call the GenerateEmbedUrlForAnonymousUser API. When you make this call, you define the dashboard you want to display, the allowed domains where the iframe is permitted to load, and the session lifetime. AWS allows you to set the session lifetime anywhere from 15 minutes up to a maximum of 600 minutes (10 hours).
Here is the step-by-step flow to generate and render this URL securely:
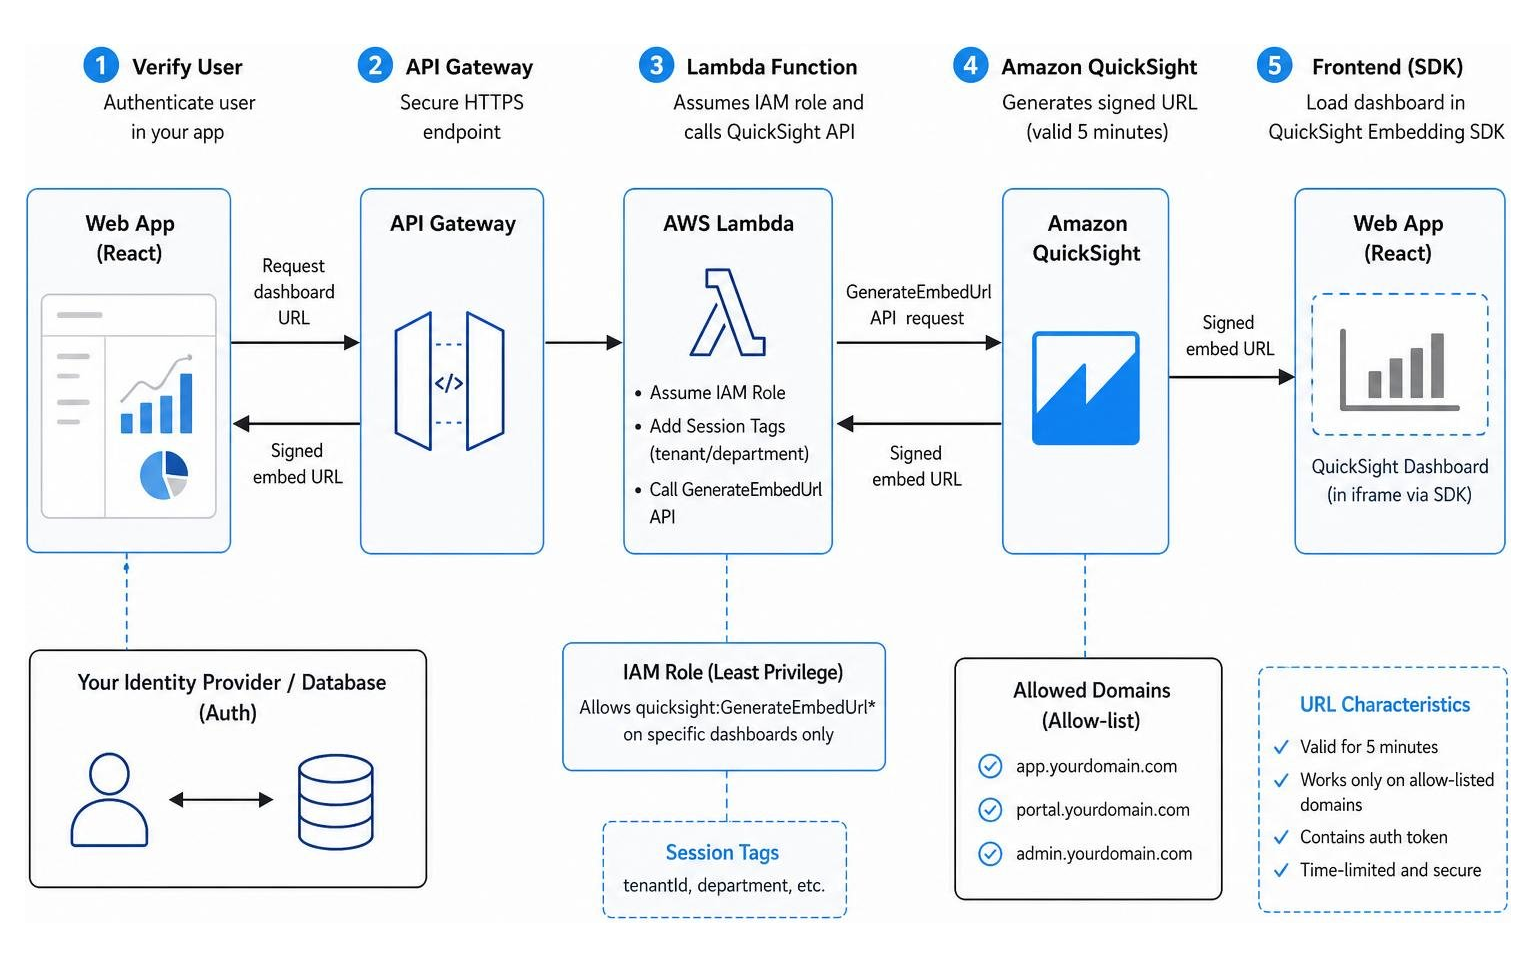
- Verify the User in Your App: When a user requests a page containing a dashboard, your backend must first authenticate their session using your own database or Identity Provider (IdP).
- Call the AWS API: Your server assumes an IAM role with the permission to call
quicksight:GenerateEmbedUrlForAnonymousUser. - Pass the Session Tags: In the API request, attach session tags that specify the user’s tenant ID or department. This is how you enforce row-level filtering.
- Retrieve the Signed URL: AWS returns a long, secure URL containing an authentication token. This URL is highly sensitive but only remains valid for 5 minutes. If someone copies it, they must use it immediately, and they can only view it on your allow-listed domains.
- Send to Frontend: Pass this URL to your client-side application, which will load it inside the QuickSight Embedding SDK.
For a deeper dive into this architecture, read our guide on QuickSight Multi-Tenant Embedding Without Provisioning Users and consult the official AWS documentation on Embedding Amazon Quick Sight dashboards for registered … .
How to Embed QuickSight Dashboards Securely for Registered Users with SSO
If you are building an internal portal or a highly secure B2B platform where every single viewer is a registered QuickSight user, you will use the GenerateEmbedUrlForRegisteredUser API. This method allows you to map your app’s users directly to QuickSight users, maintaining a strict audit trail.
To prevent users from having to log in twice (once to your app and once to QuickSight), you must configure Single Sign-On (SSO) using an Identity Provider (IdP) like AWS Cognito, Okta, or Ping Identity. This is a core component of The Developer’s Guide to SSO Analytics Embedding.
When a registered user logs into your system, your backend assumes an IAM role on their behalf using AWS Security Token Service (STS). The role session name should match the user’s unique identifier. When you call GenerateEmbedUrlForRegisteredUser, QuickSight can dynamically provision the user on their first visit (known as Just-In-Time or JIT provisioning) and automatically place them into the correct user groups.
This approach is incredibly powerful if you want to embed the entire authoring console, allowing power users to build their own reports inside your app. For more on this, check out the AWS guide on Embedding the full functionality of the Amazon Quick Sight console for registered users – Amazon Quick .
Setting Up the Serverless Backend and React SDK
To handle the URL generation securely, you should never make AWS API calls directly from your frontend. Doing so would expose your AWS Access Keys and Secret Keys to anyone opening their browser’s developer tools. Instead, we use a serverless broker pattern.
In this architecture, your React frontend requests a dashboard URL by calling a secure API endpoint hosted on AWS API Gateway. This API Gateway triggers an AWS Lambda function, which runs in a secure environment. The Lambda function assumes an IAM role, calls the QuickSight API, gets the signed URL, and returns it to your frontend.
Configuring IAM Policies and Domain Allow-lists
For this serverless broker to work, your AWS Lambda execution role must have precise, restricted permissions. Avoid using wildcard permissions like quicksight:* on all resources. Instead, scope down your IAM policies to follow the principle of least privilege.
Your IAM policy should explicitly grant the quicksight:GenerateEmbedUrlForAnonymousUser action, and the resource block should list only the specific Amazon Resource Names (ARNs) of the dashboards you want to share.
To prevent malicious actors from stealing a generated URL and trying to embed it on an unauthorized site, you must configure domain restrictions. There are two ways to do this:
- Static Allow-listing: Register your application’s domain in the QuickSight Admin Console under the “Domains” section.
- Dynamic AllowedDomains Parameter: When calling the API, you can pass the
AllowedDomainsparameter at runtime. You can specify up to 3 domains or subdomains per API call. This is highly recommended because it overrides static configurations and keeps your environments flexible.
To ensure your developers don’t accidentally allow-list unauthorized domains during testing, use strict IAM condition operators. You can attach the quicksight:AllowedEmbeddingDomains condition key to your IAM policy. This ensures that the Lambda function can only generate URLs if the requested domains match your approved corporate domains. It prevents URL variation exploits, such as changing case sensitivity or trailing slashes (e.g., trying to sneak in https://Example.com instead of https://example.com).
For a practical walkthrough, you can watch the Embed Amazon QuickSight Dashboards – Workshop or read our tutorial Zero to Embedded Analytics in Under an Hour.
Integrating the Amazon QuickSight Embedding SDK in React
Once your backend returns the secure, time-bound URL, your React frontend needs to render it. While you could technically drop this URL into a raw HTML iframe, using the official Amazon QuickSight Embedding SDK (version 2.0+) is highly recommended to build a smooth, professional user experience.
The SDK wraps the iframe in a responsive container and establishes a secure postMessage communication channel between your app and QuickSight. This allows you to listen to event callbacks and control the dashboard dynamically.
To get started, install the SDK via npm:
npm install amazon-quicksight-embedding-sdk
In your React component, you will set up a container div and use the SDK’s createEmbeddingContext to initialize the session. You then call embedDashboard and pass your container element, the generated embed URL, and your configuration options.
The SDK supports several critical event callbacks that you should implement for robust error handling:
- FRAME_MOUNTED: Fires when the iframe is successfully attached to the DOM.
- FRAME_LOADED: Fires when the initial iframe page has loaded.
- CONTENT_LOADED: Fires when the actual dashboard data and visual elements have finished rendering.
- ERROR_OCCURRED: Triggers if the URL is expired, invalid, or if there is a network error. This is where you can display a friendly error state or trigger a backend request to refresh the expired URL.
- PARAMETERS_CHANGED: Fires when a user interacts with filters, allowing you to sync your React app’s state with the dashboard’s state.
- SIZE_CHANGED: Allows you to dynamically resize the container to avoid double scrollbars. Always use relative percentage dimensions (100% width and height) on your container to let the dashboard render responsively.
For more tips on handling the frontend wrapper, see The Iframe Is the Easy Part: What Embedded Analytics Needs.
Implementing Row-Level Security (RLS) with Session Tags
If you are building a multi-tenant SaaS application, security means ensuring Tenant A can never see Tenant B’s data. This is where Row-Level Security (RLS) becomes critical.
A common rookie mistake is to filter data by passing parameters in the URL query string, like &p.TenantID=123. This is extremely insecure. Any user can open their browser console, modify the query string to &p.TenantID=456, and instantly spy on their competitor’s data.
To prevent this client-side parameter tampering, QuickSight supports tag-based Row-Level Security for anonymous users. Instead of filtering on the client, you define dataset rules in QuickSight that map specific columns (like TenantID) to session tags.
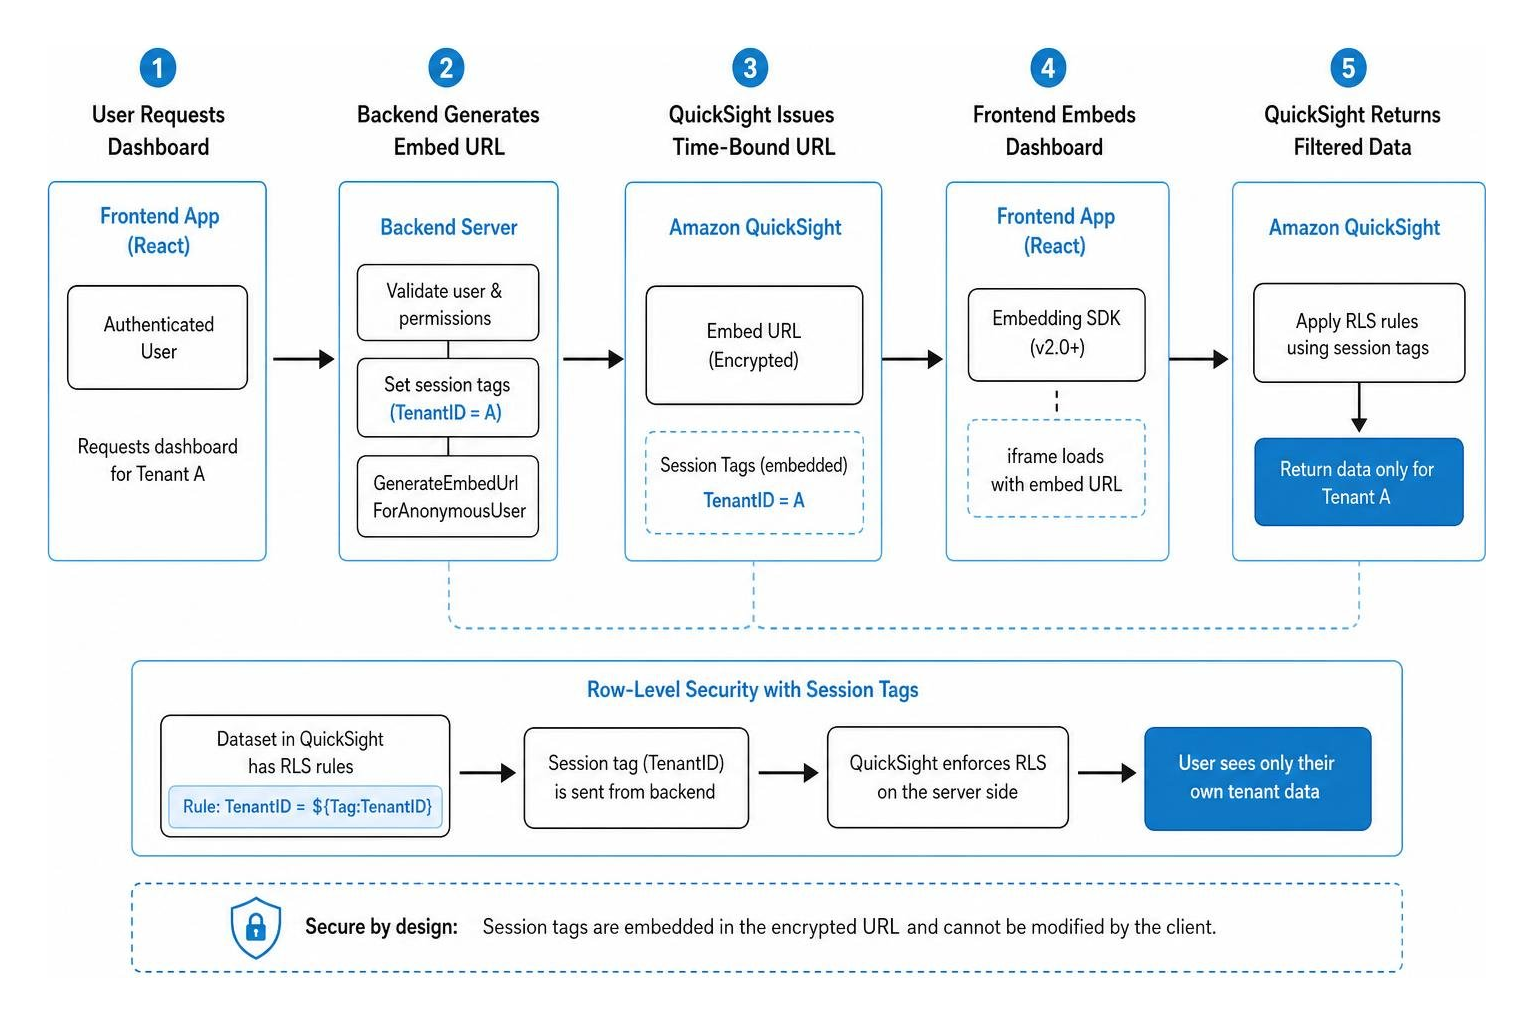
When your backend calls GenerateEmbedUrlForAnonymousUser, it securely attaches these session tags to the API request. Because the tags are processed on AWS servers and baked directly into the encrypted token of the embed URL, there is absolutely no way for a client to modify them. The browser simply receives the filtered data, keeping your databases perfectly isolated.
To learn more about the mechanics of this setup, check out the community discussion on Embed QuickSight dashboard with secure parameters and our guide on how to Embed QuickSight with RLS for Anonymous Users Without Breaking a Sweat.
Restricting Data Access Dynamically for Multi-Tenant Apps
Implementing tag-based RLS requires a clean coordination between your database schema, your QuickSight datasets, and your backend code.
First, when preparing your dataset in QuickSight, you must set up “Dataset rules” using tag keys. For example, you might create a rule that says the database column client_id should match a session tag named ClientTag.
Second, when your backend generates the embed URL, you include the SessionTags parameter in your API request. If a user from “Client 99” requests their dashboard, your server fetches their identity, verifies they belong to Client 99, and calls the API with Key: 'ClientTag', Value: '99'. QuickSight intercepts this, applies the rule to the SQL query sent to your database, and returns only the rows where client_id equals 99.
This dynamic filtering allows you to use a single, shared dashboard template for all of your clients, drastically reducing your development and maintenance overhead. It is the gold standard for Multi-Tenant Analytics.
To get a complete grasp of these security concepts, we highly recommend reading:
- QuickSight Row-Level Security: Keep Your Dashboards on a Need-to-Know Basis
- Row-Level Security AWS: A Practical Guide for Multi-Tenant Databases
- The Ultimate Guide to Row-Level Security (RLS)
- Row-Level Security
- Securing Your Data with Row-Level Security Embedding Solutions
- How to Choose a Secure Multi-Tenant Analytics Platform for Your SaaS
Frequently Asked Questions about QuickSight Embedding
What is the difference between Amazon QuickSight and Amazon Quick?
Amazon QuickSight was recently rebranded as Amazon Quick. This change represents its evolution from a standalone business intelligence tool into a comprehensive, generative AI-powered analytics ecosystem.
Under this new branding, the visualization engine we all know and love continues to exist as Amazon Quick Sight (now written as two words). It lives alongside other new capabilities like Quick Flows, Quick Automate, Quick Index, and Quick Research.
The good news for developers in 2026 is that all existing APIs, SDKs, IAM policies, and integrations remain fully backward-compatible. You do not need to rewrite any of your embedding code to accommodate this rebranding.
Why does anonymous embedding require session capacity pricing?
If you attempt to call GenerateEmbedUrlForAnonymousUser without having a session capacity pricing plan active on your AWS account, the API will immediately throw an UnsupportedPricingPlanException.
QuickSight requires this plan because anonymous embedding does not use individual user licenses. Instead of paying a flat monthly fee per registered reader, session capacity pricing allows you to purchase reader sessions in bulk (starting at 500 sessions per month). This is designed specifically to support high-traffic apps, public portals, and multi-tenant SaaS environments where provisioning individual AWS identities is impractical.
How long is a generated QuickSight embed URL valid?
The generated embed URL is valid for exactly 5 minutes from the moment your server requests it. If a user does not load the iframe within this window, the token expires, and QuickSight will display an error.
However, once the iframe successfully loads within those 5 minutes, the active session itself can last for up to 10 hours (600 minutes), depending on the SessionLifetimeInMinutes parameter you set during your backend API call.
Conclusion
Building a secure, responsive, and multi-tenant embedding solution with Amazon QuickSight is highly rewarding, but it demands a significant amount of engineering effort. Between configuring AWS IAM roles, building secure serverless token brokers, setting up complex tag-based Row-Level Security, and maintaining a custom React frontend, your engineering team can easily spend weeks writing and testing glue code.

At Embedportal, we believe you shouldn’t have to build complex backend infrastructure just to show a secure chart to your users.
Our white-label embedding platform allows you to securely embed dashboards from QuickSight, Power BI, Tableau, and Metabase in under an hour. We handle the heavy lifting — including unified branding, dynamic row-level security, and seamless Single Sign-On (SSO) — so your developers can focus on building your core product.
Ready to bypass the AWS configuration headaches and deploy production-ready analytics today? Visit us to Build a Secure White-Label Dashboard Portal and see how easy embedding can be.