The Easy Way to Map AD Groups to Power BI Roles
Why Power BI Row Level Security with Active Directory Is Worth Getting Right
Setting up power bi row level security active directory integration is one of the most important steps you can take to protect sensitive data in embedded dashboards. But for most analytics and product leads, the process quickly turns into a maintenance headache — manually updating user lists, juggling permissions across tools, and hoping nothing breaks when someone changes teams.
Here’s the quick answer for how AD groups map to Power BI RLS roles:
- Define roles in Power BI Desktop using DAX filter expressions (e.g.,
[Region] = "West") - Publish the semantic model to the Power BI service
- Add your AD security group to the role by typing its name or email in the Security settings
- Validate using the “Test as role” feature to confirm data is filtered correctly
That’s the core loop. Instead of adding individual users one by one, you assign an entire Active Directory security group to a role — and let your IT team handle who’s in that group.
Why does this matter? Because every time someone joins or leaves, you don’t touch Power BI at all. The group membership change in Azure AD handles it automatically.
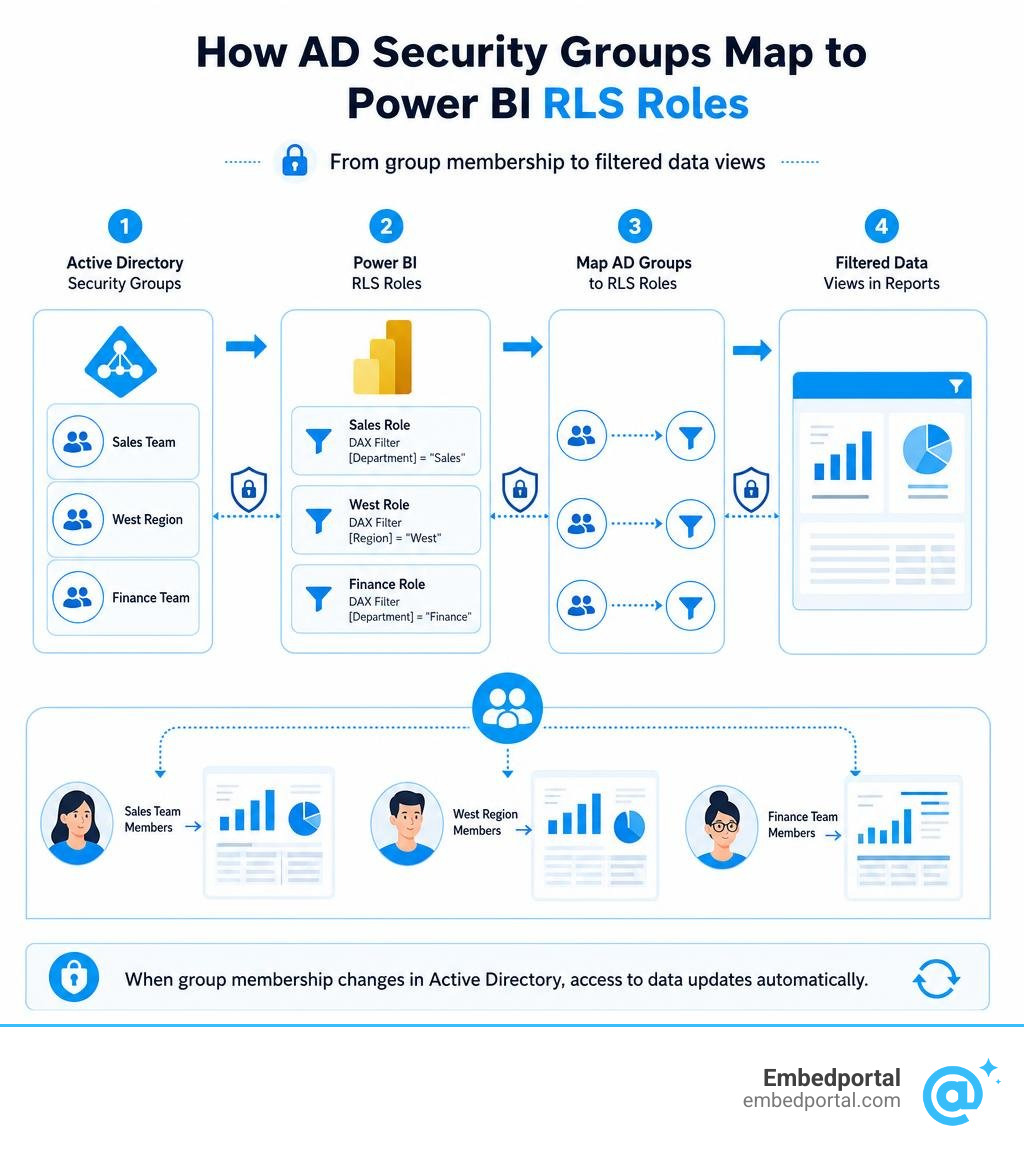
Basic power bi row level security active directory terms:
Understanding Power BI Row Level Security Active Directory Integration
To build a reliable data security model, we must understand how Power BI interacts with our identity provider. In modern cloud setups, this identity provider is Microsoft Entra ID, formerly known as Azure Active Directory.
Row-level security (RLS) acts as a gatekeeper at the data model layer. When a user opens a report, Power BI doesn’t just filter the visual; it restricts the underlying queries sent to the semantic model. This means secure data never leaves the cloud server to reach unauthorized browsers.
However, RLS is only enforced for users assigned to the Viewer role in a workspace. If a user is an Admin, Member, or Contributor, they bypass RLS rules entirely and can view all data. This makes role management in the Power BI service critical.
To learn more about the fundamentals of setting up these definitions, you can review the official Microsoft documentation on Row-level security (RLS) with Power BI.
Why Use Power BI Row Level Security Active Directory Groups?
In a small team, assigning individual email addresses to RLS roles in the Power BI service is manageable. But as an organization grows to hundreds or thousands of employees, manual assignment becomes an administrative nightmare.
By mapping Microsoft Entra ID security groups directly to Power BI roles, we offload user management to our IT department’s existing workflows. When a new sales representative is hired in California, IT adds them to the “US West Sales” security group. Because that group is already mapped to the corresponding Power BI RLS role, the new hire instantly gains access to the correct data without any intervention from the BI team.
This approach dramatically reduces administrative overhead, eliminates human error, and ensures strict compliance. For a deeper look at managing these security models, check out our guide on Power BI Row Level Security.
Supported Group Types in Power BI Service
Not all groups in the Microsoft ecosystem are treated equally when it comes to RLS. When configuring role membership in the Power BI service, we can use the following group types:
- Security Groups: The standard Microsoft Entra ID security groups (both cloud-only and synchronized from on-premises Active Directory).
- Mail-enabled Groups: Security groups that also have an email address associated with them.
- Distribution Groups: Standard email distribution lists.
It is highly important to note that Microsoft 365 groups are not supported for RLS role membership. If you attempt to add a Microsoft 365 group to an RLS role, Power BI will not resolve the membership correctly. Always stick to standard Security Groups or Distribution Groups for RLS configurations.
Static vs. Dynamic RLS: Choosing the Right Approach
When designing our security model, we must choose between two primary methods: static RLS and dynamic RLS. The right choice depends on the complexity of our organizational structure and how frequently our data access rules change. To explore this choice further, take a look at our analysis of Row Level Security Power BI.
Static RLS with AD Security Groups
Static RLS is the most straightforward approach. In Power BI Desktop, we define fixed roles with hardcoded DAX filters. For example, we might create three roles:
- Western Region: Filtered using
[Region] = "West" - Eastern Region: Filtered using
[Region] = "East" - Central Region: Filtered using
[Region] = "Central"
Once published to the Power BI service, we map our “West Coast Sales AD Group” to the Western Region role, and our “East Coast Sales AD Group” to the Eastern Region role.
This works beautifully when you have a small, stable number of roles (e.g., a handful of regions or departments). To see a practical walkthrough of setting this up, read the guide on Dynamic Row Level Security is easy with Active Directory Security Groups – FourMoo | Microsoft Fabric | Power BI .
Dynamic RLS with User Mapping Tables
If our organization has hundreds of distinct territories, stores, or clients, creating hundreds of static roles is highly inefficient. Instead, we use dynamic RLS.
Dynamic RLS uses specialized DAX functions like USERPRINCIPALNAME() or USERNAME() to capture the identity of the logged-in user at runtime. We import a security mapping table into our data model that pairs user UPNs (their login email addresses) with the specific dimension values they are allowed to see (such as Store ID or Department Code).
The DAX filter on our security table is simply written as: [UserEmail] = USERPRINCIPALNAME().
Power BI then filters the security table to only show the row matching the logged-in user. Through active relationships in our data model, this filter propagates to our fact tables, securing the entire report dynamically. To master this architecture, read our comprehensive resource on Row Level Security.
Step-by-Step Guide: Mapping AD Groups to Power BI Roles
Let’s walk through the exact process of setting up a clean, group-based RLS model from scratch.
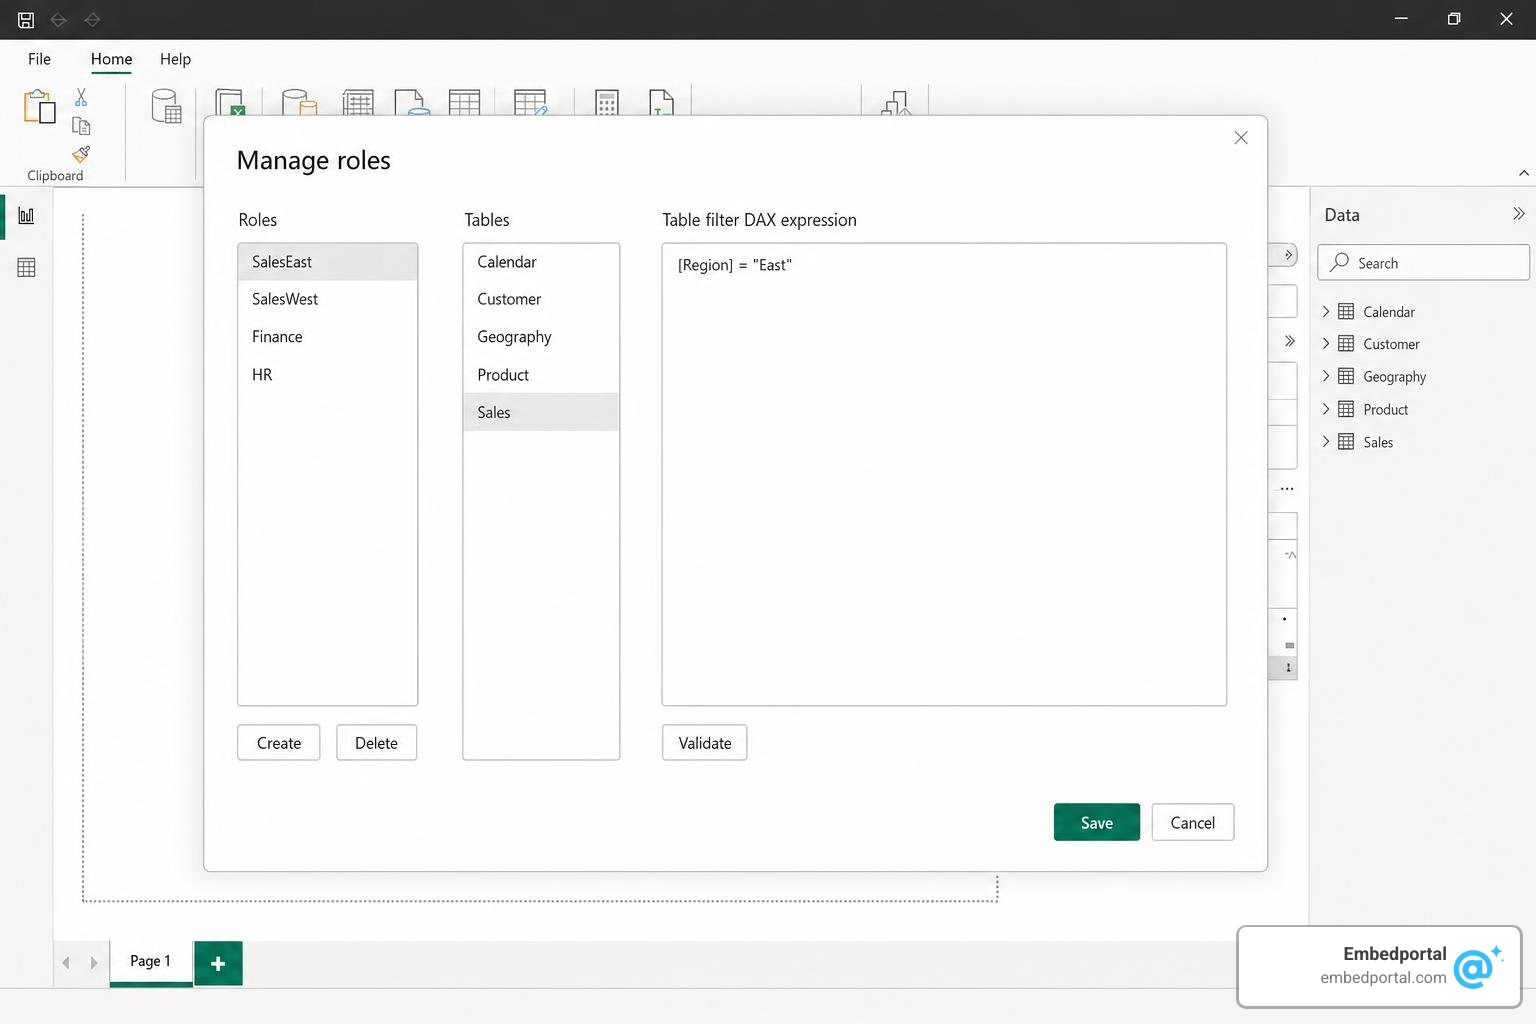
How to Configure Power BI Row Level Security Active Directory Roles
Our journey begins in Power BI Desktop, where we define the logical boundaries of our security roles.
- Open your report in Power BI Desktop.
- Navigate to the Modeling tab in the top ribbon.
- Click on Manage Roles.
- In the dialog box, click Create to add a new role. Let’s name it “USWestSales”.
- In the Tables list, select the table containing your filtering dimension (e.g.,
DimGeography). - In the Table filter DAX expression box, enter your filter. For example:
[Region] = "West". - Click Save to store the role definition.
If you are implementing a dynamic pattern instead, you would create a single role (e.g., “Dynamic_Security”) and apply a filter to your user mapping table using the expression: [UserEmail] = USERPRINCIPALNAME(). For more tips on setting up these DAX filters correctly, see Row Level Security Power BI 2.
Assigning AD Groups in the Power BI Service
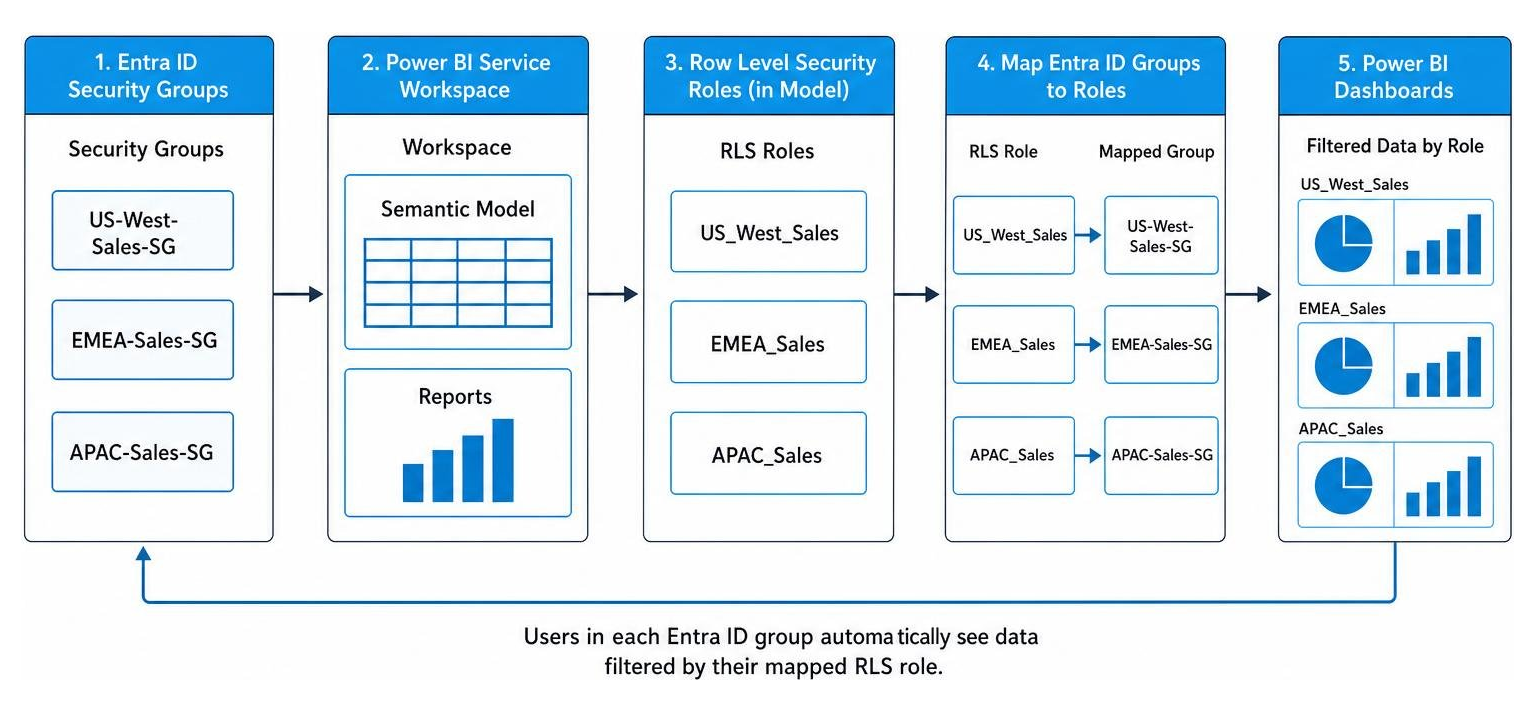
Once your roles are defined in Power BI Desktop, publish the report to a workspace in the Power BI service. Now we must map our Entra ID security groups to these roles.
- In the Power BI service, navigate to the workspace where you published the report.
- Locate the Semantic Model associated with your report.
- Click the three dots (…) next to the semantic model name and select Security.
- You will see the list of roles you created in Power BI Desktop. Select a role (e.g., “USWestSales”).
- In the Members box, type the name or email address of your Active Directory security group (e.g.,
US-West-Sales-SG@yourcompany.com). - Click Add and then click Save.
By doing this, any user who belongs to that AD group will automatically inherit the RLS rules of that role when they view the report. To learn more about managing user identities at scale, check out User Management for BI.
Validating and Troubleshooting RLS Roles
Never deploy an RLS model to production without testing it first. Power BI provides built-in tools to simulate different user experiences.
- In Power BI Desktop, go to the Modeling tab and click View as.
- Select the role you want to test, or check Other user and enter a specific user’s UPN to test dynamic RLS. Click OK to view the report through their eyes.
- In the Power BI service, go to the Security settings of your semantic model.
- Hover over the role you want to test, click the three dots (…), and select Test as role.
- This opens the report in a validation view. You can change the simulated user by clicking Viewing as in the top bar and entering any email address.
If you test with an account that has Admin or Member permissions in the workspace, RLS will not apply to them during normal viewing. They must be added as a Viewer to see the filtered data. To ensure your security filters don’t slow down report rendering, review our guide on Power BI Performance Optimization.
Best Practices and Limitations for Enterprise RLS
Implementing RLS at scale requires careful planning to avoid performance bottlenecks and security gaps.
- Keep DAX filters simple: Avoid complex, nested DAX calculations inside your security filters. Complex filters must run on every single query, which can severely degrade report performance.
- Avoid bi-directional relationships with RLS: Enabling bi-directional cross-filtering on relationships with RLS applied can cause unexpected filter propagation and performance issues. Only enable it when absolutely necessary.
- Fail closed by default: Ensure that if a user is not mapped to any security group or row in your mapping table, they see absolutely no data rather than seeing all data.
- Combine with centralized governance: For optimal maintainability, keep your security mapping files in a centralized location like SharePoint or OneDrive where authorized administrators can update them easily.
For a deeper dive into enterprise security architecture, check out our curated RLS Best Practices.
Handling External B2B Guest Users
In modern business environments, we often need to share reports with external clients or partners. When working with Microsoft Entra ID B2B guest users, UPN resolution can become tricky.
When a guest user is added to your tenant, their UPN is formatted with an external identifier (e.g., john_partner.com#EXT#@yourtenant.onmicrosoft.com). If you are using dynamic RLS, your user mapping table must store this exact #EXT# formatted string, or the USERPRINCIPALNAME() function will not find a match, and the user will see no data.
Additionally, while you can add external guests to your local Entra ID security groups, Microsoft recommends adding external guest users directly to Power BI RLS roles by their email addresses for more reliable resolution. For a complete strategy on managing external access, read Power BI External Users.
Workspace Roles and Embedding Scenarios
Workspace permissions always take precedence over RLS. If a user has Admin, Member, or Contributor permissions in a workspace, Power BI bypasses RLS rules entirely for that user. To enforce RLS, users must only have the Viewer role in the workspace, or they must access the report via an App or an embedded application.
When embedding Power BI reports in custom applications, we typically use a service principal to generate embed tokens. Because service principals are administrators of the workspace, RLS is not applied by default.
To enforce RLS in embedded scenarios, the application must pass an “Effective Identity” when requesting the embed token from the Power BI REST API. This identity specifies the username and the specific RLS roles to apply for that session. To master embedding security patterns, see our resources on Embedded Analytics in Power BI.
Frequently Asked Questions about Power BI RLS and AD Groups
Can I use Microsoft 365 groups for Power BI RLS role membership?
No. Power BI does not support Microsoft 365 groups for RLS role membership. You must use standard Security Groups, Mail-enabled Security Groups, or Distribution Groups. If your organization relies heavily on Microsoft 365 groups, you will need to create dedicated security groups for your Power BI access control.
Does RLS apply to workspace Admins, Members, or Contributors?
No. RLS is only enforced for users who have the Viewer workspace role or those who access the report through an App or an embedded portal. Anyone with Admin, Member, or Contributor workspace permissions has full read/write access to the underlying semantic model and bypasses all RLS rules.
How does dynamic RLS work with on-premises Analysis Services?
When using a Live Connection to an on-premises SQL Server Analysis Services (SSAS) tabular model, RLS is configured directly within the SSAS model rather than in Power BI.
When a user views the report, the Power BI service passes the user’s UPN to the on-premises data gateway using the EffectiveUserName property. The gateway then passes this credential to SSAS, which resolves it against your on-premises Active Directory to apply the appropriate security filters. To set up this hybrid architecture, follow the detailed tutorial on Dynamic row-level security with Analysis services tabular model – Power BI | Microsoft Learn .
Conclusion
Mapping Active Directory groups to Power BI roles is the standard for managing secure, scalable data distribution in modern enterprises. It bridges the gap between IT-driven user management and business-driven data analytics, ensuring that sensitive information remains protected without burying your BI team in manual admin tasks.
But if you are building a customer-facing software application, configuring and maintaining complex Power BI security architectures for thousands of external tenants can quickly become overwhelming.
That is where we can help. Embedportal provides a powerful, white-label embedding platform designed to simplify multi-vendor analytics. Whether you use Power BI, Tableau, or other BI tools, Embedportal lets you embed dashboards with unified branding, robust row-level security, and seamless single sign-on (SSO) in under an hour.
Ready to simplify your dashboard security and delivery? Secure your dashboards with Embedportal today.