Dynamic RLS Power BI Tutorial with Active Directory
Why Dynamic RLS in Power BI Is the Only Scalable Way to Secure Multi-User Dashboards
Dynamic RLS in Power BI is a method of restricting what data each user sees in a report — automatically — based on who is logged in, without creating a separate role for every person.
Here’s the quick answer on how it works:
- Create a user-mapping table that links each user’s email to the data they’re allowed to see
- Build one role in Power BI Desktop using the DAX function
USERPRINCIPALNAME() - Set a filter on your mapping table:
[UserEmail] = USERPRINCIPALNAME() - Publish the report and assign users or Active Directory security groups to that single role
- Power BI does the rest — each user only sees rows that match their identity
That’s it. One role. Scales to thousands of users.
If you’ve ever tried to lock down a Power BI report for a large team, you’ve probably hit the wall with static row-level security. Static RLS means creating a separate role for every user or region — which works fine for five people, but becomes a maintenance nightmare at 500, let alone 5,000.
Dynamic RLS solves this by moving the security logic out of the role definitions and into your data model. Instead of hard-coding filters like [Region] = "East" into dozens of roles, you store user-to-data mappings in a table and let a single DAX expression do all the work.
For analytics and product teams embedding dashboards into customer portals, this matters a lot. Fragmented, role-per-user security doesn’t scale — and it breaks every time your org chart changes.
Must-know dynamic rls in power bi terms:
Understanding Dynamic RLS in Power BI vs. Static RLS
When we talk about securing data inside our dashboards, we usually start with static RLS. It is simple, intuitive, and works beautifully when you only have a handful of distinct roles. But as organizations grow, static configurations quickly fall apart.
To understand why, let’s look at how they compare side-by-side:
| Feature | Static RLS | Dynamic RLS |
|---|---|---|
| Logic Location | Hard-coded inside the Power BI role definition. | Stored dynamically within your data model tables. |
| Role Count | Scales with your users or regions (e.g., 100 regions = 100 roles). | Exactly one role handles the entire organization. |
| Maintenance | Requires republishing the .pbix file to add or modify roles. | Updates automatically when your database or mapping table refreshes. |
| Scalability | Extremely poor. Unmanageable for thousands of users. | Highly scalable. Handles millions of rows and users effortlessly. |
| Typical Rule | [Region] = "West" |
[UserEmail] = USERPRINCIPALNAME() |
Imagine you are managing a payroll or sales report for 10,000 employees. With static security, you would need to manually build, test, and maintain thousands of separate roles. If an employee changes departments or leaves the company, you have to open Power BI Desktop, adjust the roles, and republish.
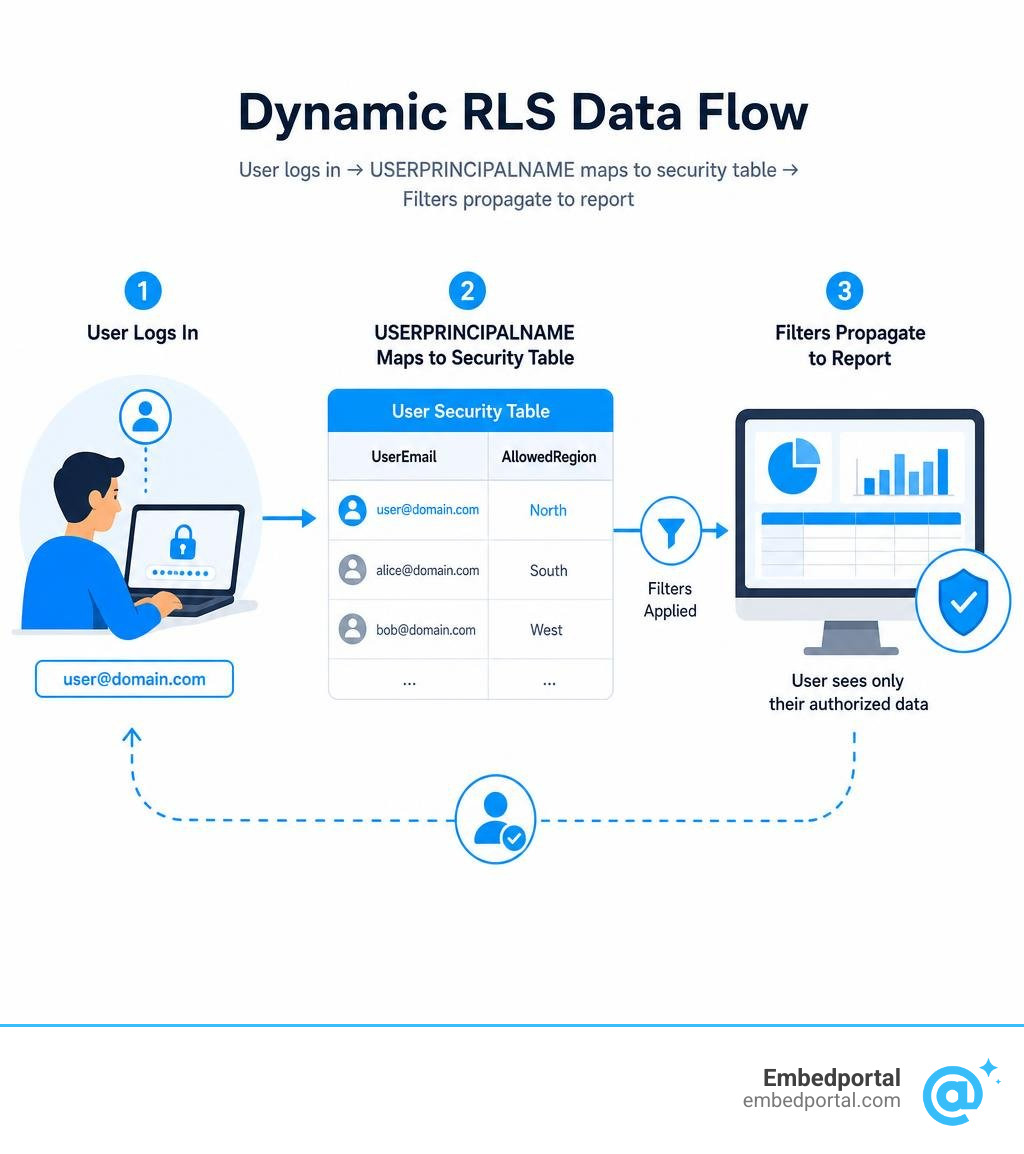
With dynamic rls in power bi, you build one single security role. That role acts as a dynamic engine. When a user logs in, Power BI captures their identity, matches it against a security mapping table, and filters the rest of the report automatically.
If you want to dive deeper into the core concepts of data authorization, you can Learn more about Row Level Security to see how these patterns protect your business.
Designing the Data Model and DAX Logic for Dynamic Security
To make dynamic security work, we must design our data model intentionally. Power BI relies on relationships to pass filters from your security tables down to your actual fact tables. If your relationships are misconfigured, your security will fail, either showing blank pages or exposing sensitive data.
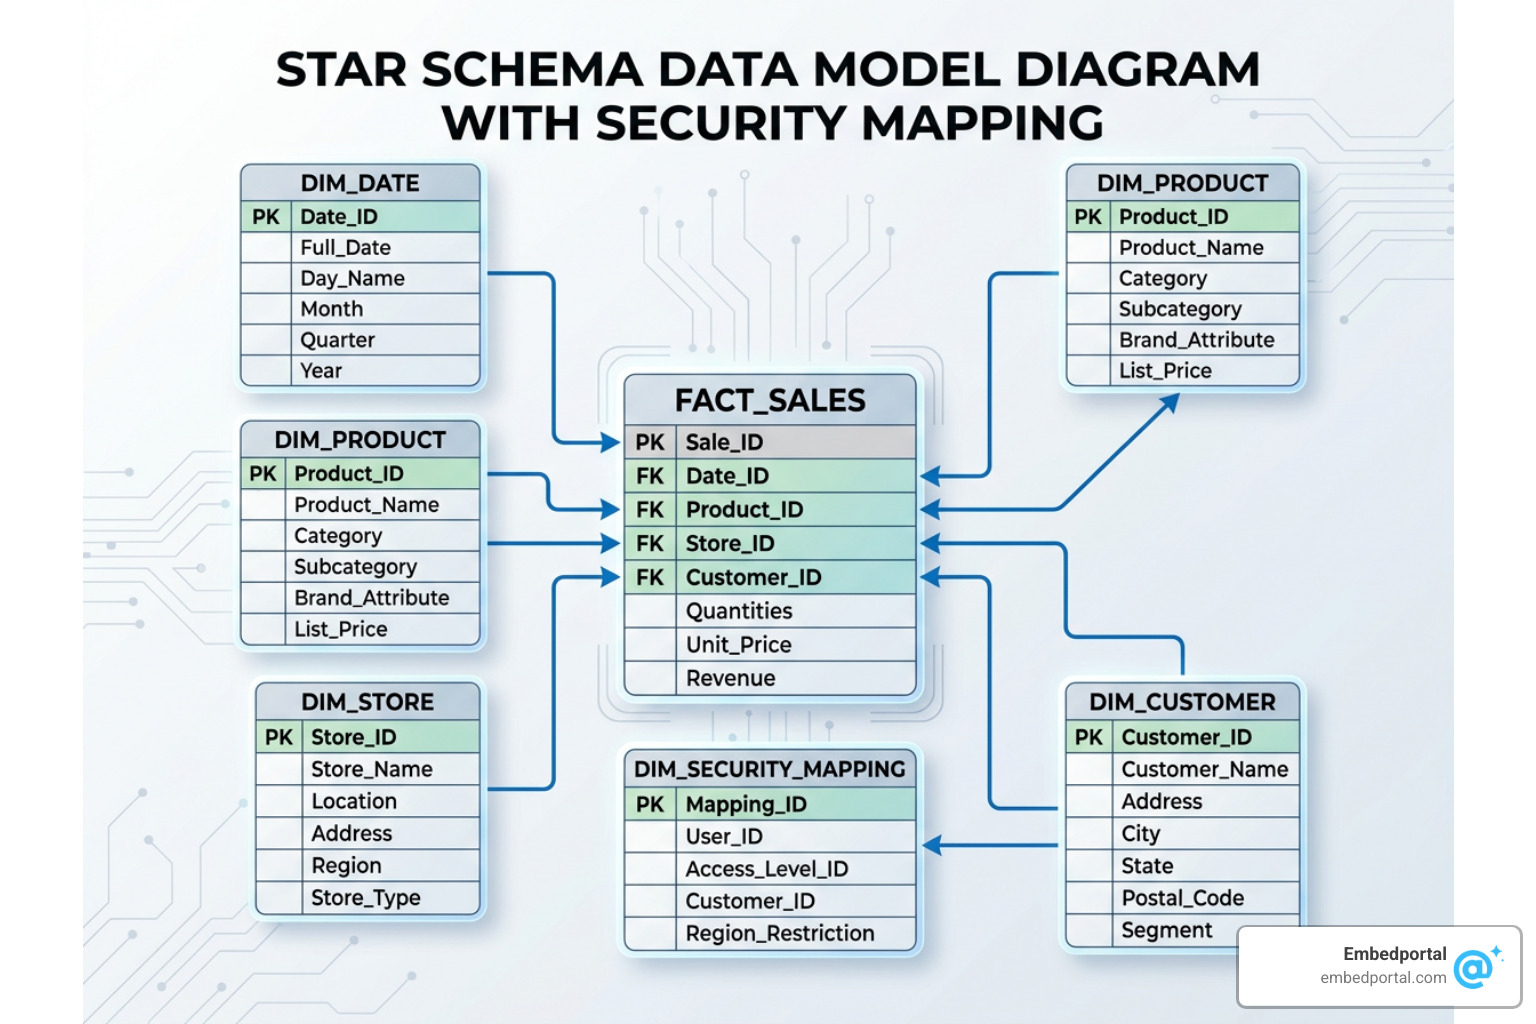
A robust dynamic security model relies on a clean star schema. We introduce a specialized dimension table: the User-Mapping Table (often called AppUser or SecurityMapping). This table must contain at least two critical columns:
- The unique identifier of your user (their login email or User Principal Name).
- The key they are permitted to see (such as
RegionID,StoreKey, orDepartmentID).
To set up your relationships correctly:
- Connect your User-Mapping Table to your standard Dimension Table (e.g.,
DimStoreorDimGeography) using the common key. - Set the relationship to filter from the User-Mapping Table to the Dimension Table.
- Enable bi-directional cross-filtering on this relationship and check the box to Apply security filter in both directions. This ensures that when the user table is filtered down to a single logged-in email, that filter propagates across the dimension table and down into your large fact tables.
To master this setup, Microsoft provides a great module on how to Restrict access to Power BI model data, which explains star schema principles for security.
For large enterprises with multiple reports, keeping this architecture clean is vital. Check out our guide on Centralized Row Level Security to learn how to manage these mapping tables in a single place.
The Core DAX Functions: USERPRINCIPALNAME() and USERNAME()
The entire engine of dynamic RLS relies on capturing who is viewing the report. Power BI gives us two primary DAX functions for this: USERNAME() and USERPRINCIPALNAME().
While they sound identical, they behave differently depending on where your report is running:
USERNAME()returns the domain and username (e.g.,DOMAIN\jdoe) when running in Power BI Desktop, but returns the user’s email address (UPN format) once published to the Power BI Service.USERPRINCIPALNAME()consistently returns the user’s login email address (e.g.,jane.doe@yourdomain.com) in both Power BI Desktop and the Power BI Service.
Because of this consistency, we strongly recommend using USERPRINCIPALNAME(). It eliminates the mismatch issues that occur when moving from desktop testing to cloud deployment.
For a deep dive into how these functions behave in real-world scenarios, you can read the Dynamic Row-Level Security (RLS) Implementation in… – Microsoft Fabric Community blog post, which covers these fundamental functions in detail.
Handling Organizational Hierarchies with PATH and PATH CONTAINS
What happens if your security rules are not flat? In many companies, managers need to see the data of everyone who reports to them, directly or indirectly, while individual contributors should only see their own records.
To handle this hierarchical security dynamically, we use parent-child DAX functions:
PATH(): This function takes an Employee ID and a Manager ID, and builds a delimited text string showing the entire reporting chain above that employee (e.g.,101|105|112|130).PATHCONTAINS(): This function checks if a specific user’s ID exists anywhere within that path string.
To implement this, you add a calculated column to your employee table:
UserPath = PATH(Employee[EmployeeID], Employee[ManagerID])
Then, in your RLS role filter, you apply a rule like this:
PATHCONTAINS(Employee[UserPath], MAXX(FILTER(Employee, Employee[Email] = USERPRINCIPALNAME()), Employee[EmployeeID]))
This elegant expression finds the logged-in user’s Employee ID, and then filters the table to show any rows where that ID exists in the reporting path.
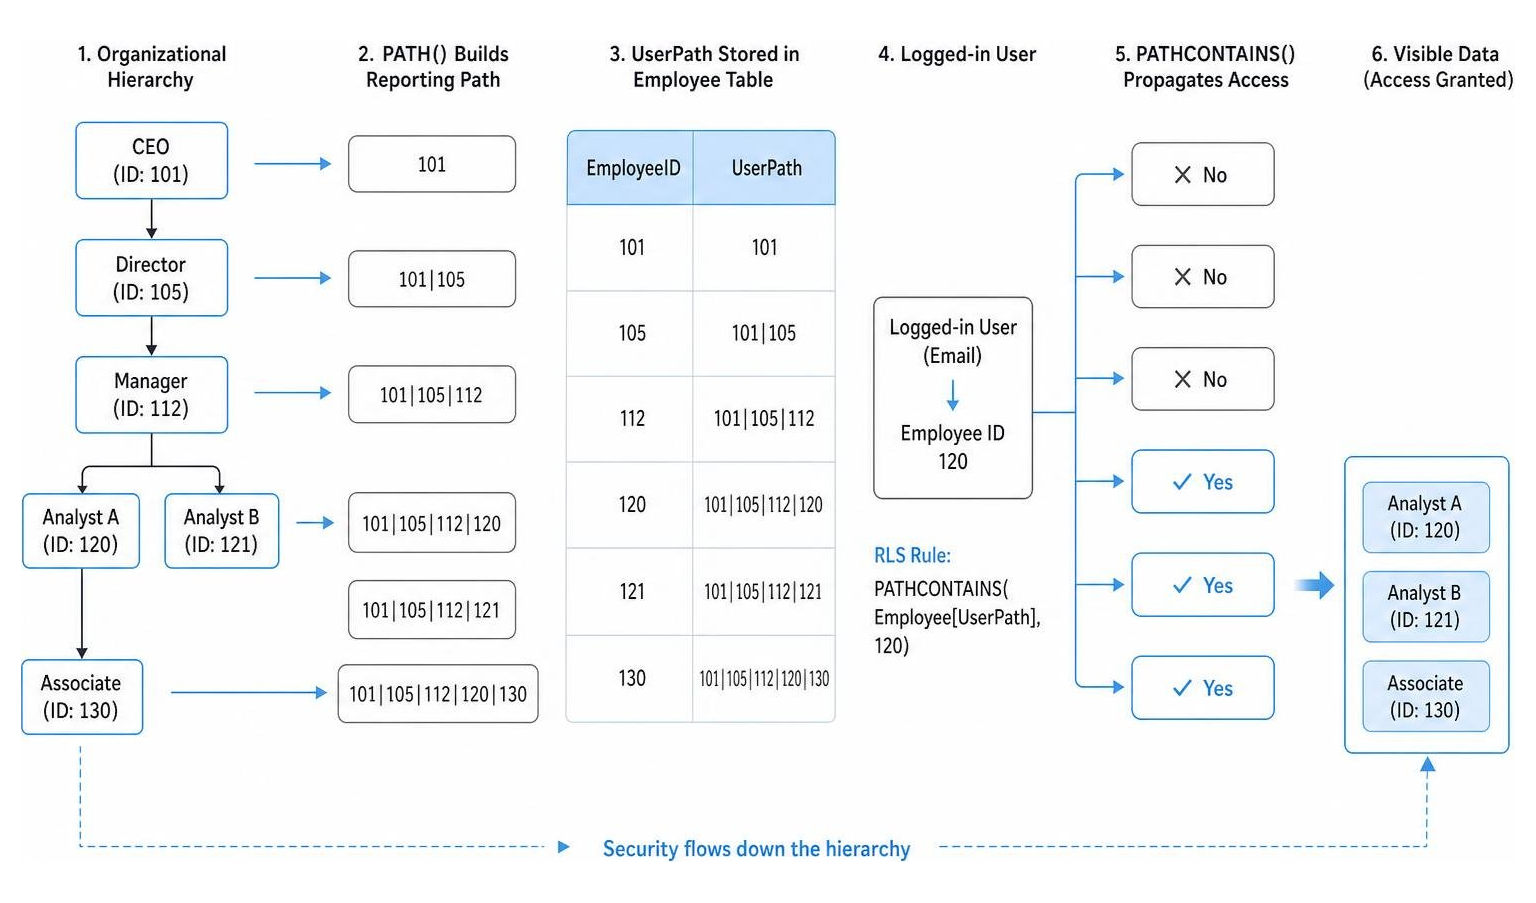
Using this pattern, you do not need to hardcode management levels. Power BI automatically resolves the reporting chain on the fly. You can read more about setting up these advanced structures in our resource on Row Level Security Power BI.
Step-by-Step Guide: Implementing and Testing Dynamic Security
Now that you understand the underlying architecture and DAX logic, let’s build and test our dynamic security role inside Power BI Desktop.

Before publishing, we must ensure our security filters are working perfectly. For more details on the desktop environment setup, refer to our comprehensive guide on Row Level Security Power BI 2.
Step-by-Step: Configuring Dynamic RLS in Power BI Desktop
Follow these steps to create your dynamic security role:
- Open your report in Power BI Desktop.
- Navigate to the Modeling tab in the top ribbon and click on Manage Roles.
- In the Manage Roles window, click New to create a new role. Give it a descriptive name, such as
DynamicSecurityRole. - In the Tables list, select your User-Mapping Table (e.g.,
AppUser). - In the Table filter DAX expression box, enter the following filter:
[UserEmail] = USERPRINCIPALNAME() - Click Save to apply the role.
By filtering the user-mapping table, Power BI will automatically propagate this filter through your model relationships, restricting the visible rows in your dimension and fact tables. For a checklist of optimization strategies during this phase, take a look at our RLS Best Practices guide.
Testing and Validating Dynamic RLS Roles
Never publish a security-enabled report without testing it first! Power BI Desktop makes validation straightforward:
- In the Modeling tab, click View as.
- In the window that appears, check the box for your newly created
DynamicSecurityRole. - Check the box for Other user and type in the exact email address of a user from your mapping table (e.g.,
sales.rep@yourdomain.com). - Click OK.
Your entire report will now filter to show exactly what that specific user would see. Look at your visuals to ensure no sensitive data is leaking. Once verified, click Stop Viewing in the yellow bar at the top of the screen to return to your normal view.
To understand how to validate multi-tenant deployments where users belong to different organizations, read our deep-dive on Multi Tenant Row Level Security.
Publishing and Assigning Active Directory Security Groups
Once your report is tested and ready, it is time to publish it to the Power BI Service and connect it to your organization’s identity management system.
To manage access efficiently at scale, we use Microsoft Entra ID (formerly Azure Active Directory) Security Groups rather than assigning individual users one-by-one.
- Publish your report: Click Publish in Power BI Desktop and select your target workspace.
- Access Security Settings: In the Power BI Service, locate your published semantic model (dataset). Click the three dots (…) next to it and select Security.
- Assign Members: You will see the
DynamicSecurityRoleyou created. In the “Members” box, type the name of your Entra ID Security Group (e.g.,All_EmployeesorSales_Department) and click Add. - Save: Click Save to apply the changes.
By adding a broad security group to this single role, you ensure that every member of your organization is covered by the security engine. When they open the report, the USERPRINCIPALNAME() function resolves their individual identity and filters the dataset based on your mapping table.
For official documentation on these cloud settings, check out the Microsoft Fabric guide on Row-level security (RLS) with Power BI. For broader user provisioning tips, read our guide on User Management for BI.
Workspace Roles and Dynamic RLS Interaction
A common point of confusion is why some users can still see all data even after you assigned them to an RLS role. This happens because of Power BI workspace permissions.
RLS is only enforced for users with the Viewer role in a workspace.
If a user is assigned as an Admin, Member, or Contributor in the workspace where the report lives, they have edit permissions on the semantic model. Power BI bypasses RLS for these roles so that developers can build and edit reports without restrictions.
Always keep your development environments separate, and ensure your end-users are strictly assigned as Viewers in the production workspace. To learn more about setting up these workspace access layers, check out our resource on Dashboard Data Access.
Advanced Considerations and Enterprise Limitations
While dynamic rls in power bi is incredibly powerful, large enterprises must navigate several technical limitations depending on their data architecture.
If you are using DirectQuery, RLS is enforced at the source. This means Power BI must pass the user’s identity down to your database. This requires configuring Single Sign-On (SSO) via Kerberos or OAuth2 so that the database can execute the queries using the viewer’s security context.
For Analysis Services live connections, RLS cannot be configured within the Power BI Service. Instead, you must define your security roles and dynamic filters within your on-premises SSAS Tabular model or Azure Analysis Services.
External B2B guest users present another unique challenge. When an external partner accesses your report, their User Principal Name might resolve in an alternative format (containing #EXT# in the string). If your mapping table contains their standard email address, the match will fail, and they will see no data. You must ensure your mapping table stores the exact UPN format that Power BI resolves for guest sessions.
For a detailed look at sharing dashboards securely with users outside your tenant, read our article on Power BI External Users.
Combining Dynamic RLS with Object-Level Security and SSO
To achieve a true “defense in depth” security posture, you can combine dynamic RLS with Object-Level Security (OLS). While RLS restricts rows of data, OLS allows you to completely hide sensitive columns or entire tables (such as salary details or social security numbers) from specific users.
You configure OLS in Power BI Desktop using external tools like Tabular Editor. When combined with DirectQuery SSO, you ensure that sensitive data is secure both in transit and at rest, preventing unauthorized users from finding hidden fields through custom report creation.
To understand how to safely share these highly secure dashboards across your organization, see our guide on Shared Dashboard Access.
Best Practices for Scaling Dynamic RLS in Power BI
As your data volume and user base grow, keep these enterprise scaling tips in mind:
- Minimize Bi-Directional Filters: Bi-directional cross-filtering is highly demanding. Limit its use to your security tables and keep your core dimension-to-fact relationships single-directional.
- Keep Mapping Tables Fresh: Schedule your mapping table to refresh frequently (ideally under 24 hours) so that organizational changes are reflected quickly.
- Avoid Filtering Large Fact Tables Directly: Always apply your RLS filters to small dimension or lookup tables, and let those filters propagate naturally to your large fact tables.
- Default to Zero Access: Design your DAX filters so that if a user’s email is not found in your mapping table, they see zero rows rather than everything. Security should always fail-safe.
- Monitor Performance: Use the Performance Analyzer in Power BI Desktop to measure the impact of your security filters on visual load times.
For more technical performance tips, check out our guide on Power BI Performance Optimization.
Frequently Asked Questions about Dynamic RLS
Can users bypass dynamic RLS by creating their own reports?
No. Because RLS is enforced at the semantic model level in the cloud, any report, visual, Q&A query, or external tool (like Excel Analyze in Excel) that connects to that dataset will have the security rules applied. Even if a user has Build permissions to create their own reports, they can only query and see the rows allowed by their RLS scope.
How does dynamic RLS handle external B2B guest users?
External B2B guest users can access reports secured with dynamic RLS, but you must account for UPN resolution differences. Depending on how your Azure AD tenant is configured, a guest’s UPN might look like john.doe_externaldomain.com#EXT#@yourtenant.onmicrosoft.com. Your user-mapping table must store this exact string to successfully match and filter the data.
For more tips on guest collaboration, read our guide on Power BI Guest Access.
Can I use Microsoft 365 groups for RLS role membership?
No, Microsoft 365 groups are not supported for RLS role assignment in the Power BI Service. You must use security groups, mail-enabled security groups, or assign users directly by their email addresses.
Conclusion
Implementing dynamic rls in power bi is the absolute gold standard for securing enterprise dashboards. By separating your security logic from your role definitions and placing it directly into your data model, you build a system that scales seamlessly as your organization grows.
But managing complex security rules, tenant configurations, and embed tokens across multiple platforms can quickly become overwhelming. This is where Embedportal can help.
Embedportal is a white-label embedding platform designed to simplify your entire dashboard delivery. We enable teams to embed multi-vendor analytics — whether you use Power BI, Tableau, QuickSight, or Metabase — with unified branding, centralized row-level security, and seamless single sign-on (SSO) in under an hour.
Instead of wrestling with custom code, complex API tokens, and fragmented security setups across different BI tools, let us handle the heavy lifting. Secure your dashboards with Embedportal and deliver a world-class, secure analytics experience to your customers today.