The Quick Guide to Power BI App Row Level Security
Why Power BI App Row Level Security Is Critical for Your Embedded Analytics
Power BI app row level security (RLS) is the mechanism that controls which rows of data each user can see inside a Power BI report or embedded dashboard — without needing separate reports for each person.
Here’s the quick answer to how it works:
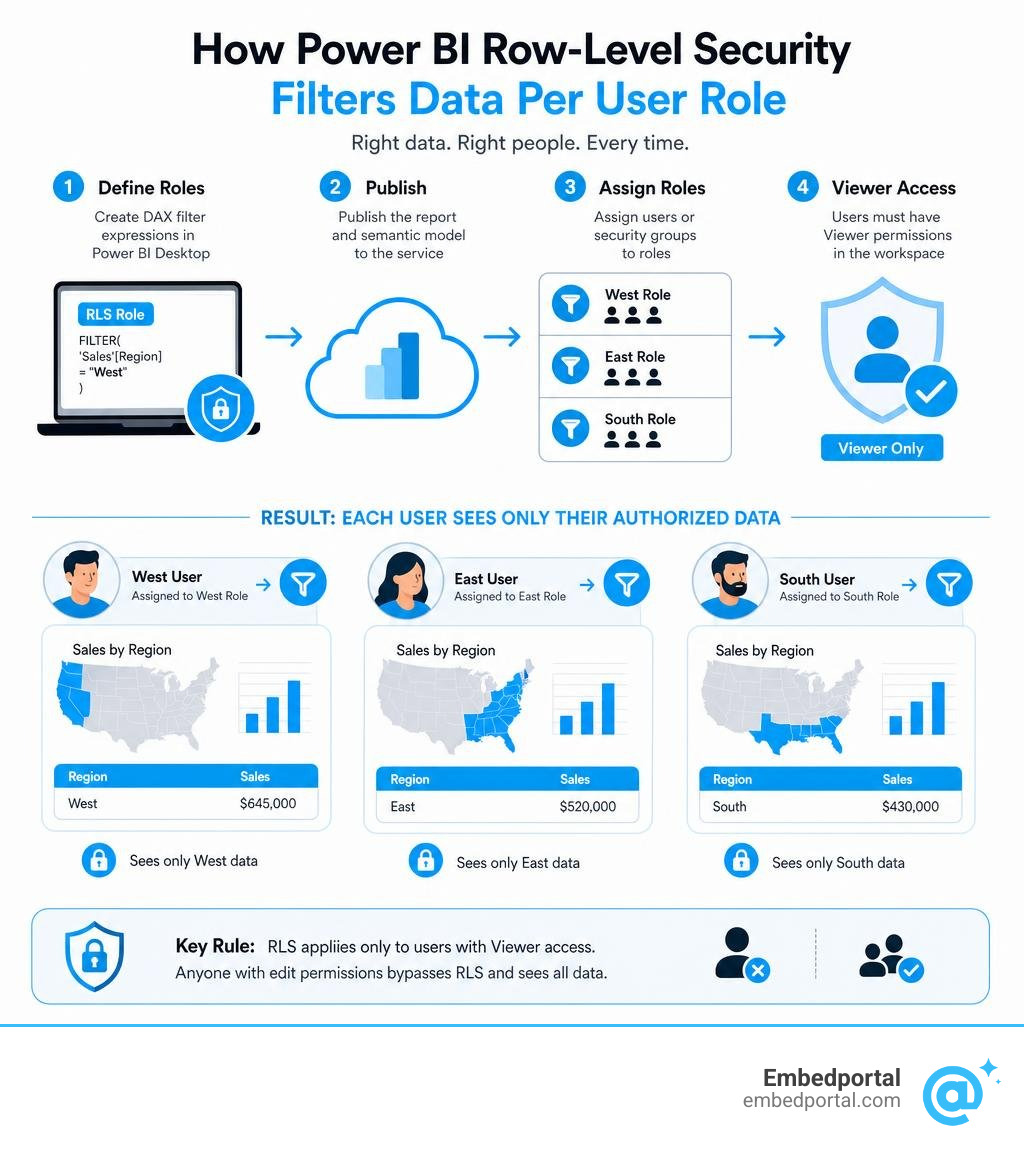
- Define roles in Power BI Desktop using DAX filter expressions (e.g., filter rows where Region = “West”)
- Publish your report and semantic model to the Power BI service
- Assign users or security groups to those roles in the semantic model’s Security settings
- Ensure users have Viewer permissions in the workspace — not Admin, Member, or Contributor
Important: RLS only applies to users with read-only (Viewer) access. Anyone with edit permissions on the semantic model bypasses RLS entirely and sees all data.
This sounds straightforward. But in practice — especially when you’re embedding reports across a customer portal, integrating Power Apps, or managing external B2B guest users — the configuration gaps add up fast.
One common frustration: a test user is set up with a Florida-only RLS role, but they can still see all the data in the published app. The culprit is almost always workspace permissions, not the DAX rule itself.
If you’re managing embedded dashboards for multiple customers or teams, a fragmented RLS setup becomes a real liability. This guide walks you through exactly how to configure, embed, and troubleshoot Power BI app row level security — so your users see only what they’re supposed to see.
Power bi app row level security terms you need:
Understanding Row-Level Security in Power BI
At its core, row-level security allows us to secure our data by filtering rows based on who is viewing the report. Instead of maintaining dozens of identical reports filtered for different territories, departments, or clients, we build a single report that dynamically adapts to the identity of the logged-in user.
When a user opens a report, Power BI applies DAX (Data Analysis Expressions) filter rules to the underlying semantic model. These rules act as a silent, automatic WHERE clause on every query executed by the report visuals. If a user is assigned to a role that filters a table, any visual querying that table will only receive the rows that evaluate to TRUE under the DAX filter expression.
This filtering propagates throughout the entire semantic model based on the relationships defined in our star schema. For instance, if we filter a dimension table like “Customers” to only show accounts assigned to a specific manager, that filter automatically flows down to the “Sales” fact table, restricting the visible transactional rows.
However, a fundamental rule of Row Level Security Power BI is that it is only enforced for users who have read-only permissions. If a user has write or edit permissions on the semantic model or the workspace, Power BI assumes they are a developer or administrator who needs to see the raw, unfiltered data. In these cases, RLS rules are completely ignored.
To learn more about optimizing your data models for security propagation, you can read the official Row-level security (RLS) guidance in Power BI Desktop – Power BI | Microsoft Learn.
Static vs. Dynamic RLS: Which Should You Choose?
When designing our security architecture, we must choose between static and dynamic RLS. The choice depends on the scale of our user base, the frequency of personnel changes, and the complexity of our security rules.
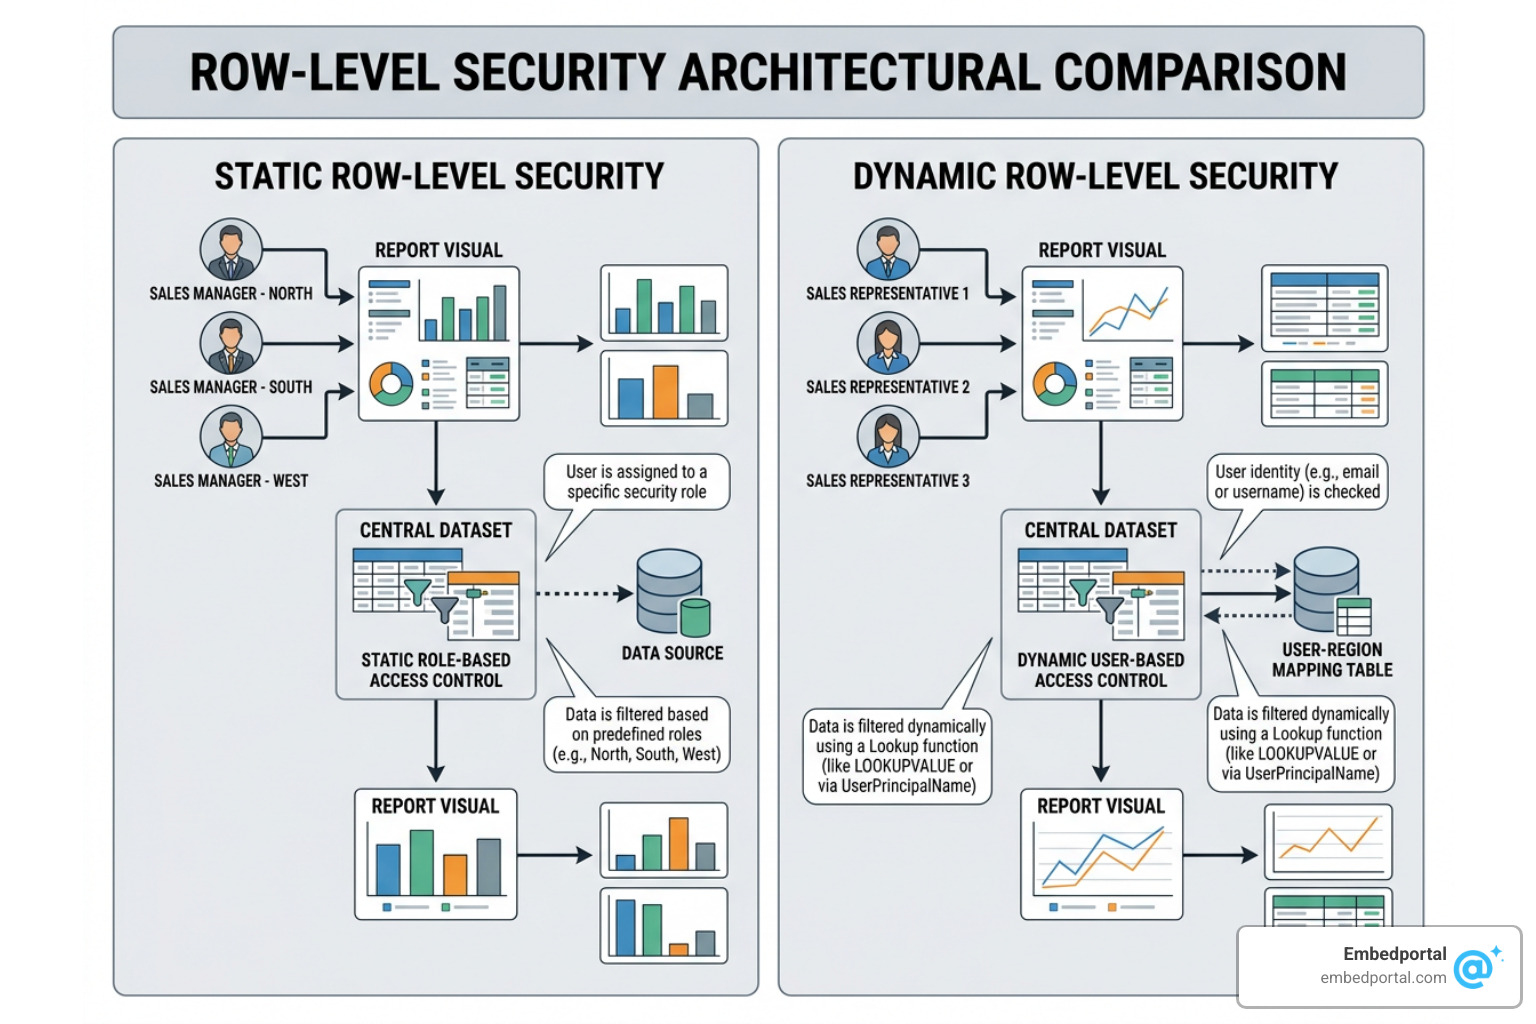
Static RLS involves creating specific, hardcoded roles in Power BI Desktop. For example, we might create a “West Region” role with the DAX filter [Region] = “West”, and an “East Region” role with [Region] = “East”. In the Power BI service, we then manually assign individual users or groups to these static roles. While this is simple to set up for a handful of regions or departments, it quickly becomes an administrative nightmare as the organization grows. If we expand into ten new regions, we have to open Power BI Desktop, manually add ten new roles, republish the report, and map users to those new roles in the service.
Dynamic RLS, on the other hand, uses environmental DAX functions to dynamically filter data based on the logged-in user’s credentials. The most common functions are USERNAME() and USERPRINCIPALNAME(). In the Power BI service, USERPRINCIPALNAME() returns the user’s login email address (e.g., user@domain.com). By setting up a security mapping table in our database that links user email addresses to their permitted regions, we can write a single dynamic DAX rule like [UserEmail] = USERPRINCIPALNAME(). This single rule handles an infinite number of users and regions without ever requiring us to modify or republish the Power BI Desktop file.
| Feature | Static RLS | Dynamic RLS |
|---|---|---|
| Setup Complexity | Low (Hardcoded DAX) | Medium (Requires security mapping table) |
| Maintenance Overhead | High (Manual updates for new roles) | Low (Automatically scales with data updates) |
| Best For | Small teams, fixed regions, simple rules | Large organizations, SaaS portals, multi-tenant apps |
| DAX Functions Used | Fixed values (e.g., [Region] = “West”) | USERPRINCIPALNAME(), USERNAME(), CUSTOMDATA() |
| Model Flexibility | Low | High |
For organizations building customer-facing portals or large internal applications, dynamic RLS is the undisputed gold standard. It keeps our model lean and minimizes maintenance overhead. For deeper insights on planning your security architecture, check out our guide on Row Level Security Best Practices.
Why Workspace Permissions Break Power BI App Row Level Security
One of the most common support questions in the Power BI community is: “I configured my RLS roles perfectly, but my users can still see all the data!”
As discussed in the famous Solved: PBI App and row Level Security forum thread, the breakdown almost always stems from workspace permissions. Power BI workspace roles are categorized into Admin, Member, Contributor, and Viewer.
The Admin, Member, and Contributor roles all possess edit permissions for the semantic model. Because they have edit rights, Power BI bypasses RLS rules entirely for these users. They are treated as data creators who require full visibility to build, edit, and troubleshoot reports.
Only users assigned to the Viewer role are subject to RLS enforcement. When we publish a Power BI App, the app consumers are treated as read-only viewers. Therefore, RLS will work perfectly for users accessing the report through the published Power BI App, provided they do not also have Admin, Member, or Contributor access to the underlying workspace.
If a user is both an App consumer and a Contributor in the workspace, their workspace permissions override the App’s read-only state, and they will bypass RLS. To prevent data leakage, always keep your development team separate from your end-users, and ensure your end-users only have Viewer access to the workspace or access via the App itself.
Configuring Power BI App Row Level Security: Step-by-Step
Setting up secure data access requires a coordinated two-step process: first, we define the roles and rules in Power BI Desktop, and second, we assign users and manage those roles in the Power BI Service.
By separating the role definition from the actual user assignments, Power BI allows us to build a reusable security framework that does not need to change every time someone is hired, promoted, or leaves the company. To understand the broader landscape of data security, read our comprehensive overview of Row Level Security.
For official step-by-step documentation from Microsoft, you can refer to Row-level security (RLS) with Power BI.
Step 1: Define Roles and DAX Rules in Power BI Desktop
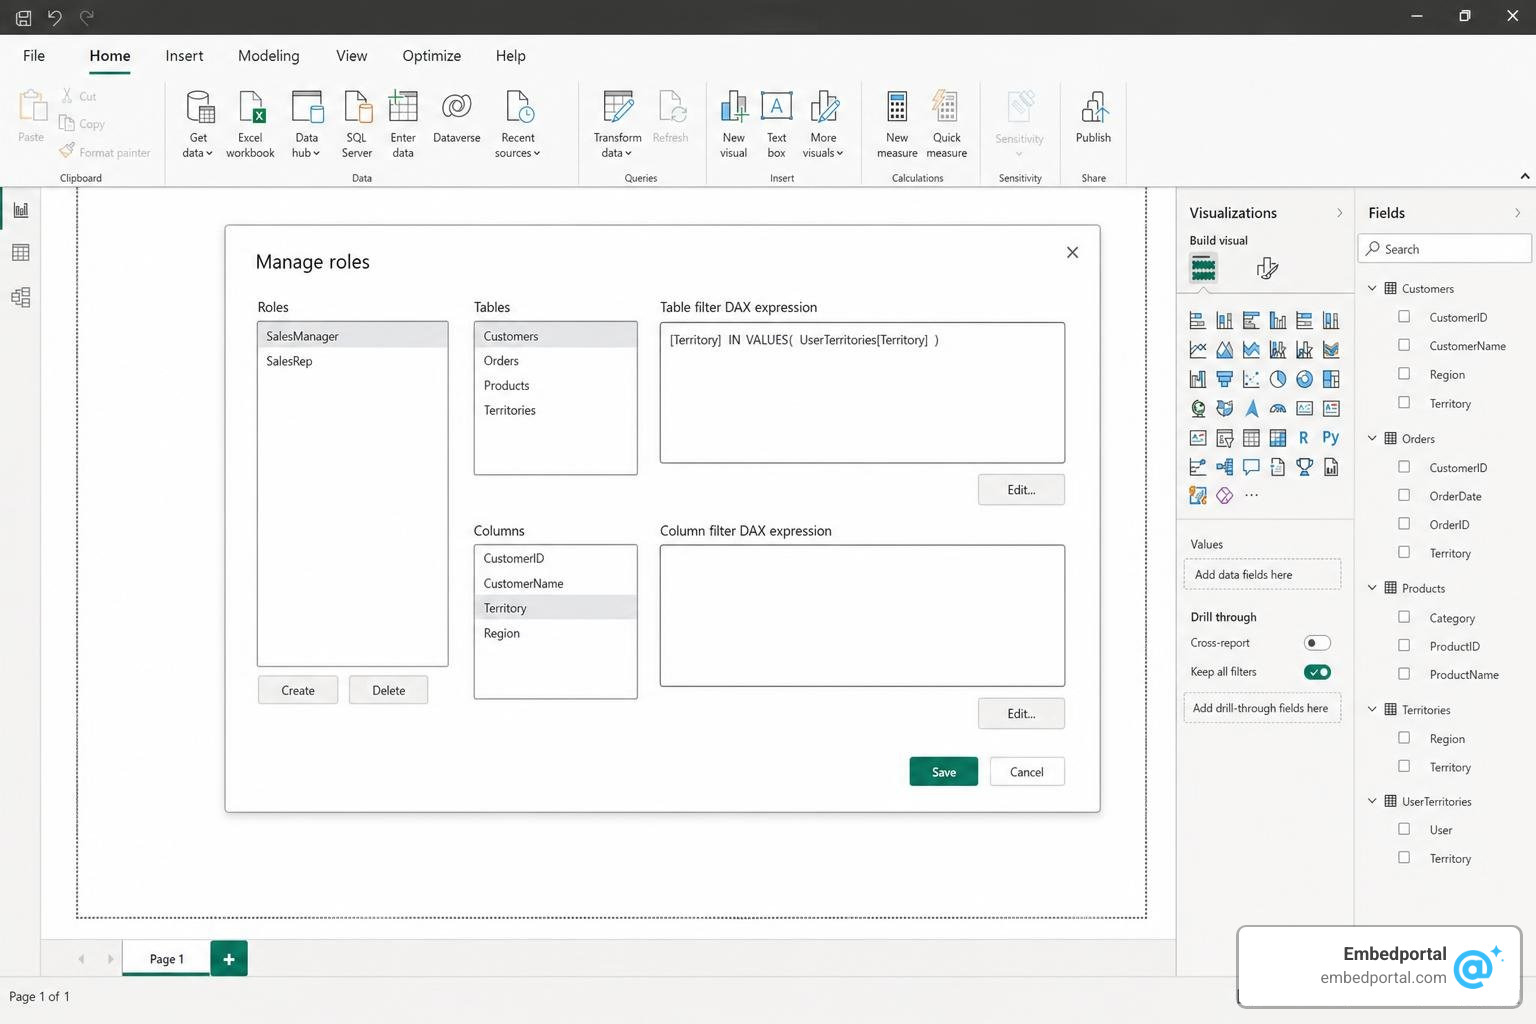
To start, open your report in Power BI Desktop. Navigate to the Modeling tab in the top ribbon and select Manage roles. This opens a dialog box where you can create and manage your security roles.
- Click Create to add a new security role. Give it a descriptive name, such as “Sales Representative” or “Regional Manager”.
- In the Tables list, select the table you want to filter. This is typically a dimension table, such as “Customers”, “Geography”, or a custom “UserSecurity” table.
- In the Table filter DAX expression box, enter your filter rule. For a static rule, you might write: [Region] = “West”.
- For a dynamic rule, you will want to match the logged-in user’s email with a column in your security table. Enter: [Email] = USERPRINCIPALNAME().
- Click Save to store your roles.
To ensure your DAX filter expressions are optimized and do not cause performance bottlenecks, follow the training guidelines on how to Restrict access to Power BI model data – Training | Microsoft Learn.
Step 2: Publish and Assign Members in the Power BI Service
Once your roles are defined and saved in Power BI Desktop, publish the report to your target workspace in the Power BI service. After publishing, the roles must be mapped to actual users or security groups.
- In the Power BI Service, navigate to the workspace where you published the report.
- Locate the semantic model associated with your report. Click the three dots (More options) next to the semantic model name and select Security.
- You will see a list of the roles you created in Power BI Desktop. Select a role to manage its membership.
- In the member assignment box, enter the email addresses of the users, or search for Microsoft Entra ID (formerly Azure Active Directory) security groups, distribution groups, or mail-enabled groups.
- Click Add, and then click Save to apply the membership.
Microsoft 365 groups are not supported for RLS role membership. We must use Entra ID security groups or mail-enabled security groups to manage access at scale. If you are sharing reports with external partners, you can learn more about configuring guest permissions in our guide to Power BI Guest Access.
Implementing Power BI App Row Level Security for External B2B Guests
Sharing reports with external Business-to-Business (B2B) guest users introduces unique identity resolution challenges. When an external guest user accesses your Power BI tenant, their identity must be correctly mapped by RLS.
When using dynamic RLS, the USERPRINCIPALNAME() function behaves differently depending on how the guest user is authenticated. For native users, it returns their standard email address. For B2B guest users, it may return a reformed User Principal Name containing “ext” and your tenant’s domain (e.g., john_externaldomain.com#EXT#@yourtenant.onmicrosoft.com).
To handle this seamlessly, we recommend storing the guest user’s actual external email address in your security mapping table. Then, use a diagnostic card visual in a test report to display the exact output of USERPRINCIPALNAME() when a guest user is signed in. This allows you to align your mapping table format with the value Power BI actually resolves.
Additionally, when assigning B2B guests to roles in the Power BI Service, it is often more reliable to add them individually by their guest email addresses rather than nesting them deep inside local security groups, which can sometimes fail to resolve across tenant boundaries. For more information on managing external collaborations, read our guide on Power BI External Users.
RLS in Embedded Analytics and Power Apps Integration
In modern application development, we rarely expect users to navigate directly to the Power BI Service. Instead, we embed reports directly into custom portals, SaaS applications, or model-driven Power Apps.
When embedding, we must choose between two primary architectures: “user owns data” (where each viewer signs in with their own Power BI license) and “app owns data” (where a single master account or service principal authenticates, and the application serves the reports to unlicensed end-users). To understand the cost and architectural differences between these approaches, read our breakdown of App Owns Data vs User Owns Data.
For developer-focused documentation on standard cloud-based RLS with embedding, see Using standard cloud based row-level security with embedded content in Power BI embedded analytics – Power BI | Microsoft Learn.
How RLS Works in “App Owns Data” Embedding
In an “app owns data” scenario, the end-users viewing your application do not have individual Power BI licenses or Entra ID accounts in your tenant. Instead, your application uses a Service Principal to authenticate with Power BI and generate an embed token.
Because Power BI has no knowledge of who your application’s end-user is, we cannot rely on standard USERPRINCIPALNAME() resolution. Instead, we must pass the user’s identity dynamically when generating the embed token via the Power BI REST API.
We do this by defining an EffectiveIdentity object in our API call. This object contains:
- The username (which can be any string, such as a user ID, email, or region name).
- The roles we want to apply.
- The dataset ID.
Inside our Power BI semantic model, we write our dynamic DAX filters using the USERNAME() function. When the report renders, USERNAME() resolves to whatever string we passed as the username in our EffectiveIdentity object. We can also use the CUSTOMDATA() DAX function to pass complex, delimited strings (like “Department=Sales;Region=West”) which our DAX rules can parse for advanced multi-tenant filtering.
To learn more about the mechanics of token generation, visit our guide on Power BI Embedding. If you are planning a deployment and need to calculate capacity costs, check out our analysis of Power BI Embedded Pricing.
Integrating RLS with Embedded Power Apps Visuals
A powerful pattern in enterprise reporting is embedding a Power Apps visual directly inside a Power BI report. This allows users to not only view data but also write back to a database, update records, or trigger workflows (such as adding a comment to a shared Excel file or SQL database) without leaving the dashboard.
However, a common security trap occurs when RLS filters the Power BI report, but the embedded Power App still displays all records. This happens because the Power App connects directly to its own data source (like Dataverse or SQL Server) and bypasses the Power BI semantic model’s RLS rules.
To ensure consistent security across both the report and the embedded app:
- Pass the filtered user identifier (such as their email address) from the Power BI dataset as a source field to the Power App visual.
- Inside the Power App, write matching filter logic on your galleries and forms to restrict data visibility to the passed-in email.
- Build the Power App directly from inside the Power BI report interface rather than importing an existing standalone app. This establishes a stronger metadata binding between the Power BI data integration context and the Power App.
For a detailed walkthrough of this integration pattern, read Power BI embed in Power Apps: row-level security that works | SC.
Validating and Troubleshooting Power BI RLS
Before launching your reports to production, you must validate that your RLS rules are working exactly as intended. A single misconfigured relationship or a faulty DAX expression can result in either empty reports or, worse, unauthorized data exposure.
Fortunately, both Power BI Desktop and the Power BI Service provide robust tools to simulate user identities and audit query performance. For a deep dive into advanced testing workflows, see Row Level Security Power BI 2.
Common RLS Failure Modes and How to Fix Them
During validation, you are likely to encounter a few standard failure modes. Understanding how to diagnose them will save you hours of debugging.
- The “No Data Available” Visual Error: This usually happens when a dynamic DAX filter references a column or table that does not exist in the published model, or when there is a mismatch in the email format. If your security mapping table stores lowercase emails (e.g., john@domain.com) but Entra ID returns mixed-case emails (e.g., John@Domain.com), the exact string match might fail. Always use a diagnostic measure to display USERPRINCIPALNAME() on a card visual to verify the exact format Power BI is receiving.
- SSO and DirectQuery Failures: The “Test as role” feature in the Power BI service does not work for DirectQuery semantic models that have Single Sign-On (SSO) enabled. In this scenario, Power BI passes the test user’s credentials directly to the source database (like Snowflake or Azure SQL), which requires the database itself to enforce security. To test this, you must log in to the Power BI Service using a real, non-admin test account.
- Bi-directional Filtering Issues: By default, security filters only propagate in one direction (from the one-side of a relationship to the many-side). If your security mapping table is on the many-side of a relationship, the filter will not propagate to your fact table unless you check the box to “Apply security filter in both directions” in your relationship settings. However, be cautious: bi-directional security filtering can cause performance issues and unexpected circular paths.
To measure the exact performance impact of your RLS rules on query load times, use the Performance Analyzer tool in Power BI Desktop to run side-by-side tests with and without RLS enabled. For optimization tips, read our guide on Power BI Performance Optimization.
Frequently Asked Questions about Power BI App Security
Can I use RLS to restrict access to specific columns or measures?
No, row-level security is strictly designed to filter rows of data. If a user has access to a row, they can see every column and measure associated with that row. If you need to restrict access to sensitive columns (such as salaries or social security numbers) while keeping the rest of the row visible, you must use Object-Level Security (OLS) or split your data into separate semantic models. Learn more about structural security in our guide on Row Level Security.
Does RLS apply to workspace Admins, Members, or Contributors?
No. RLS is only enforced for users who have read-only (Viewer) access to the workspace or who consume the report through a published Power BI App. Anyone with Admin, Member, or Contributor roles has edit permissions on the underlying semantic model and will bypass all RLS rules, seeing the entire dataset.
Can I assign Microsoft 365 groups directly to RLS roles?
No, Microsoft 365 groups are not supported for RLS role membership in the Power BI Service. To manage role assignments at scale, you must use Microsoft Entra ID security groups, mail-enabled security groups, or distribution lists.
Conclusion
Implementing power bi app row level security is the most effective way to ensure your users only see the data they are authorized to access. Whether you rely on static roles for simple regional teams or leverage dynamic USERPRINCIPALNAME() mapping tables for complex, multi-tenant enterprise applications, getting the configuration right prevents data leaks and simplifies report management.
However, setting up and maintaining RLS across multiple environments, workspaces, and applications can quickly become complicated. If you are building customer-facing portals and want to bypass the complexity of managing nested workspaces, guest user invites, and custom API token generation, we can help.
Embedportal is a SaaS company based in California, USA, that provides a white-label embedding platform for BI dashboards. Our platform enables teams to embed multi-vendor analytics (including Tableau, Power BI, QuickSight, and Metabase) with unified branding, centralized row-level security, and single sign-on (SSO) in under an hour.
Instead of wrestling with custom code and complex cloud permissions, you can manage all your data security from a single, intuitive interface. Ready to simplify your analytical security? Secure your embedded analytics with Embedportal today.