The Ultimate Guide to RLS Power BI Setup
Why RLS Power BI Security Is Essential for Modern Analytics Teams
RLS in Power BI (Row-Level Security) is a built-in feature that controls which rows of data each user can see in a report — without building separate reports for every person or team.
Here’s a quick summary of how it works:
- What it is: A security layer applied to your Power BI data model using DAX filter expressions
- What it does: Restricts data at the row level so each user only sees the data they’re allowed to see
- How it’s applied: You define roles in Power BI Desktop, publish to the Power BI Service, then assign users or security groups to those roles
- Two main types: Static RLS (hard-coded filters per role) and Dynamic RLS (filters based on the logged-in user’s identity)
- Key limitation: RLS only applies to users with Viewer permissions — workspace Admins, Members, and Contributors bypass it entirely
If you manage a SaaS product or a multi-user analytics environment, you’ve probably felt this pain: one report, dozens of customers, and every single one of them should only see their data.
That’s exactly the problem RLS Power BI solves — and it does it at the data model level. That means every report built on a secured dataset inherits the same rules automatically. No duplicate reports. No manual filtering hacks.
But RLS has real complexity under the hood. Getting it wrong means users either see too much data or nothing at all. And when you layer in embedded analytics, guest users, or multi-vendor dashboards, the configuration gaps add up fast.
This guide covers everything — from basic setup to enterprise-grade dynamic RLS, testing strategies, and the edge cases that trip up even experienced teams.
Handy rls power bi terms:
What is RLS Power BI and How Does It Work?
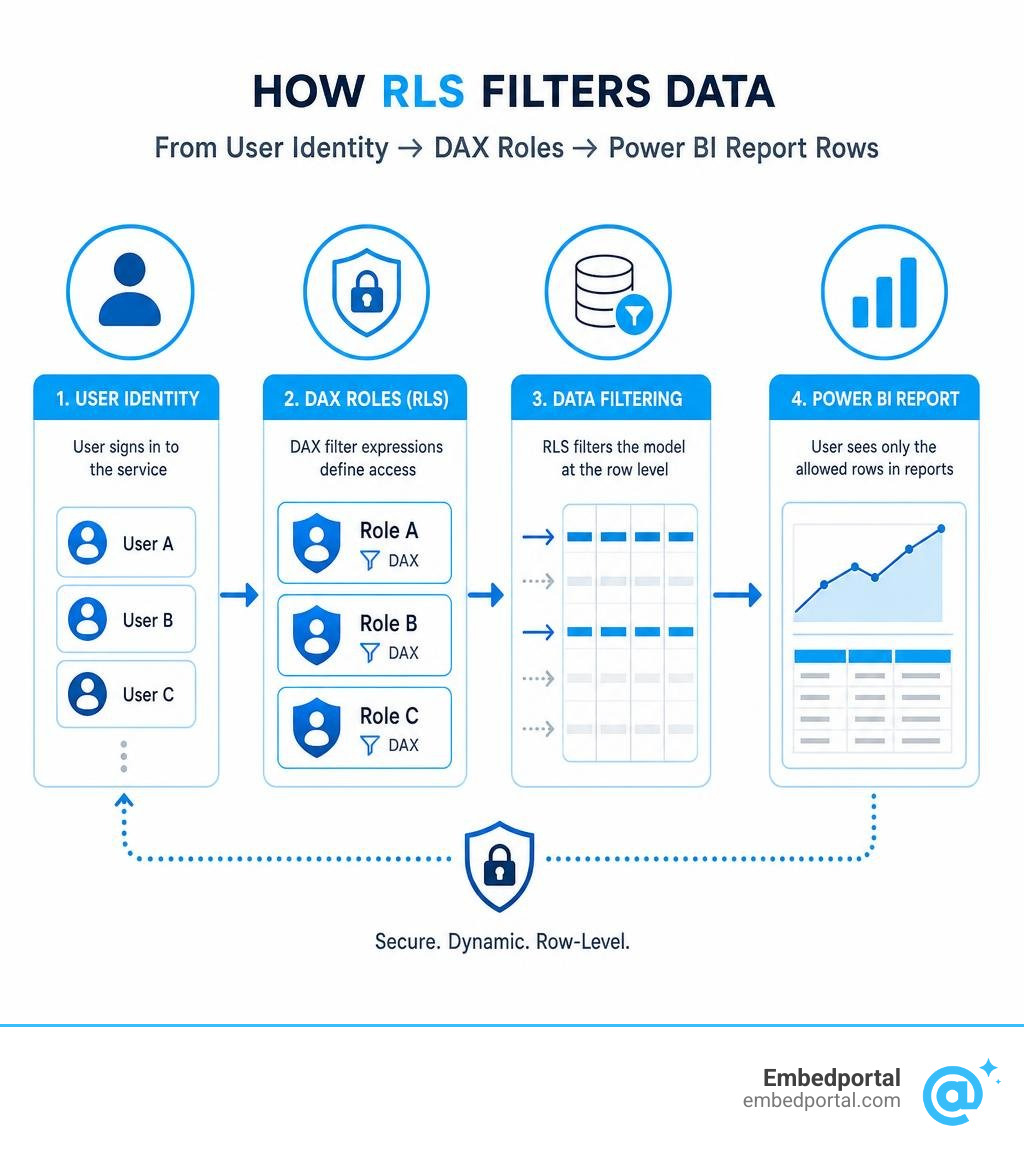
To understand how rls power bi operates, we have to look at how Power BI queries and filters data. At its core, Row-Level Security works by injecting a filter directly into the DAX query context before any visuals are rendered.
When a user opens a report, Power BI identifies who they are and checks if they are mapped to any security roles. If they are, Power BI applies the DAX filter expression defined for that role to the specified tables. This evaluation happens in row context, meaning the DAX expression is evaluated for each row of the table. If the expression returns TRUE, the row remains visible; if it returns FALSE, the row is silently filtered out.
This security model is highly robust. Because it is applied at the semantic model level, it is impossible for users to bypass it using slicers, filters, or even drill-downs. It supports:
- Import models: The security rules are applied to the in-memory data cached in the Power BI Service.
- DirectQuery models: The security filters are translated directly into the WHERE clauses of the SQL queries sent to the underlying database.
To explore the basic concepts further, you can read our detailed guide on Row Level Security in Power BI.
Static vs. Dynamic RLS Architectures
When planning your security architecture, you must choose between static and dynamic RLS. The choice depends entirely on the size of your user base and how frequently your access rules change.
Static RLS relies on hard-coded values inside the roles you define in Power BI Desktop. For example, you might create a role named US_East and write a filter like: [Region] = “East”. You then manually assign users to this role in the Power BI Service. While simple to set up, static RLS becomes a maintenance nightmare if you have hundreds of regions, departments, or clients.
Dynamic RLS, on the other hand, uses environmental DAX functions like USERPRINCIPALNAME() or USERNAME() to filter data dynamically. Instead of creating a role for every single region, you create a single role (e.g., UserAccess) and map it to a security table containing user emails and their permitted attributes. Power BI resolves the logged-in user’s identity at runtime, looks up their permissions in your mapping table, and filters the data accordingly.
Here is a quick comparison of the two approaches:
| Feature | Static RLS | Dynamic RLS |
|---|---|---|
| Role Maintenance | High (Requires creating and managing multiple roles in Desktop) | Low (Single role handles all users dynamically) |
| Data Model Changes | High (Republishing required when new regions/groups are added) | Low (Data-driven; updates automatically via database/ETL updates) |
| DAX Complexity | Low (Simple hardcoded equality filters) | Medium to High (Requires relationships, lookups, or user-mapping tables) |
| Best For | Small organizations with few segments (e.g., East, West, Central) | Large enterprises, multi-tenant SaaS, or rapidly changing user permissions |
| Dynamic Functions Used | None | USERPRINCIPALNAME(), USERNAME(), CUSTOMDATA() |
Configuring Row-Level Security in Power BI Desktop
Configuring rls power bi begins in Power BI Desktop. The process requires a clean data model built on solid star schema principles.
In a star schema, you separate your data into dimension tables (descriptive attributes like Geography, Products, or Customers) and fact tables (numerical metrics like Sales or Orders). For the most efficient and performant RLS, you should always apply your security filters to dimension tables rather than large fact tables. Because of relationship propagation, when a dimension table is filtered, those filters naturally cascade down to your fact tables through active, one-to-many relationships.
To ensure your model is optimized for these filters, review the official Row-level security (RLS) guidance in Power BI Desktop.
Step-by-Step Static RLS Power BI Configuration
Let’s walk through setting up a static RLS role in Power BI Desktop:
- Open your report in Power BI Desktop and navigate to the Modeling tab in the ribbon.
- Click on Manage roles. This opens the role configuration dialog.
- Click New to create a new security role. Give it a descriptive, clear name (e.g., RegionalWestSales).
- Select the table you want to filter from the Tables list (usually a dimension table like Geography or Store).
- In the Table filter DAX expression editor, write your rule. For example:
[Region] = "West". - Click Save to apply the role settings.
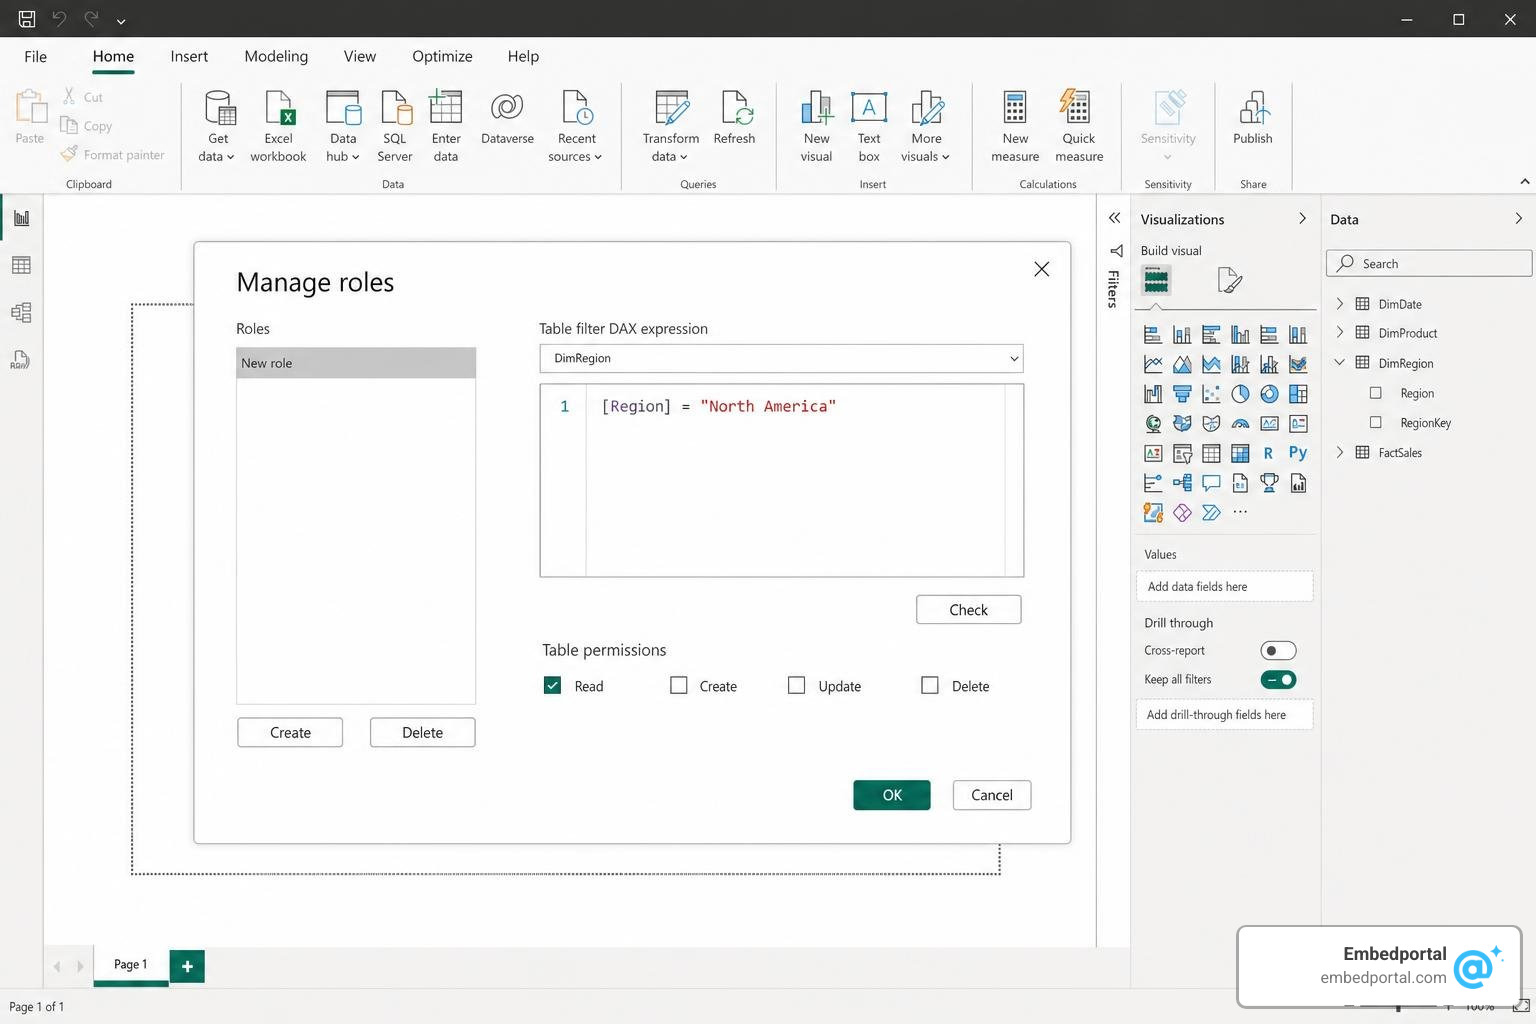
Once saved, you should immediately test the role locally. Click View as in the Modeling tab, check the box next to your newly created role, and click OK. The report visuals will instantly update to show only the data permitted by that role.
Implementing Dynamic RLS with User Mapping Tables
For larger deployments, you will want to implement dynamic RLS. This requires adding a user-mapping security table to your data model.
Let’s say we have a mapping table named UserRegionSecurity with two columns: UserEmail and RegionCode. This table acts as a bridge between the logged-in user and the dimension table.
- Import your UserRegionSecurity table into your model.
- Establish a relationship between UserRegionSecurity[RegionCode] and your Geography[RegionCode] table. Ensure the relationship is configured correctly. In many-to-many or complex scenarios, you may need to enable bidirectional filtering, though single-direction is preferred for performance.
- Open Manage roles in the Modeling tab and create a single role named DynamicUserAccess.
- Select your UserRegionSecurity table and write the following DAX expression:
[UserEmail] = USERPRINCIPALNAME(). - Save the role.
At runtime, USERPRINCIPALNAME() returns the email address of the logged-in user (e.g., john.doe@company.com). Power BI filters the UserRegionSecurity table to only show rows matching that email, and that filter propagates to the Geography table, securing the entire report.
For a deeper dive into structuring these security tables, check out our guide on Power BI Row Level Security.
Managing and Assigning Roles in the Power BI Service
After defining your roles in Power BI Desktop, you must publish the report to the Power BI Service to manage role memberships.
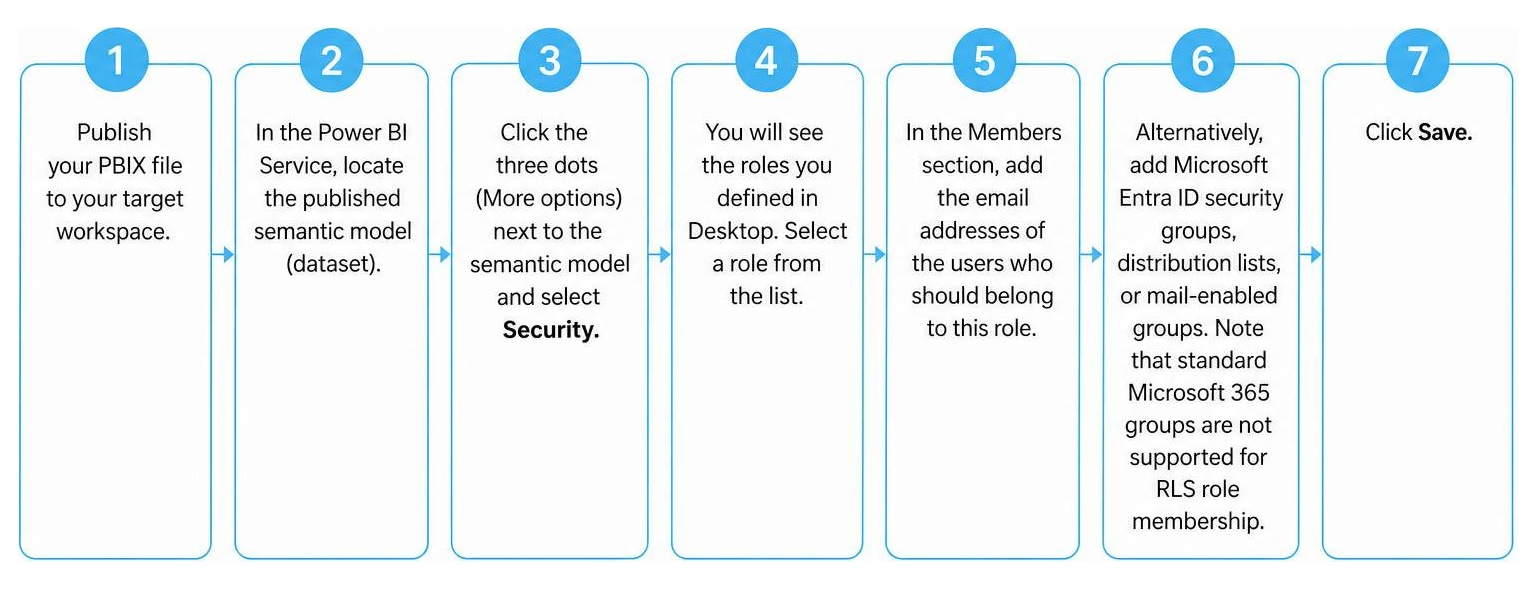
- Publish your PBIX file to your target workspace.
- In the Power BI Service, locate the published semantic model (dataset).
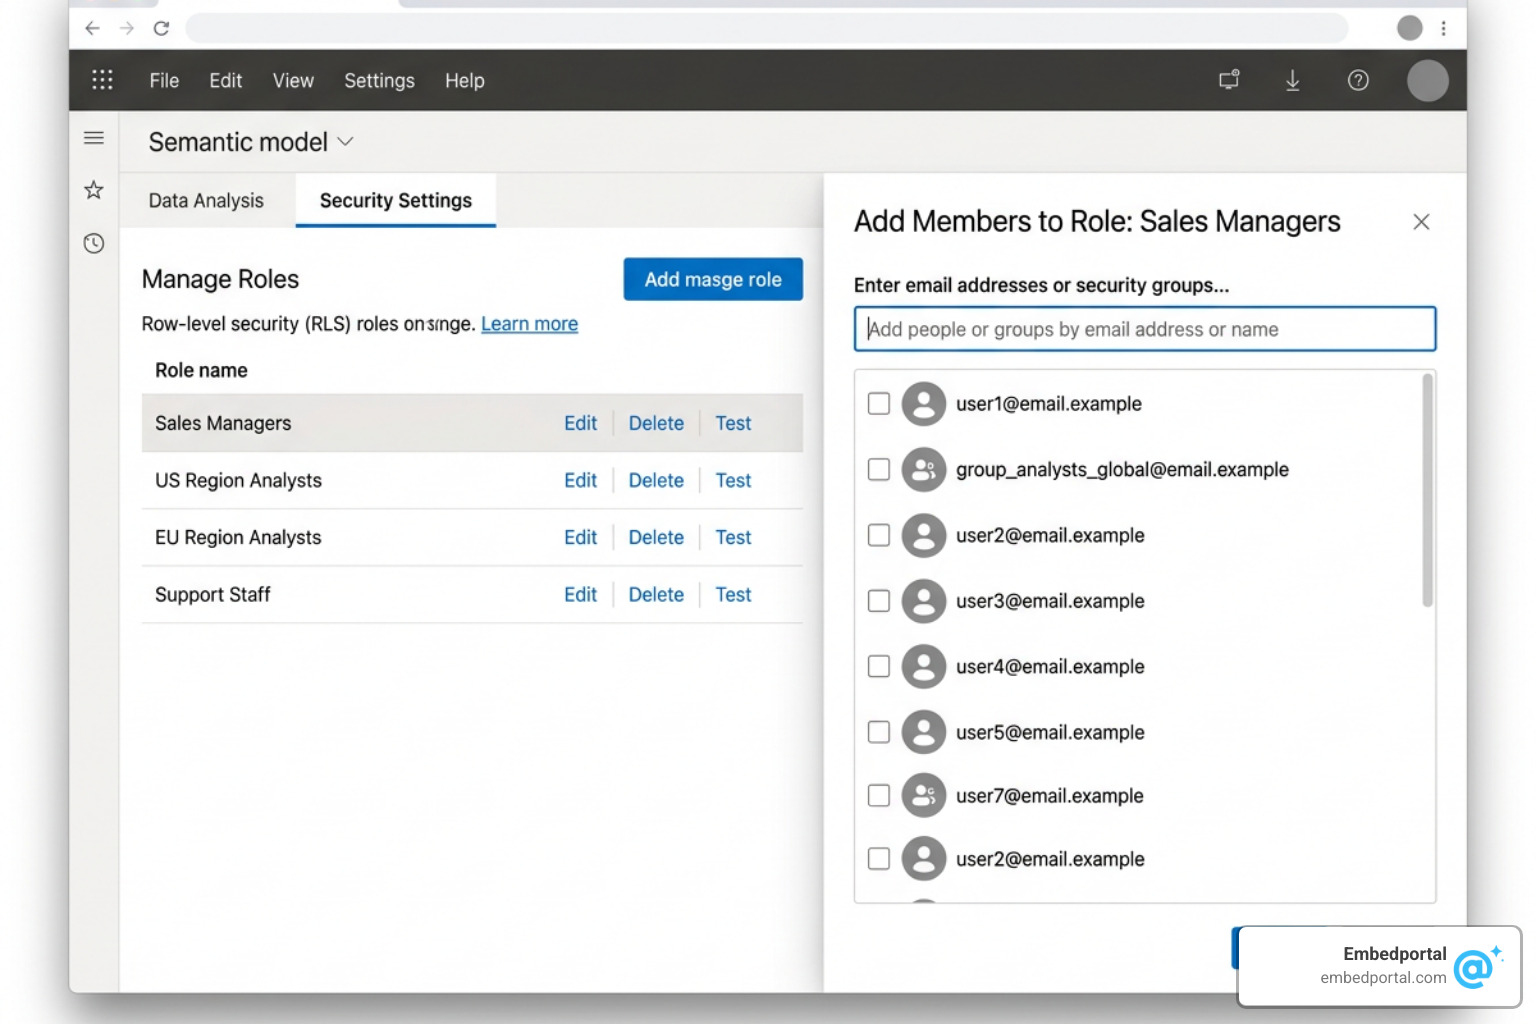
- Click the three dots (More options) next to the semantic model and select Security.
- You will see the roles you defined in Desktop. Select a role from the list.
- In the Members section, add the email addresses of the users who should belong to this role.
- Alternatively, add Microsoft Entra ID security groups, distribution lists, or mail-enabled groups. Standard Microsoft 365 groups are not supported for RLS role membership.
- Click Save.
Workspace Permissions and RLS Enforcement
A common point of confusion is why RLS sometimes fails to apply to certain users. RLS is only enforced for users with Viewer permissions on the workspace or report.
If a user is assigned the role of Admin, Member, or Contributor within the workspace, they have write/edit permissions on the semantic model. Because they can edit the model, Power BI bypasses RLS entirely, allowing them to see all data. To enforce RLS, you must ensure that end-users are either:
- Added strictly as Viewers in the workspace.
- Given access to the report by sharing it directly or publishing it via a Power BI App, without granting workspace access.
Handling External B2B Guest Users
Enforcing RLS on external Business-to-Business (B2B) guest users requires special attention to User Principal Names (UPNs).
When an external guest user accesses your Power BI tenant, their UPN is resolved differently than your internal users. For example, if john@externalpartner.com is invited as a guest, their resolved UPN in your tenant might look like: john_externalpartner.com#EXT#@yourtenant.onmicrosoft.com.
If you are using dynamic RLS, your mapping table must store the exact UPN format that your tenant resolves, rather than their native email address. To troubleshoot this, we recommend creating a simple card visual in a test report containing a measure that returns USERPRINCIPALNAME(). Have a guest user log in and view the card to verify the exact string format you need to populate in your security tables.
Testing, Validation, and Troubleshooting Strategies
Before rolling out your secured reports to production, you must thoroughly test your RLS configuration.
Testing and Validating Your RLS Power BI Setup
To test your security roles in the Power BI Service:
- Go to your semantic model’s Security settings.
- Click the three dots next to the role you want to test and select Test as role.
- This opens the report in a validation view. You can select different reports from the top dropdown to see how the security filters apply across different layouts.
- To test dynamic RLS for a specific user, click Viewing as: [Role Name], enter the user’s specific email address, and click Apply.
For advanced enterprise testing, you can write DAX queries using tools like Tabular Editor or DAX Studio to impersonate users and verify that the returned rows match your security expectations. This is especially helpful in embedded scenarios. Learn more about testing setups in our guide on Embedded Analytics in Power BI.
Enterprise Best Practices and Performance Optimization
Implementing RLS can impact query performance if the data model is not optimized. To keep your reports running fast, follow these RLS Best Practices:
- Apply filters to dimensions: Keep your RLS filters on small dimension tables. Let relationship propagation filter the large fact tables.
- Avoid complex DAX in roles: Keep your DAX expressions as simple as possible. Avoid heavy lookups or calculated columns within your security filters.
- Minimize bidirectional filters: Bidirectional relationships with security filtering enabled on both sides can drastically slow down queries. Use them sparingly and only when necessary.
- Use Performance Analyzer: Use Power BI Desktop’s built-in Performance Analyzer to measure query execution times with and without RLS roles active.
Common Pitfalls and Troubleshooting
Keep these common limitations and pitfalls in mind:
- Service Principals: Service principals cannot be added to RLS roles. If your application embeds Power BI content using a service principal, RLS is not applied automatically. Instead, you must generate an embed token and pass an effective identity string via the REST API.
- DirectQuery SSO: If you use DirectQuery with Single Sign-On (SSO) enabled, the source database itself might enforce security roles. In this case, Power BI’s internal RLS is bypassed in favor of database-level security.
- Test as Role Limitations: The “Test as role” feature does not work for DirectQuery semantic models utilizing single sign-on (SSO) or for paginated reports.
To understand how to handle these embedding and security challenges, refer to the official documentation on Using standard cloud based row-level security with embedded content in Power BI embedded analytics.
Frequently Asked Questions About Power BI RLS
Can I use RLS to restrict access to specific columns or measures?
No. RLS is strictly designed to filter rows of data. If a user has access to a row, they can see all columns and measures for that row. To restrict access to specific columns or tables, you must use Object-Level Security (OLS), which is managed via external tools like Tabular Editor.
Does RLS apply to workspace Admins, Members, or Contributors?
No. RLS is only enforced for users with Viewer permissions. Anyone with Admin, Member, or Contributor access to a workspace can view all data and edit the security rules themselves.
Why does my visual fail when RLS is applied to a user?
This usually happens when a visual relies on a calculated table or a complex relationship that has been broken by the RLS filter. It can also occur if the user does not have read permissions on a related dimension table that propagates filters to the visual’s data source.
Conclusion
Setting up rls power bi is a powerful way to secure your data at the source. Whether you use simple static roles or design a robust dynamic user-mapping system, RLS ensures that your sensitive data remains in the right hands.
However, managing RLS, workspace permissions, and SSO across multiple enterprise customers can quickly become overwhelming — especially if your team also uses other BI tools like Tableau or QuickSight.
That is where we can help. Embedportal is a white-label embedding platform that allows you to embed multi-vendor analytics with unified branding, centralized row-level security, and seamless SSO in under an hour. Instead of wrestling with complex tenant configurations and guest access, you can manage all your data security from a single, centralized dashboard.
Ready to simplify your analytics security? Explore our Embedportal Row-Level Security Solutions and schedule a demo today.