The No-Nonsense Guide to Power BI Row Level Security
Why Power BI Desktop Row Level Security Is Essential for Secure Data Sharing
Power BI Desktop row level security (RLS) is the built-in mechanism that controls which rows of data each user can see in a shared report — without needing separate reports for every audience.
Here’s the quick version of how it works:
- Define roles in Power BI Desktop using DAX filter expressions (e.g.,
[Region] = "West"or[Email] = USERPRINCIPALNAME()) - Publish the report to the Power BI service
- Assign users or security groups to roles in the semantic model’s Security settings
- RLS is enforced automatically — users only see rows their role allows
Key fact: RLS only applies to users with Viewer permissions in a workspace. Users with Admin, Member, or Contributor access bypass RLS entirely.
If you’re building embedded dashboards for multiple customers or departments, RLS is not optional — it’s the difference between a secure product and a data breach waiting to happen.
The challenge most analytics and product teams run into isn’t understanding what RLS is. It’s the fragmented implementation: roles defined in Desktop, memberships managed in the service, workspace permissions that silently override everything, and B2B guest users who see nothing at all. One team consolidated 19 separate lab reports into a single secured report using RLS — but only after navigating all of those pitfalls first.
This guide walks you through the entire process, from creating your first role in Power BI Desktop to advanced patterns like dynamic RLS, Object-Level Security, and Microsoft Fabric’s OneLake security.
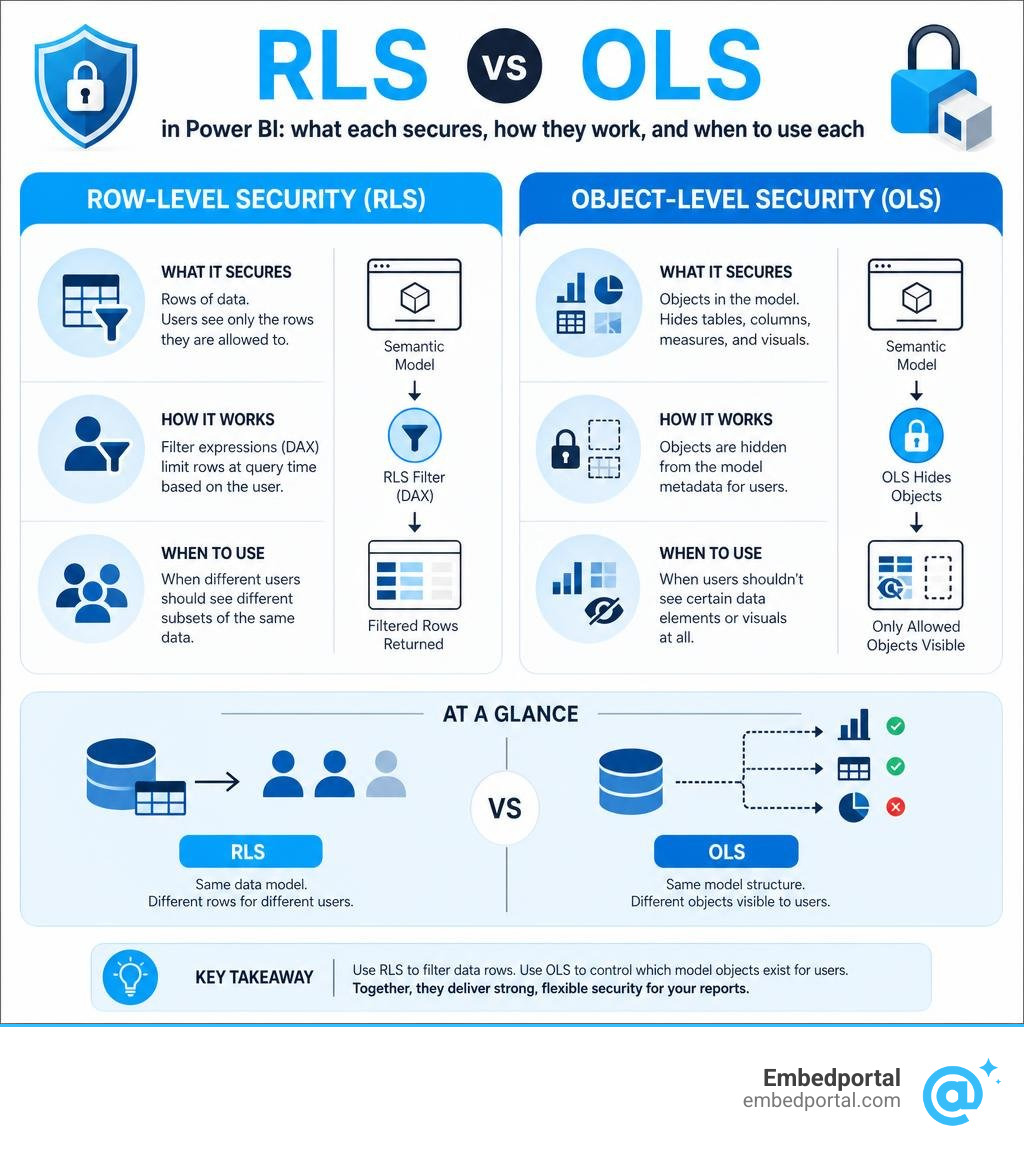
Power bi desktop row level security word roundup:
Understanding Row-Level Security: Static vs. Dynamic Architectures
To build a reliable data security strategy, we must first understand how Power BI processes row-level filtering. At its core, RLS operates directly within the semantic model. When a user queries a report, Power BI injects a DAX filter into the query evaluation process. This filter acts as a silent, un-bypassable WHERE clause that restricts data access at the storage engine level.
This means that even if a user tries to export data, use smart narratives, or drill down into details, they can never access rows of data that their assigned role restricts. However, how we choose to define these filters determines how scalable our model will be.
| Feature | Static RLS | Dynamic RLS |
|---|---|---|
| Filter Definition | Hardcoded values in DAX (e.g., [Region] = "East") |
Environmental DAX functions (e.g., [Email] = USERPRINCIPALNAME()) |
| Maintenance Overhead | High (requires updating/republishing for new roles) | Low (data-driven; updates automatically via mapping tables) |
| Scalability | Poor (ideal for few, stable categories) | Excellent (scales to thousands of unique users effortlessly) |
| User Mapping | Manual assignment in Power BI Service | Automatic matching based on user login identity |
| Best Use Case | Small organizations with static regional managers | Multi-tenant SaaS apps, enterprise sales, complex HR portals |
What is Power BI Desktop Row Level Security?
When we talk about power bi desktop row level security, we are referring to the creation of roles and rules within the desktop authoring environment. By default, a data model has no roles. This means that anyone with read access to the model can see every single row of data.
By defining roles, you create logical security boundaries. A role consists of a name and one or more DAX rules applied to specific tables. When a user is assigned to a role, Power BI evaluates the DAX rule in a row context. If the expression evaluates to TRUE for a given row, that row is visible; if it evaluates to FALSE, the row is hidden.
To learn more about the fundamentals of setting up these boundaries, you can explore the Microsoft training on how to Restrict access to Power BI model data – Training | Microsoft Learn or read our detailed overview of Row Level Security.
Static RLS vs. Dynamic RLS
Static RLS is the simplest way to get started. In a static configuration, you hardcode values directly into your DAX filter expressions. For example, if you have three sales regions (East, West, and Central), you would manually create three separate roles in Power BI Desktop: “RegionEast”, “RegionWest”, and “RegionCentral”. Within the “RegionEast” role, you would apply a filter to your Territory table like [Region] = "East".
While static RLS is straightforward, it quickly becomes a maintenance nightmare in enterprise deployments. If your company expands into ten new regions, you must open Power BI Desktop, manually add ten new roles, save, republish, and re-assign users in the cloud.
Dynamic RLS solves this by turning security into a data-driven process. Instead of hardcoding values, you write a single DAX rule that references environmental functions. This approach relies on a user-mapping table (often called a security table or bridge table) within your data model. This table maps each user’s login email to their authorized data attributes.
By utilizing dynamic security, you only need to build and maintain a single role. When a new employee joins or changes territories, you simply update the mapping table in your source database. The next time the semantic model refreshes, the security rules update automatically without any manual report modifications. For a deeper dive into choosing between these architectures, see our guide on Row Level Security Power BI.
Implementing Power BI Desktop Row Level Security Step-by-Step
Let’s walk through the actual mouse clicks required to implement RLS inside Power BI Desktop.
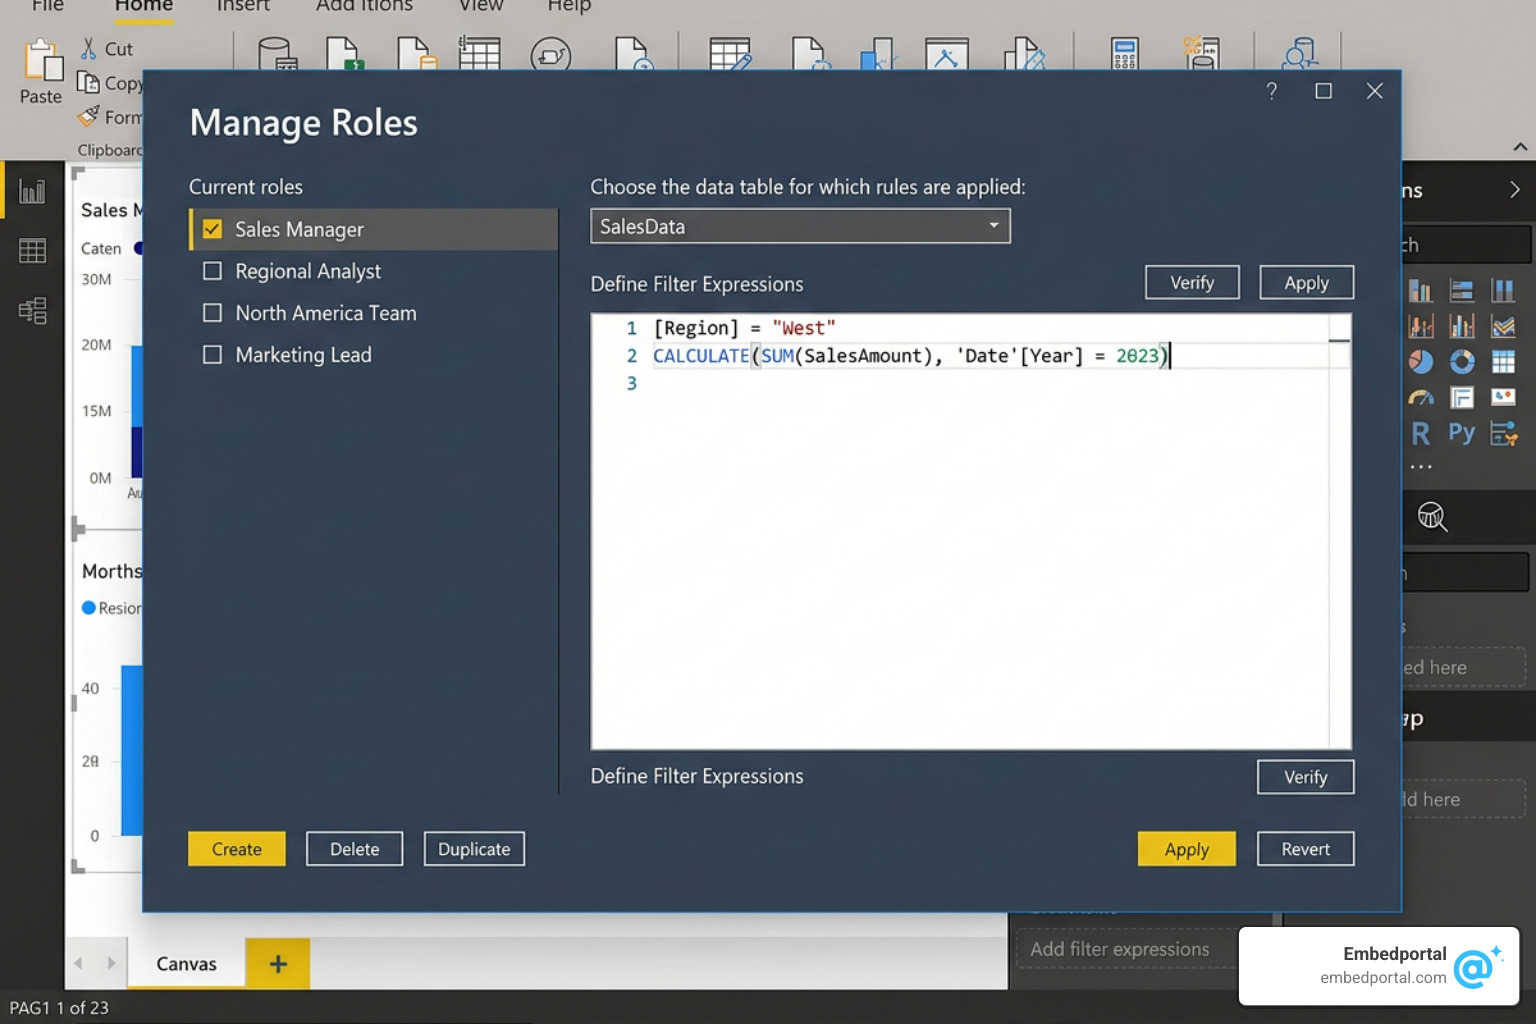
To begin setting up your security roles:
- Open your report in Power BI Desktop.
- Navigate to the Modeling tab in the top ribbon.
- Click on Manage Roles.
- In the dialog box that appears, click New to create a role.
- Give your role a clear, descriptive name (e.g.,
User_Dynamic_Access). - Select the table you want to filter from the Tables list.
- Click the Add filter button or write your DAX expression directly in the expression editor.
- Click Save.
Creating Roles and Defining DAX Filter Expressions
Writing the right DAX filter expression is the heart of RLS. Let’s look at the most common patterns.
For static RLS, the expression is a straightforward equality check:
[Region] = "West"
For dynamic RLS, we rely on identity functions. Power BI provides two primary functions for retrieving the current user’s identity: USERNAME() and USERPRINCIPALNAME().
USERNAME()returns the user’s domain and username in a local Active Directory format (e.g.,DOMAIN\username) when running in Power BI Desktop, but returns the user’s User Principal Name (UPN) (e.g.,user@company.com) once published to the cloud.USERPRINCIPALNAME()consistently returns the user’s UPN (e.g.,user@company.com) in both Desktop and the cloud. Because of this consistency, we highly recommend usingUSERPRINCIPALNAME()to avoid discrepancies between your local tests and production behavior.
To set up dynamic RLS, you will typically have an AppUser or Employee table that contains a column with user emails. Your DAX filter expression on that table would look like this:
[Email] = USERPRINCIPALNAME()
If your security structure is more complex — such as a user having access to multiple regions through a many-to-many relationship — you can use a lookup pattern. For example, if you are integrating with an on-premises Analysis Services model, you might use a pattern like:
[TerritoryID] = LOOKUPVALUE(DimUserSecurity[SalesTerritoryID], DimUserSecurity[UserName], USERNAME())
You can study this specific pattern in detail by reviewing the Microsoft tutorial on how to Dynamic row-level security with Analysis services tabular model – Power BI | Microsoft Learn or reading our breakdown on Row Level Security Power BI 2.
Pro Tip: If you want to create an “unfiltered” or “admin” role that can see everything, you can define a role and leave the DAX expression blank, or explicitly write a true filter like
1 = 1orTRUE().
Designing Data Models for Performant RLS
A common mistake is applying RLS filters directly to massive fact tables. Doing this can severely degrade report performance because Power BI must evaluate the DAX expression for every single row in that giant table.
Instead, always design your data model using a clean star schema. Place your RLS filters on your smaller dimension tables (like Customers, Employees, or Regions) rather than your fact tables (like Sales or Transactions).
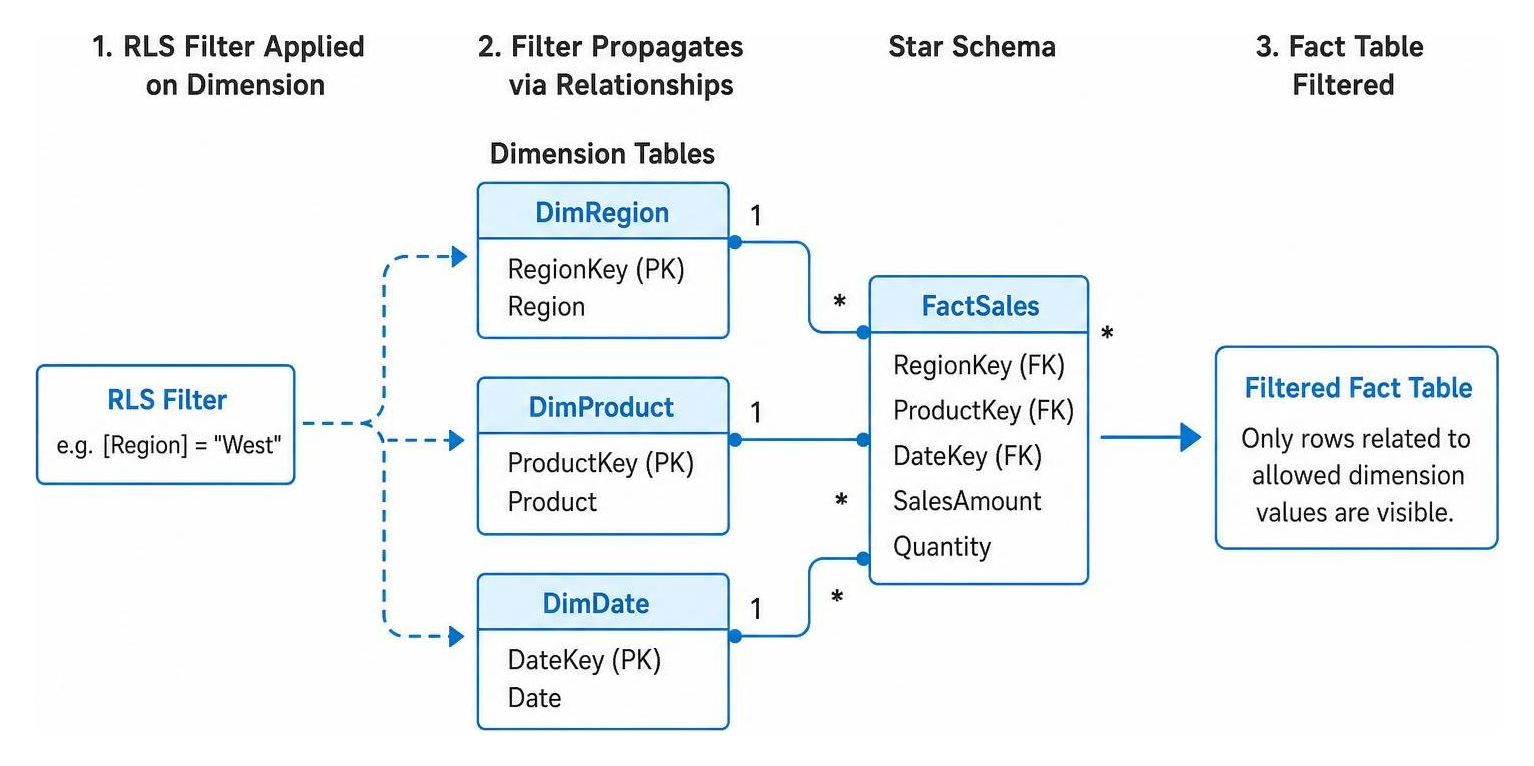
When you apply a filter to a dimension table, Power BI’s active relationships automatically propagate that filter down to the related fact tables. For this to work seamlessly:
- Ensure your relationships are configured correctly.
- Use single-direction filtering where possible to keep performance high.
- If you must use bi-directional cross-filtering to propagate security filters, check the Apply security filter in both directions option in the relationship settings with caution. Bi-directional security filtering can cause significant query performance overhead on large datasets.
For detailed architectural advice on structuring your models, consult the official Row-level security (RLS) guidance in Power BI Desktop – Power BI | Microsoft Learn and our curated list of RLS Best Practices.
Publishing to Power BI Service and Managing Role Memberships
Defining roles in Power BI Desktop is only half the battle. Desktop is where you design the security rules, but the cloud is where you actually enforce them by assigning real people to those roles.
Once your design is complete, click Publish on the Home tab of Power BI Desktop and select your target workspace.

Assigning Users and Security Groups in the Cloud
After publishing, you must configure the role assignments in the Power BI Service:
- Navigate to the workspace containing your report.
- Find the semantic model (formerly dataset) associated with your report.
- Click the three dots (…) next to the semantic model and select Security.
- You will see the list of roles you created in Power BI Desktop. Select a role.
- Under Members, type the email addresses or security groups you want to assign to this role.
- Click Add, then click Save.
When assigning memberships, keep these critical rules and limitations in mind:
- Supported Groups: You can assign individual users, mail-enabled security groups, distribution groups, and Microsoft Entra security groups.
- M365 Groups Limitation: Microsoft 365 groups are not supported for RLS role membership.
- Service Principals Limitation: Service principals cannot be added directly to an RLS role. If your application uses a service principal to embed reports, RLS will not be applied automatically unless you explicitly pass an effective identity token during embed generation.
For strategies on managing these memberships at scale, refer to our guide on Centralized Row Level Security.
Workspace Roles and RLS Interaction
One of the most frequent support tickets we see goes something like this: “I set up RLS perfectly, but my colleague can still see all the data!”
The culprit is almost always workspace permissions. Power BI workspace roles (Admin, Member, and Contributor) have edit permissions on the semantic model by default. Because they can edit the model, Power BI assumes they are developers and completely bypasses RLS restrictions for them.
Rule of Gold: RLS is only enforced for users who have Viewer permissions in the workspace (or who access the report via an App or an embedded portal where they only have Read-only rights).
If a user is an Admin, Member, or Contributor, they will see all data, regardless of what RLS roles they are assigned to. To learn more about setting up multi-tenant environments without permission leaks, read our article on Multi Tenant Row Level Security.
Testing, Validating, and Troubleshooting RLS
Never deploy an RLS-enabled report to production without testing it first. A mistake in your DAX formula or relationship design could result in two catastrophic outcomes: either users see absolutely no data (a blank screen), or worse, they see sensitive data they shouldn’t.
Testing and Validating Power BI Desktop Row Level Security
Fortunately, Power BI provides robust tools to test your security configuration before publishing.
In Power BI Desktop, go to the Modeling tab and click View as. This opens a dialog where you can simulate different roles:
- Select a static role to see the report exactly as a member of that role would.
- To test dynamic RLS, check Other user and type in the email address of a specific user. This simulates how
USERPRINCIPALNAME()will resolve for that individual.
Once published to the Power BI Service, you can perform similar validation:
- Go to your semantic model’s Security settings.
- Click the three dots (…) next to a role and select Test as role.
- This will open the report in a simulation mode, showing you exactly what that role sees.
- You can change the simulated user at the top of the screen to test different dynamic identities.
Validation Tip: Create a simple card visual in your report containing a measure called
Who Am Idefined asWho Am I = USERPRINCIPALNAME(). This makes it incredibly easy to verify which identity Power BI is currently evaluating during your tests.
To find more validation techniques, browse our Category Row Level Security archive.
Common Pitfalls: DirectQuery, SSO, and B2B Guest Users
As you implement RLS in complex enterprise environments, you will likely encounter these common hurdles:
- DirectQuery and Single Sign-On (SSO): When using DirectQuery, you can choose to let the underlying database enforce security instead of Power BI. If you enable SSO, the user’s credentials are passed directly to the database. However, be aware that the Test as role feature does not work for DirectQuery semantic models with SSO enabled. Additionally, calculated tables and columns that reference a DirectQuery table from an SSO source are not supported in the service.
- B2B External Guest Users: If you share reports with external partners (B2B guest users), UPN resolution can get tricky. Depending on how your Microsoft Entra ID is configured, a guest user’s UPN might resolve to an alternative format (like
user_foreigncompany.com#EXT#@yourtenant.onmicrosoft.com). If your mapping table expects their native email (user@foreigncompany.com), dynamic RLS will fail and they will see no data. Always verify how your guest UPNs are stored and resolved. - Paginated Reports: That the Test as role feature in the service does not work for paginated reports.
Advanced Security: Combining RLS with OLS and Microsoft Fabric
For organizations requiring a “defense-in-depth” security posture, row-level security is often just the first layer.
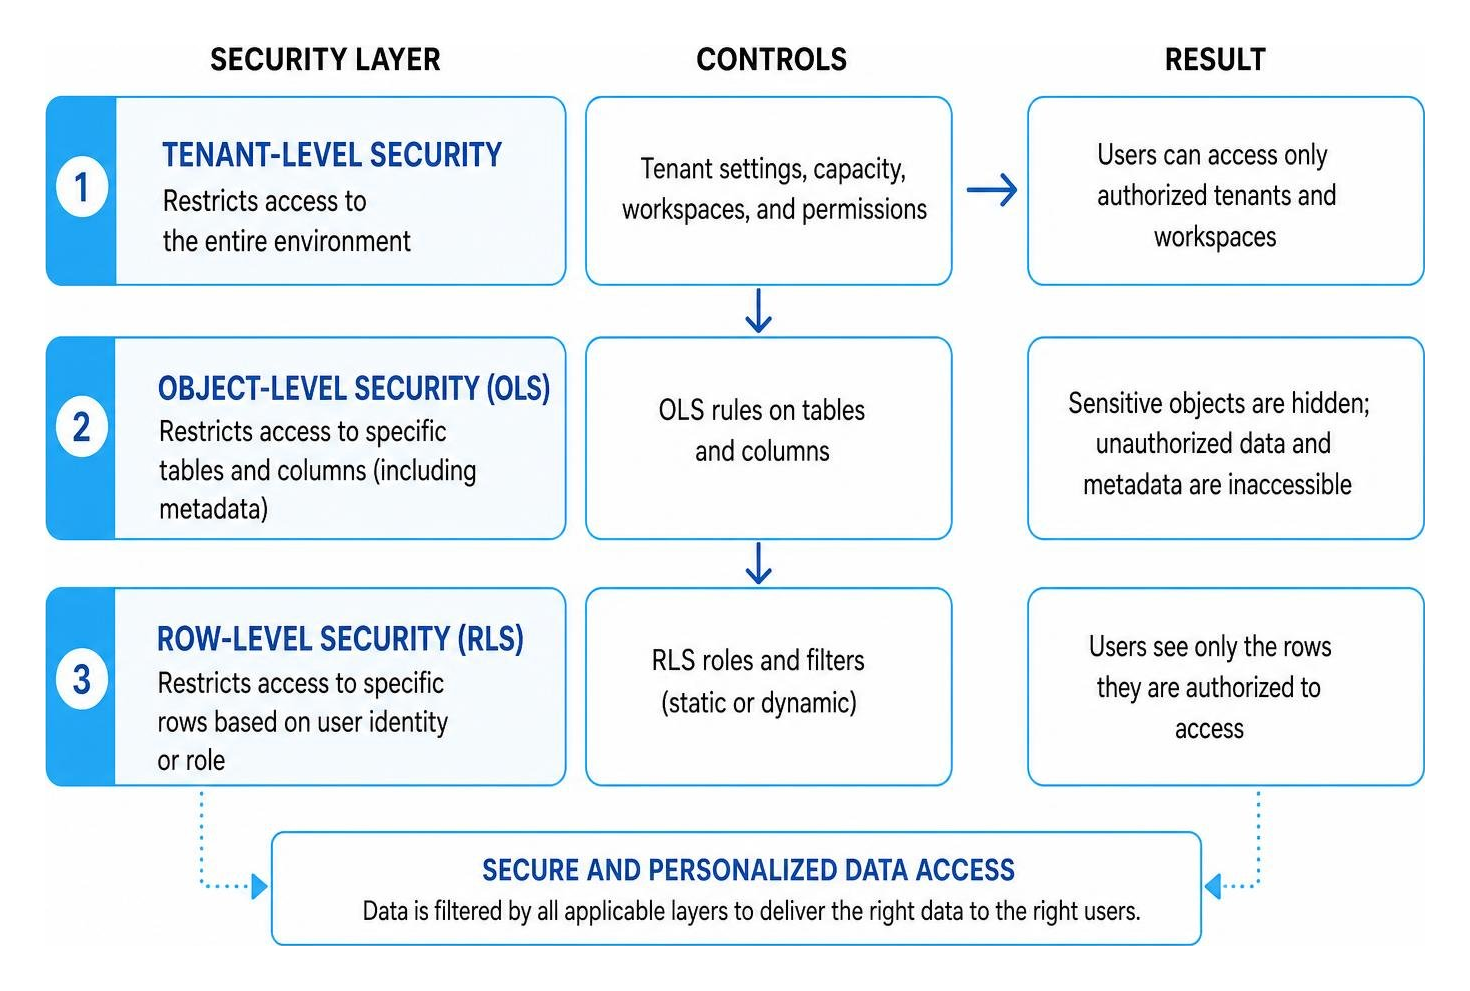
Object-Level Security (OLS) Integration
While RLS restricts rows of data, Object-Level Security (OLS) restricts access to entire tables or columns, including their metadata.
If a user does not have permission to see a column secured by OLS (for example, a SocialSecurityNumber column in an employee table), that column completely disappears from their view. If they try to build a visual with it, or if a report visual uses it, they will see a visual error instead of the sensitive data.
To set up OLS, you cannot use the standard Power BI Desktop interface; you must use an external tool like Tabular Editor to define OLS rules on your model’s tables and columns.
Direct Lake and OneLake Security in Microsoft Fabric
If your organization is adopting Microsoft Fabric, you are likely utilizing Direct Lake mode. Direct Lake provides the query performance of Import mode directly on top of Delta tables in OneLake, without needing to import or copy the data.
The good news is that RLS is fully supported for Direct Lake semantic models. However, there is a performance catch: if your RLS DAX query is too complex or relies on features not natively optimized for Direct Lake, the query may fall back to DirectQuery mode. When fallback occurs, query performance can decrease significantly. To avoid this, keep your dynamic RLS filters as simple and direct as possible.
Frequently Asked Questions about Power BI RLS
Here are quick answers to the most common questions our clients ask when implementing RLS.
Can a user belong to more than one RLS role?
Yes, a user can be assigned to multiple RLS roles. When this happens, the roles act in an additive manner. This means the user will see the union of the data allowed by each role.
For example, if Role A allows them to see “East” region data and Role B allows them to see “West” region data, being in both roles means they will see both East and West data. Power BI does not apply a “once denied, always denied” rule. If any assigned role grants access to a row, the user can see it.
Why is RLS not working for some users in my workspace?
This is almost always due to workspace permissions. If a user has been granted the Admin, Member, or Contributor role in the workspace, they have edit capabilities over the semantic model and report. Power BI bypasses RLS for these users so they can develop and troubleshoot. To enforce RLS, you must change their workspace role to Viewer, or share the report with them via an App or a secure external sharing mechanism.
How do I remove or disable RLS for public access?
If you need to share a report publicly (for example, embedding a demonstration dashboard on a public website) and want to remove RLS entirely:
- Open the report in Power BI Desktop.
- Go to the Modeling tab and click Manage Roles.
- Select each defined role and click Delete.
- Save the report and republish it to the Power BI Service.
Once all roles are deleted, RLS is completely disabled, and any viewer will have access to the entire dataset.
Conclusion
Mastering power bi desktop row level security is a fundamental requirement for building secure, enterprise-grade business intelligence solutions. Whether you choose the simplicity of static RLS for small, stable teams or the robust scalability of dynamic RLS for complex organizational structures, setting up your filters correctly ensures your sensitive data stays protected.
But what happens when your security needs extend beyond a single Power BI report? What if your clients demand unified, white-labeled analytics that combine Power BI, Tableau, and other BI vendors under a single, secure roof?
That is where Embedportal comes in.
We provide a white-label embedding platform designed specifically for analytics and product teams. With Embedportal, you can embed dashboards from multiple vendors (including Power BI, Tableau, QuickSight, and Metabase) with unified branding, centralized row-level security, and seamless Single Sign-On (SSO) integration in under an hour.
Instead of wrestling with complex embedding APIs, workspace permission leaks, and multi-tenant security configurations across different platforms, let us handle the heavy lifting. Secure your embedded dashboards with Embedportal today and deliver a world-class, secure analytics experience to your users.