The All Access Pass for Dynamic RLS in Power BI
Why Power BI Row Level Security All Access Is Harder Than It Sounds
Configuring Power BI row level security all access is one of those tasks that sounds simple — just let certain users see everything — but quickly becomes complicated once you have a mix of regional managers, executives, and embedded dashboard consumers all hitting the same semantic model.
Here is the quick answer to the most common question:
How do you give one user full access to all rows while restricting everyone else with RLS?
You have two main options:
- Bypass RLS entirely — Assign the unrestricted user a workspace role of Admin, Member, or Contributor. RLS only applies to users with Viewer permissions, so higher workspace roles see all data automatically.
- Use dynamic RLS with an ‘ALL’ marker — Keep the user as a Viewer, but add an
ALLentry in your security mapping table and write a DAX filter that grants full access when that value is detected. This is the right approach when the user needs to be subject to RLS governance or is accessing an embedded report.
The first option is the simplest. The second is more powerful and is the focus of this guide.
Why does this matter for embedded analytics? If you are embedding Power BI dashboards into a customer portal, workspace role bypasses often do not translate cleanly across tenants or embedding contexts. You need a RLS pattern that is robust, scalable, and does not break when a new region or dimension is added.
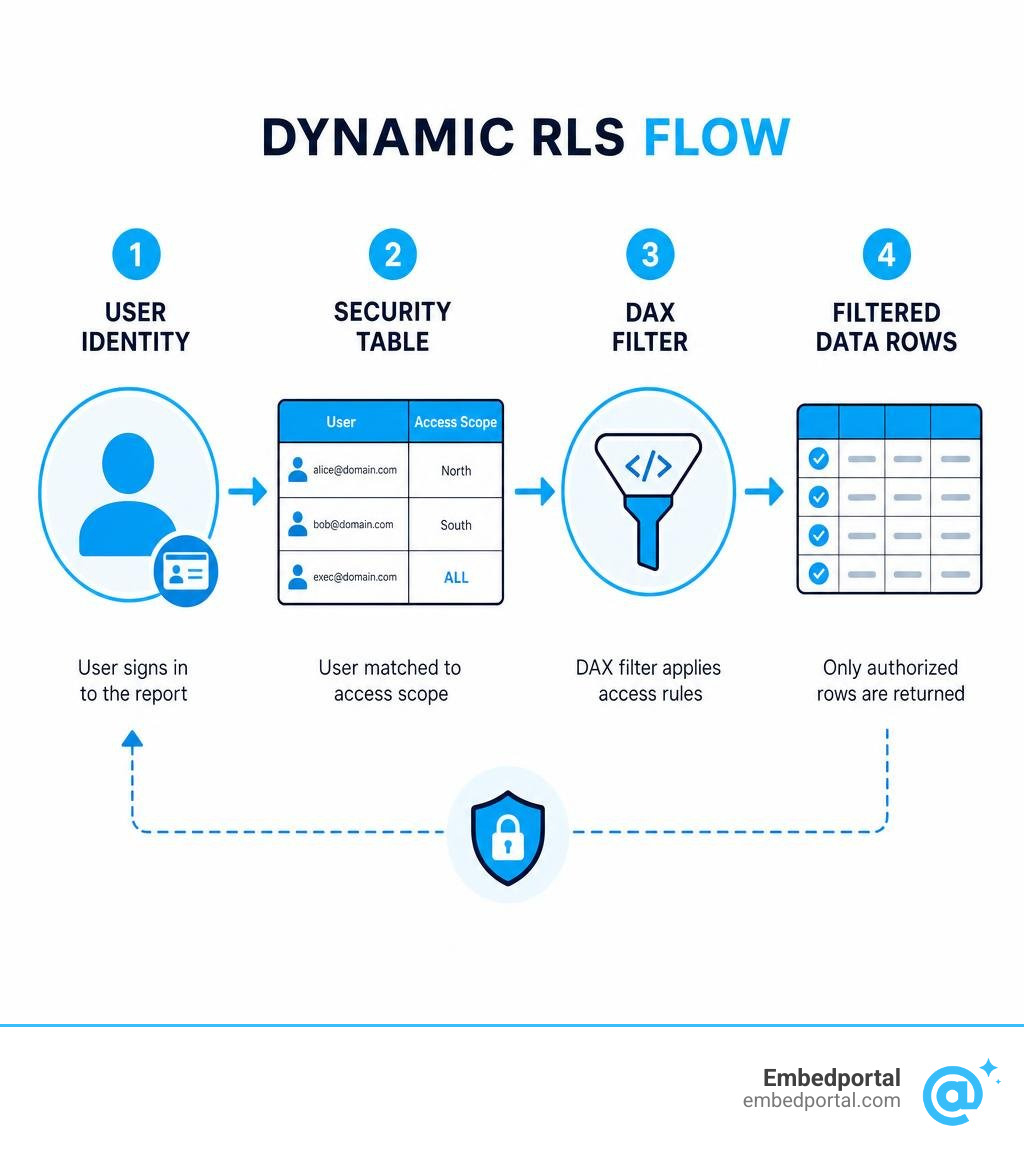
Power bi row level security all access terms simplified:
Understanding Power BI Row Level Security All Access Scenarios
To master the art of configuring an all-access pass within a secured environment, we first need to understand how Power BI processes row-level security. At its core, RLS is a method of filtering data rows dynamically based on the identity of the user viewing the report.
When a user opens a report, Power BI evaluates the DAX security rules defined in the semantic model. These rules act as a silent, automatic WHERE clause appended to every query sent to the database. If a rule resolves to TRUE for a given row, the user can see it; if it resolves to FALSE, the row is hidden.
However, a common point of confusion is how workspace roles interact with these filters. RLS is only enforced for report consumers assigned to the Viewer role in a Power BI workspace. Anyone who is designated as an Admin, Member, or Contributor in the workspace will completely bypass all RLS rules. They will automatically have unrestricted, all-access views of the entire dataset.
While this bypass mechanism is convenient for internal testing or giving a hands-on developer complete oversight, it creates a massive security loophole if used as a permanent solution for executive access. For example, if we assign our CEO a Member role in the workspace just so they can bypass RLS, we also grant them edit permissions. They could accidentally delete a report, modify a semantic model, or share sensitive datasets with unauthorized parties.
Furthermore, in embedded analytics scenarios where dashboards are shared with external users or clients, we cannot simply make everyone a workspace administrator. We must keep our users strictly bound to Viewer permissions while programmatically granting certain users full access. This is why we need a robust implementation of Power BI Row Level Security that handles both granular and unrestricted access within a single, unified framework.
To explore the official fundamentals of how Power BI handles these restrictions, you can check out the Microsoft training on how to Restrict access to Power BI model data – Training | Microsoft Learn.
Static vs. Dynamic RLS: Choosing the Best Approach for Unrestricted Access
When designing your security architecture, you must choose between static and dynamic RLS. The choice you make directly impacts how easily you can grant all-access passes to specific users.
Static RLS relies on hardcoded rules defined in Power BI Desktop. For example, we might create a role named Western Region and write a DAX filter such as: Region equals Western. We would then need to create a separate role for every single region, plus a dedicated All Access role that has no filters applied to it.
While static RLS is straightforward to set up for small organizations with a handful of users, it does not scale. Every time a new region is added, or a new manager is hired, we have to open Power BI Desktop, modify the roles, republish the semantic model, and manually reassign users in the Power BI Service. The administrative overhead quickly becomes a nightmare.
Dynamic RLS, on the other hand, uses a single security role combined with a user-mapping table. Instead of hardcoding regions or roles, we write a dynamic DAX expression that matches the logged-in user’s email address against our mapping table. This approach is highly scalable because all security permissions are stored as data in a table rather than hardcoded rules in the model. If a manager changes regions or an executive requires full access, we simply update the mapping table in our source database. The changes flow into Power BI automatically during the next scheduled refresh.
The table below highlights the key differences between these two architectures:
| Feature | Static RLS | Dynamic RLS |
|---|---|---|
| Setup Complexity | Low (defined directly in Desktop) | Medium (requires security mapping table) |
| Maintenance Overhead | High (requires manual model republishing) | Low (managed via database updates) |
| Scalability | Poor (hard to manage with 50+ users) | Excellent (scales to thousands of users) |
| All-Access Implementation | Requires a separate role with no filters | Managed dynamically via an ‘ALL’ keyword |
| Best For | Small teams with static divisions | Enterprise deployments & embedded analytics |
For organizations looking to deploy security models that grow with their business, dynamic RLS is the clear winner. To dive deeper into how to structure these rules for long-term maintainability, read our comprehensive guide on Row Level Security Power BI and review the official Row-level security (RLS) guidance in Power BI Desktop – Power BI | Microsoft Learn.
How to Configure Power BI Row Level Security All Access Using a Single Dynamic Role
To build a truly dynamic system, we want to avoid creating multiple roles in Power BI. Having one role for regular users and another for administrators leads to additive filter issues and complex user management. Instead, we can implement a single-role pattern that dynamically grants full access to designated users while restricting everyone else.
We achieve this by introducing an ALL keyword inside our security mapping table. When the DAX filter expression detects that the logged-in user is mapped to ALL, it returns TRUE for every row in the dataset, effectively granting them an all-access pass.
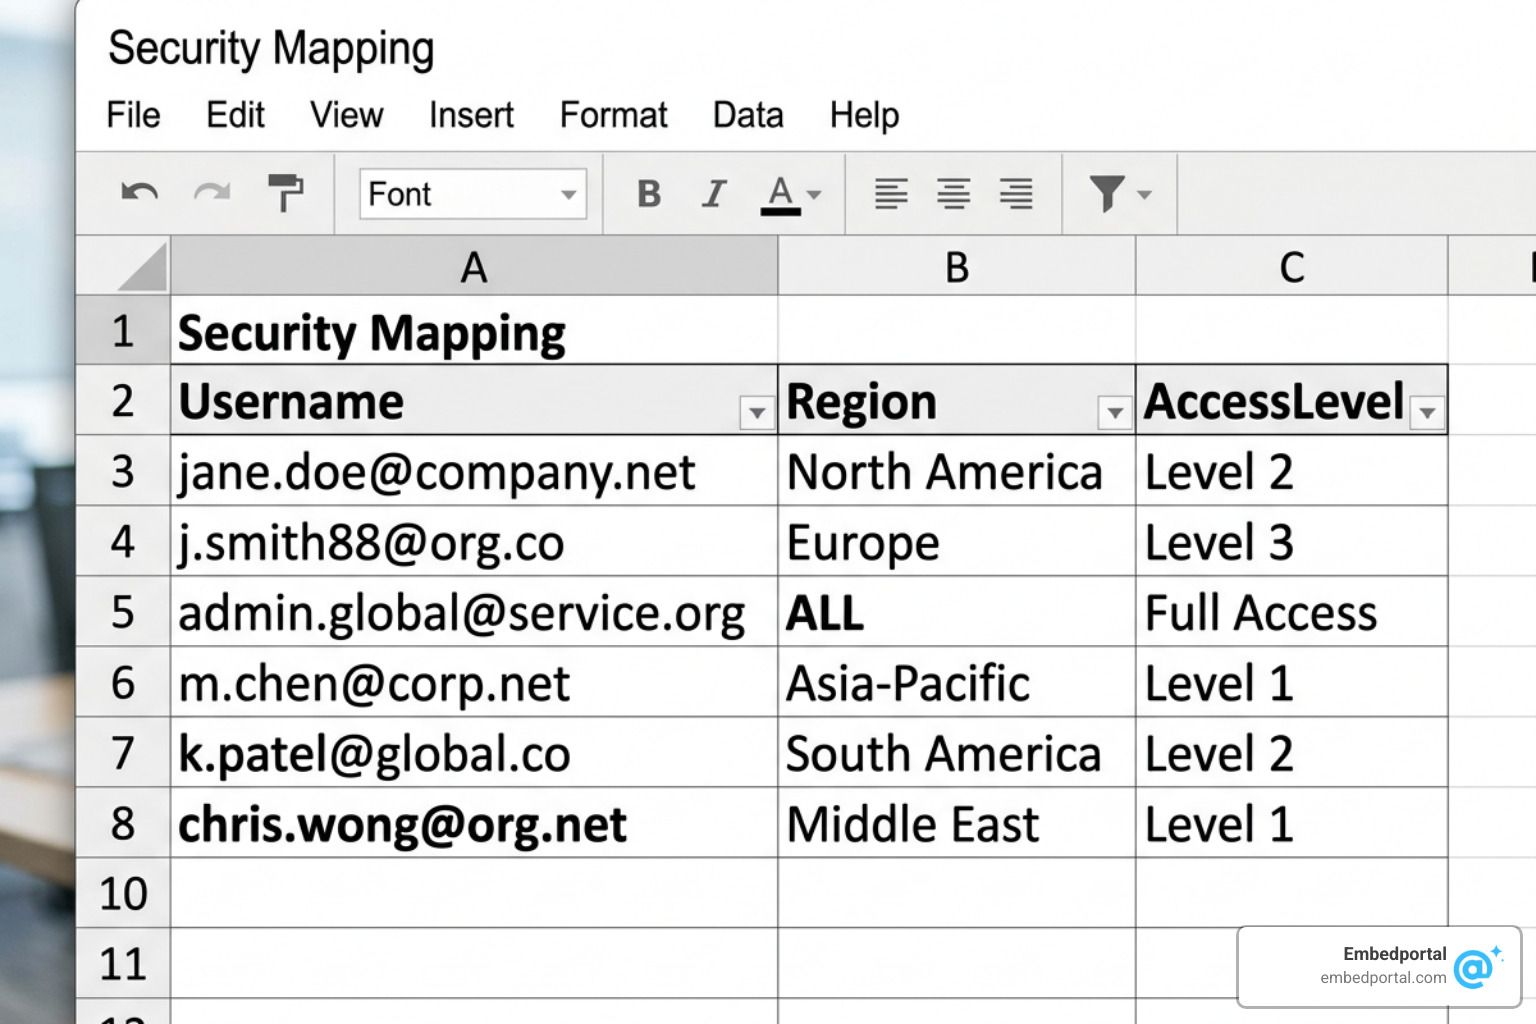
This pattern allows us to centralize our security logic. Rather than scattering security rules across different workspaces and roles, we control everything from a single data source. This concept of Centralized Row Level Security is highly recommended for enterprise environments.
For a detailed walkthrough of this dynamic pattern, you can read the original community discussion on Configuring “all” access with dynamic row-level security – XXL BI.
Designing the Security Mapping Table for Power BI Row Level Security All Access
The foundation of our dynamic security system is the mapping table. This table must map each user’s authenticated email address (their UserPrincipalName) to the dimension values they are allowed to see.
To support our all-access scenario, we will design a table named SecurityMapping with two main columns: UserEmail and AllowedRegion. For standard users, we list their email alongside their specific region. For our executive team, we list their email alongside the value ALL.
Here is a conceptual look at how this table should be structured:
- user1@company.com | West
- user2@company.com | East
- ceo@company.com | ALL
To integrate this table into our data model, we must adhere to clean star schema design principles. We set up a relationship between our SecurityMapping table and our main Region dimension table.
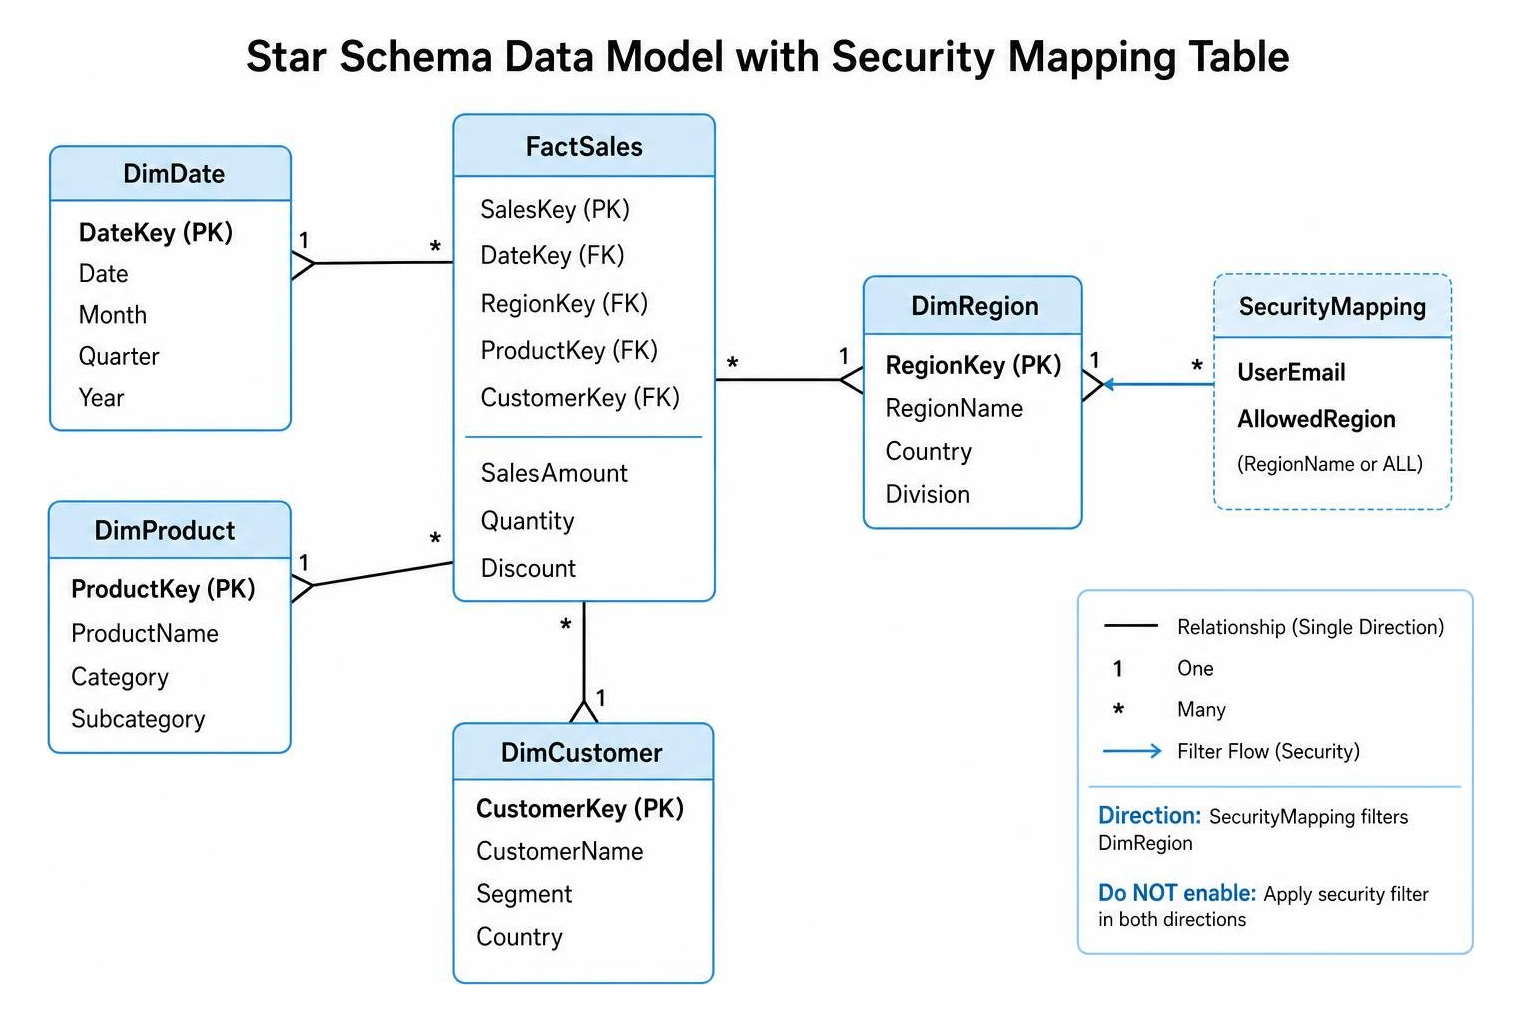
We must configure this relationship with care:
- Relationship Type: Many-to-Many or One-to-Many depending on whether a user can access multiple regions.
- Filter Direction: Single direction, where the SecurityMapping table filters the Region dimension table.
- Apply Security Filter in Both Directions: Do NOT enable this unless absolutely necessary, as bi-directional security filtering can cause severe performance degradation on large datasets.
Writing the DAX Filter Expression for Power BI Row Level Security All Access
Once our mapping table is in place and linked to our dimension tables, we need to write the DAX expression that will enforce our security rules. We will apply this filter to our Region dimension table within the Manage Roles editor in Power BI Desktop.
We want our DAX expression to perform a simple logical check:
- Find the rows in our SecurityMapping table that match the current user’s email address using the USERPRINCIPALNAME() function.
- Check if any of those rows contain the keyword ALL.
- If ALL is found, return TRUE for all regions.
- If ALL is not found, filter the Region table to only include the specific regions mapped to that user’s email.
We can write this defensive DAX expression as follows:
VAR CurrentUser = USERPRINCIPALNAME()
VAR UserHasAllAccess =
- CALCULATE(*
- COUNTROWS(SecurityMapping),*
- SecurityMapping[UserEmail] = CurrentUser,*
- SecurityMapping[AllowedRegion] = “ALL”*
- ) > 0*
RETURN - IF(*
- UserHasAllAccess,*
- TRUE(),*
- Region[RegionName] IN*
- CALCULATETABLE(*
- VALUES(SecurityMapping[AllowedRegion]),*
- SecurityMapping[UserEmail] = CurrentUser*
- )*
- )*
By using this pattern, we ensure that our security logic is robust. If a user is not found in our security table at all, the expression will return FALSE, ensuring they see no data rather than accidentally leaking information. This defensive design is a cornerstone of secure dashboard deployment.
Testing, Validating, and Troubleshooting Your All-Access RLS Configuration
Before publishing your report to production, you must thoroughly test your RLS configurations to ensure that restricted users cannot see unauthorized data, and that your all-access users can indeed see everything.
In Power BI Desktop, you can test your roles using the View as role feature under the Modeling tab. This tool allows you to simulate the experience of another user by entering their email address.
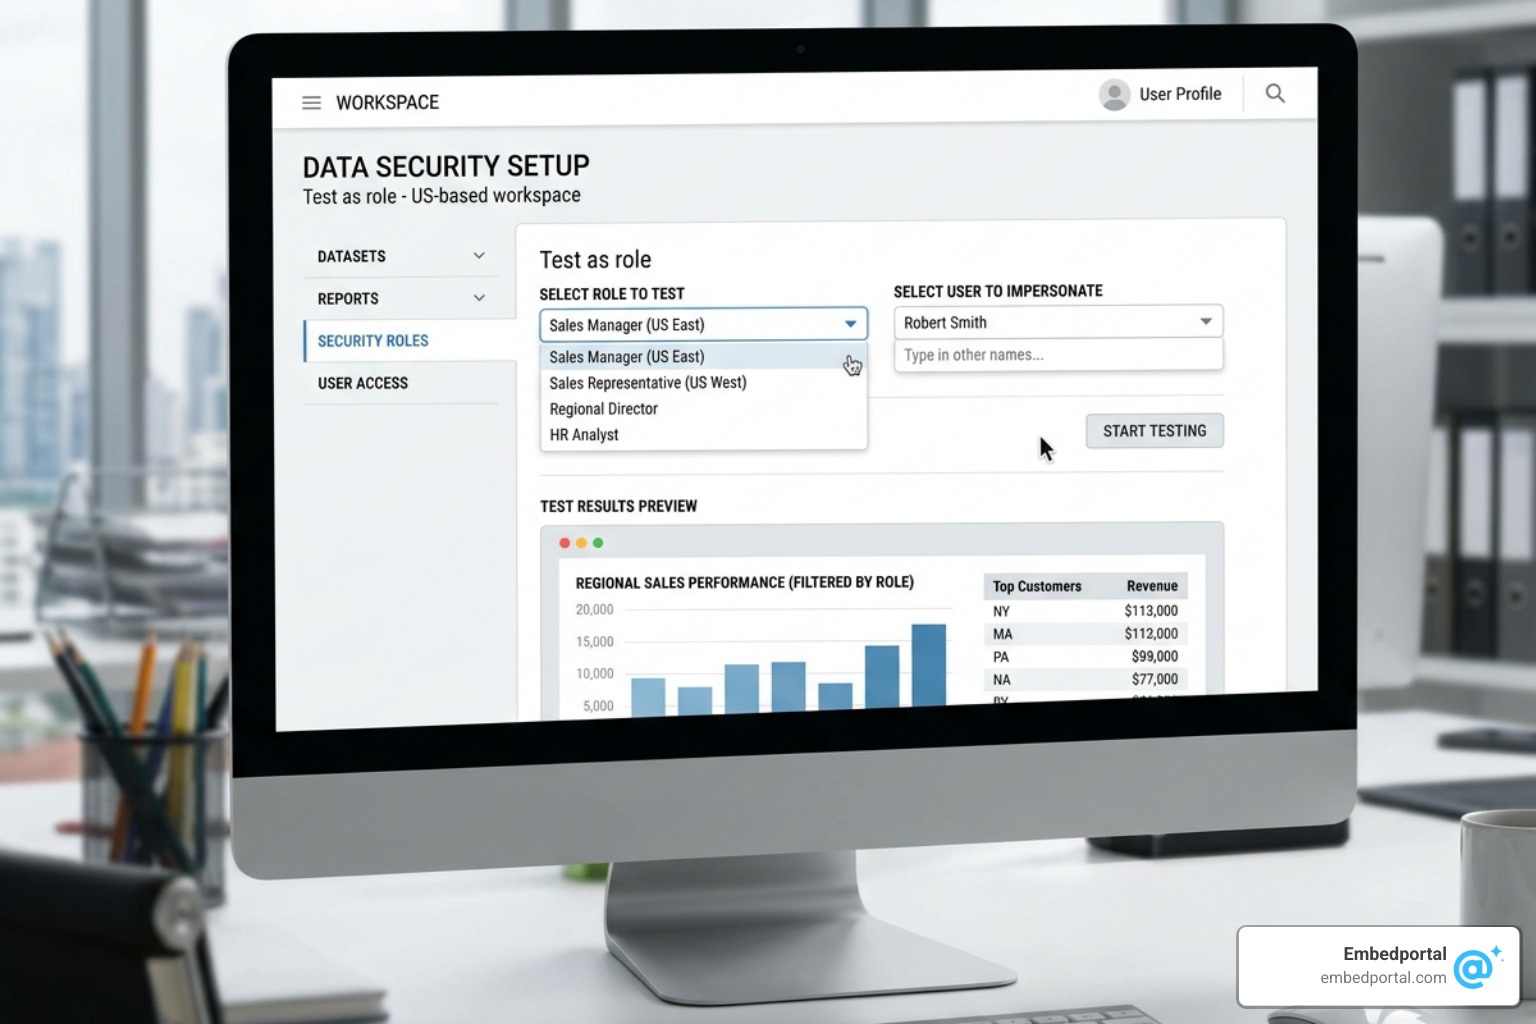
Once you publish the model to the Power BI Service, you can perform cloud-based validation using the Test as role feature found in the security settings of your semantic model. However, keep in mind that when testing dynamic RLS in the cloud, Power BI uses your own identity to evaluate the expressions. This means you cannot use Test as role to see exactly what an external B2B guest user or a service principal would see.
Here are some common troubleshooting scenarios to watch out for:
- B2B Guest Users seeing blank reports: External users often have different UserPrincipalName formats (such as containing #EXT#) in your Microsoft Entra ID. If your mapping table contains their standard email but their UPN is formatted differently, the DAX lookup will fail.
- Service Principals bypassing RLS: Service principals cannot be added to standard RLS roles. If your embedded application uses a service principal as the final effective identity, RLS will not be applied automatically. You must pass the effective identity programmatically using the CUSTOMDATA() function.
- USERELATIONSHIP conflicts: If your model relies heavily on the USERELATIONSHIP() DAX function to activate inactive relationships, you may encounter unexpected errors when RLS is enabled. The best workaround is to redesign your relationships to avoid relying on active/inactive toggles during security evaluation.
For a complete checklist of validation steps, read our guide on RLS Best Practices.
Frequently Asked Questions about Power BI Row-Level Security
Can a user belong to multiple RLS roles, and how does that affect all-access scenarios?
Yes, a user can belong to multiple RLS roles. However, you must be extremely careful because Power BI evaluates multiple roles using an additive union approach. If a user is assigned to a restricted Sales role and an unrestricted All Access role, the filters are combined. Since the All Access role returns TRUE for all rows, the user will see all data, completely overriding the restrictions of the first role. Always aim to manage permissions through a single dynamic role to prevent accidental data exposure.
Why does my B2B guest user see no data even though they are assigned to an all-access role?
This is almost always caused by a UPN mismatch. When external B2B guest users log into your tenant, their UPN is often transformed into a format like user_externaldomain.com#EXT#@yourtenant.onmicrosoft.com. If your security mapping table contains their native email (user@externaldomain.com), the USERPRINCIPALNAME() function will not find a match, resulting in a blank report. To fix this, store the exact UPN of the guest user in your security table, or add them directly to the RLS role by their email address in the Power BI Service instead of relying on Entra security groups.
Can service principals be assigned to RLS roles for embedded analytics?
No, service principals cannot be added directly to RLS roles in the Power BI Service. If you are building an app-owns-data embedded solution, your backend application must generate an embed token that defines the effective identity. You can use the CUSTOMDATA() string to pass the user’s access rights from your application directly to the Power BI model, allowing you to filter data dynamically without assigning the service principal to a specific role.
Conclusion
Implementing Power BI row level security all access does not have to be a headache. By moving away from rigid, hardcoded static roles and embracing a dynamic, single-role pattern with an ALL keyword, we can build a scalable security architecture that accommodates both restricted regional viewers and unrestricted executives.
While configuring this directly in Power BI is powerful, managing these security rules across multiple workspaces, tenants, and BI vendors can quickly become overwhelming.
This is where we at Embedportal can help. We provide a white-label embedding platform designed to make dashboard deployment simple and secure. With Embedportal, you can embed dashboards from Power BI, Tableau, QuickSight, and Metabase into your customer portals in under an hour. We provide unified branding, centralized row-level security management, and seamless Single Sign-On (SSO) integration, ensuring that your users always see exactly what they are authorized to see—no more, no less.
If you are ready to simplify your data security and deliver a polished, professional analytics experience to your users, explore our platform features on Row Level Security and see how we can streamline your embedding workflow.