How to Handle the Default Role Dilemma in Power BI RLS
The Power BI RLS Default Role Problem That Catches Teams Off Guard
Power BI RLS default role behavior is one of the most misunderstood parts of building a secure embedded analytics setup — and getting it wrong can expose data you never meant to share.
Here’s the quick answer to what most people are searching for:
What is the default role behavior in Power BI RLS?
- No roles defined: Any user with query permission sees all data in the model.
- Roles defined, user assigned to one: The user sees only the rows their role permits.
- Roles defined, user assigned to none: The user receives an access-denied error and sees no data.
- User is a workspace Admin, Member, or Contributor: RLS is bypassed entirely — they always see all data regardless of role assignment.
- There is no built-in “default role” feature: Power BI does not let you automatically assign a fallback role to unassigned users.
That last point is where teams run into trouble. You build roles, publish your report, and assume unassigned users are safely locked out. But depending on how your workspace permissions are configured, some users may still see everything.
For analytics leads embedding dashboards into a customer portal, this isn’t just a minor config issue — it’s a security risk that can surface in front of paying customers.
This guide walks you through exactly how to close that gap: from understanding the default behavior, to creating catch-all and blank roles, to structuring your data model so access is always predictable.
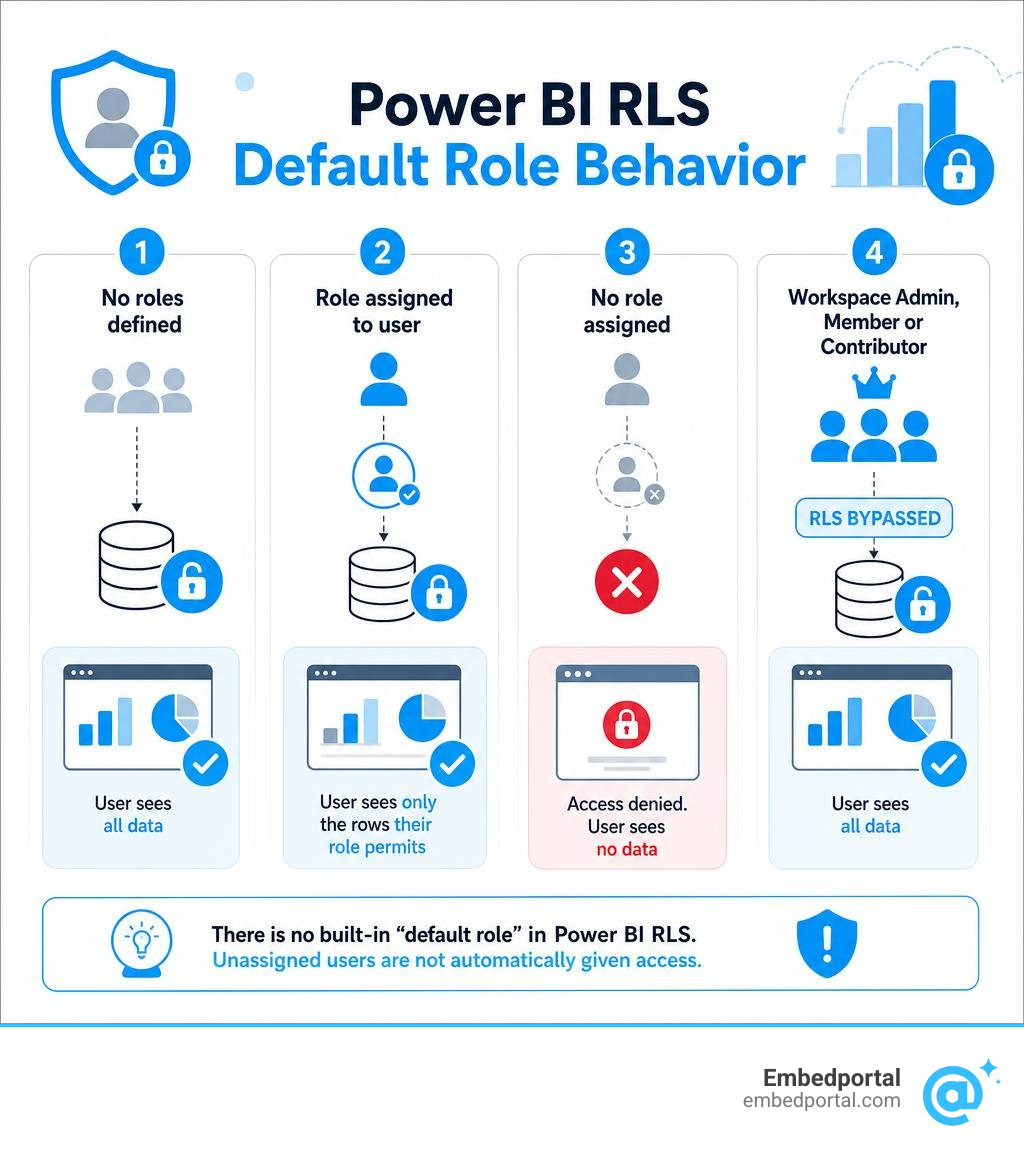
Power bi rls default role terminology:
Understanding the Power BI RLS Default Role Behavior

When we design reports in Power BI Desktop, we are working in an environment where security is open by default. Until we explicitly define at least one security role, anyone who has permission to view the semantic model can see every single row of data.
The moment we introduce even one row-level security (RLS) role into the model, the entire security paradigm changes. Power BI shifts from an “open” model to a “closed” model. This change is critical to understand when designing a secure reporting environment. To get a solid grasp of how security propagates through your model, you can review the Row Level Security Power BI structural fundamentals.
The core issue is that Power BI does not have a native setting called power bi rls default role that automatically catches unassigned users and drops them into a safe, restricted view. Instead, the service relies on rigid, binary logic: either a user is explicitly assigned to an active RLS role, or they are not. If they are not, their access path hits a dead end. For a deeper look into designing these rules correctly from the start, check out the Row-level security (RLS) guidance in Power BI Desktop – Power BI | Microsoft Learn documentation.
What Happens When a User Has No Power BI RLS Default Role?
If we publish a semantic model with RLS roles configured, but we do not assign a specific user to any of those roles in the Power BI Service, that user will be met with a “Cannot Load Model” or “Model Load Error” when they attempt to open the report.
Behind the scenes, Power BI is executing a strict security check. Because RLS is active on the dataset, the engine refuses to run queries without an active filter context. Since the user has no role, no filter context can be generated, resulting in an outright block.
While this prevents data leaks, it is a terrible user experience. Instead of seeing a clean, branded landing page or a helpful message explaining how to request access, the user sees broken visual containers and technical error messages. This is why relying on the default “no-role” state as your primary security barrier is a bad practice.
Workspace Roles vs. Row-Level Security
We must also address how workspace-level permissions interact with RLS, as this is the single most common reason why developers believe their RLS configurations are failing during testing.
Power BI workspace permissions exist on a plane above row-level security. Workspace roles are divided into:
- Admin
- Member
- Contributor
- Viewer
If a user is assigned as an Admin, Member, or Contributor in the workspace where the report and semantic model reside, they will bypass all RLS filters entirely. They will see 100% of the data, regardless of what RLS roles you have set up or whether they are assigned to them.
RLS is only enforced for users who hold the Viewer role in the workspace, or who access the report via an app, sharing link, or secure embedded portal. If you are testing your security and find that an unassigned user can still see all data, check their workspace permissions immediately.
How to Configure a Secure Default Role in Power BI
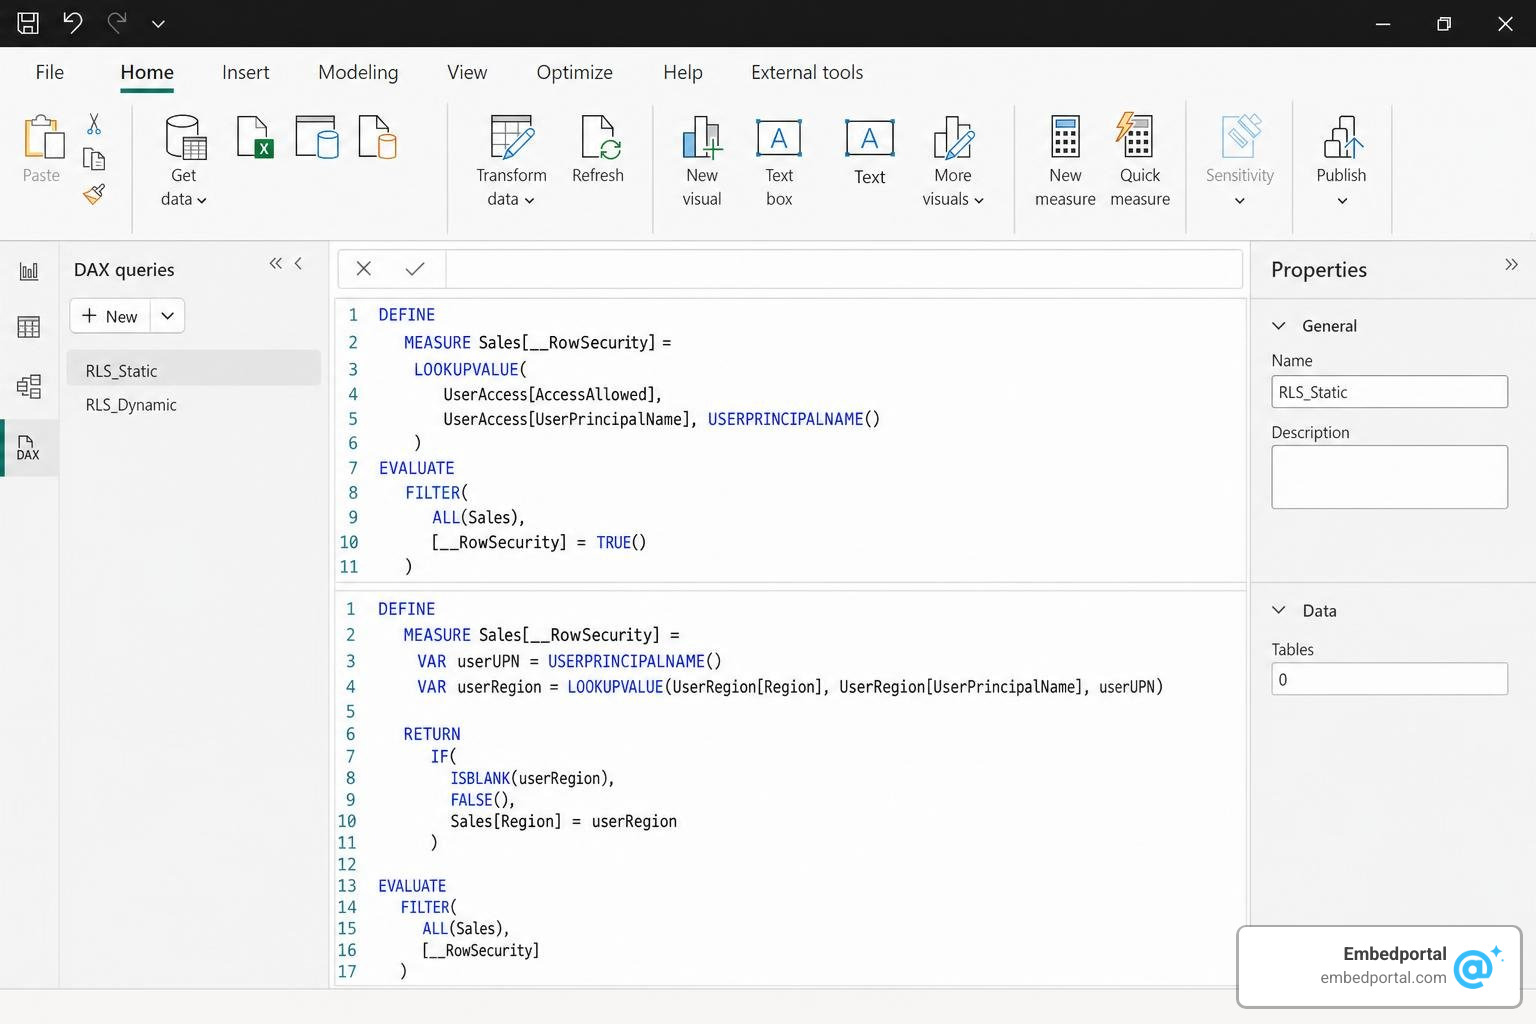
To prevent users from encountering ugly model load errors while keeping our data secure, we can design custom roles that act as default guardrails.
When configuring these rules in Power BI Desktop, we write DAX expressions that evaluate to TRUE or FALSE for every row in a table. If the expression evaluates to TRUE, the row is visible; if FALSE, the row is hidden. For step-by-step training on how these rules propagate through model relationships, refer to Restrict access to Power BI model data – Training | Microsoft Learn. For more advanced design options, you can also explore our guide on Power BI Row Level Security.
Creating a Catch-All Power BI RLS Default Role
If we want to ensure that any user who accesses our report but hasn’t been assigned a specific data-viewing role is handled gracefully, we can build a “catch-all” role.
To do this, we create a role in Power BI Desktop (for example, named “Default_Restricted”) and apply a DAX filter of FALSE() to our primary dimension or fact tables. When a user is assigned to this role, they will not see any transactional data, but the report structure itself will load successfully.
To make this experience professional, we can combine this catch-all role with Object Level Security (OLS) or specialized page navigation. For instance, we can create a dedicated landing page in our report that says, “Your account is active, but you do not have permission to view this data. Please contact your administrator.” We can then use RLS or OLS to hide all other report pages and data visuals from this default role, showing them only this helpful landing page.
Designing a Blank Role for Unfiltered Access
On the other end of the spectrum, we often need a “Super User” or “All Access” role. This is useful for executive users who need to see everything, or for testing purposes.
To build a role that allows completely unrestricted access to the entire dataset, we create a role (e.g., “All_Data”) and write a DAX filter that always evaluates to true. For example, applying the DAX expression TRUE() to a core table ensures that no rows are filtered out.
However, we must be highly cautious when combining this with other roles. In Power BI, if a user is assigned to multiple RLS roles, the filters are additive. This means the user will see the union of all allowed rows. If a user is accidentally assigned to both a restricted regional role and our “AllData” role, the “AllData” role’s TRUE() filter will override the restrictions, exposing all data to that user.
Best Practices for Managing Dynamic RLS and User Mapping
As your user base grows from a dozen users to thousands, creating static roles for every possible combination of permissions becomes impossible. This is where dynamic RLS becomes essential.
Instead of hardcoding values like ‘Region'[Region] = “West” into dozens of static roles, we can use dynamic RLS to filter data based on the identity of the logged-in user. For a comprehensive overview of how to structure these systems efficiently, read our guide on Row Level Security Best Practices.
Below is a comparison of how static and dynamic security models behave when handling default access:
| Security Type | Management Complexity | Default State Behavior | Best Used For |
|---|---|---|---|
| Static RLS | High (Requires manual role creation for each slice of data) | Unassigned users get a model load error or require manual group mapping | Small teams, simple department-level security (e.g., HR vs. Finance) |
| Dynamic RLS | Low (Single role handles all users via a database lookup table) | Unassigned users automatically see zero rows (secure by default) | Large enterprises, multi-tenant applications, SaaS embedding |
Structuring Your Data Model for Secure Defaults
To implement a bulletproof dynamic RLS system, we must structure our data model using clean star schema design principles.
We start by creating a hidden user mapping table (often named “UserSecurity” or “AppUser”) in our database. This table should contain at least two columns: the user’s email address (matching their Microsoft Entra ID or login identity) and an access key (such as a Region ID, Department ID, or Customer ID).
Next, we set up a relationship between our “UserSecurity” table and our target dimension tables. For performance and security, we should filter our dimension tables so that model relationships naturally propagate the filters down to our massive fact tables.
In Power BI Desktop, we then define a single dynamic RLS role (e.g., “DynamicUserSecurity”) and apply a DAX filter to the “UserSecurity” table using the USERPRINCIPALNAME() function:
UserSecurity[Email] = USERPRINCIPALNAME()
Because USERPRINCIPALNAME() returns the email address of the currently authenticated user in the Power BI Service, this single rule dynamically filters the “UserSecurity” table to only the row matching that user. That filter then flows through our model relationships, automatically restricting the rest of the report. If a new employee joins the company, we don’t need to touch Power BI Desktop; we simply add their email and permissions to our database mapping table, and the security model handles the rest.
Combining Static and Dynamic Rules for Multi-Country Access
In real-world business scenarios, security requirements are rarely simple. You might have regional sales reps who should only see data for their own country, but you also have regional managers who need access to multiple countries, and executives who need global access.
We can solve this by designing our user mapping table to support a many-to-many relationship structure. Instead of listing a single country per user, our mapping table can have multiple rows for a single user email, with each row representing an authorized country:
- user1@company.com | USA
- user1@company.com | Canada
- user2@company.com | UK
When we configure our relationships, we can enable bidirectional cross-filtering between our mapping table and our dimension tables to allow these multi-value filters to propagate.
However, we must monitor our report performance closely when doing this. Bidirectional relationships combined with complex RLS filters can increase query execution times. To keep our reports fast, we should avoid writing complex DAX filters like LOOKUPVALUE or CONTAINS inside our RLS roles. Instead, flatten your hierarchies in your data warehouse and use clean, single-column relationships with composite keys where possible.
Limitations and Gotchas When Testing and Deploying RLS
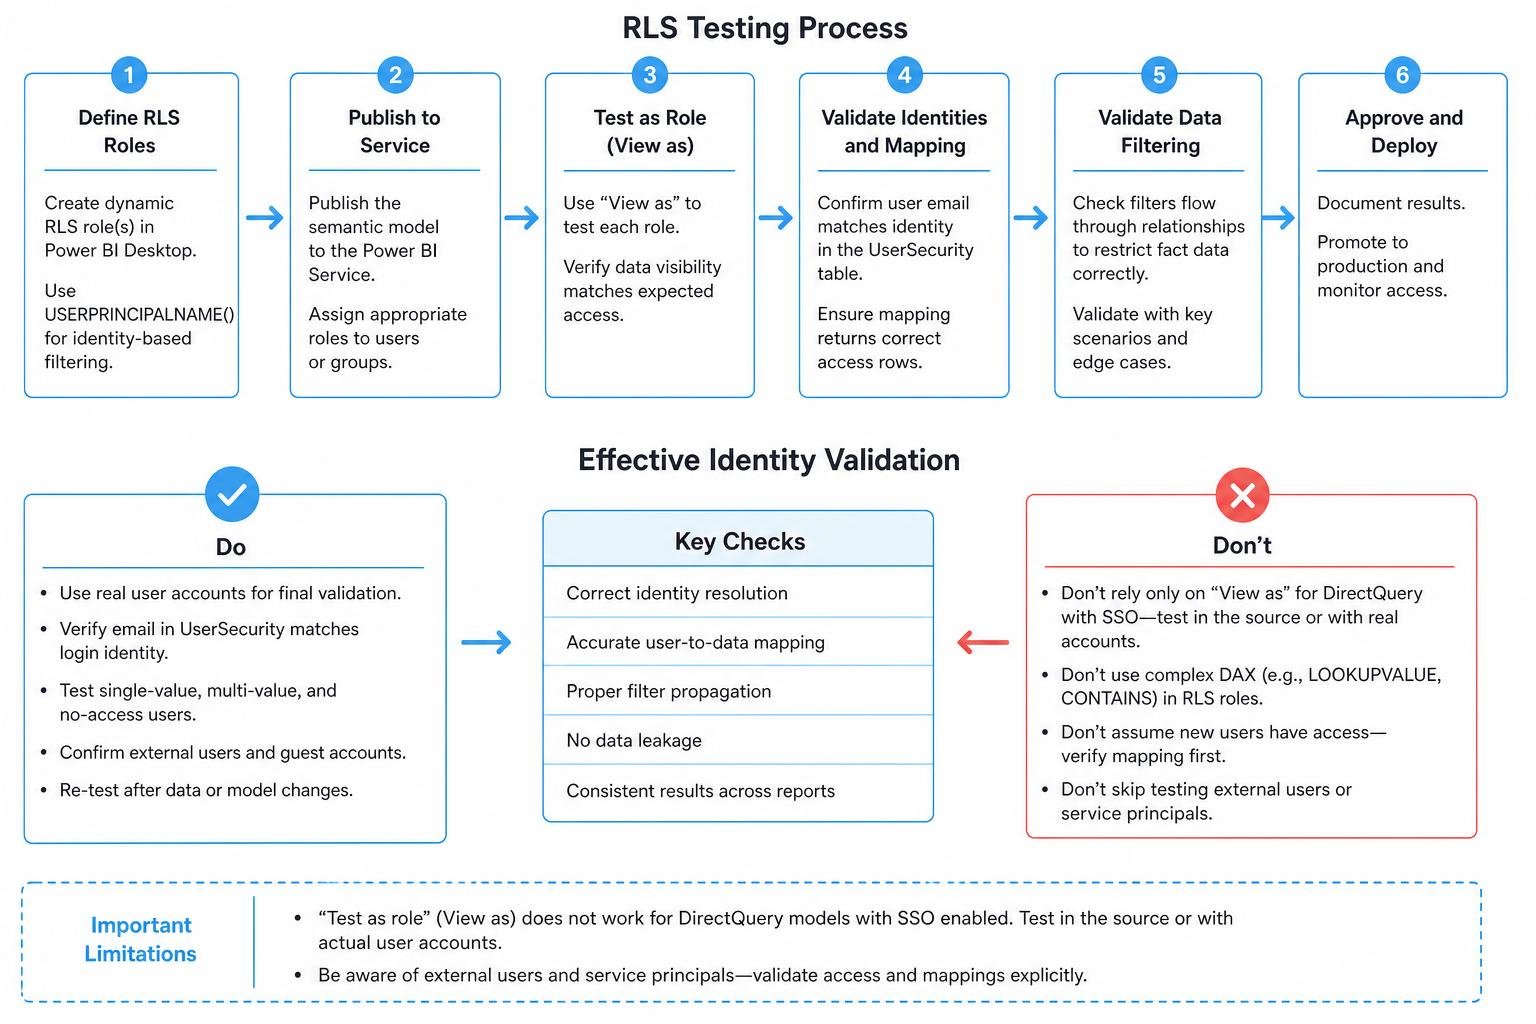
Once your RLS roles are defined, you must thoroughly validate them before deploying them to production. However, there are several critical limitations in Power BI’s testing tools that can lead to a false sense of security. To ensure you don’t run into platform-level roadblocks, review the official Row-level security (RLS) with Power BI – Microsoft Fabric | Microsoft Learn documentation.
First, let’s look at the “Test as role” (or “View as”) feature in Power BI Desktop and the Power BI Service. While this is an excellent tool for verifying static and dynamic DAX rules, it does not work for DirectQuery models with single sign-on (SSO) enabled. If your report queries a data source directly using the viewer’s credentials, you must test the security directly within the underlying database or by logging in with actual test accounts.
Second, be aware of how Power BI handles external users and service principals:
- B2B Guest Users: If you are sharing reports with external partners using Microsoft Entra B2B guest access, the USERPRINCIPALNAME() function may return a modified string containing “#EXT#” instead of their standard email address. Always create a simple “Who Am I” card visual in a test report to verify exactly what string Power BI is returning for your external guest users.
- Service Principals: If you are using a service principal to embed your reports, RLS is not applied automatically by the workspace. Because service principals act as administrators, they bypass standard RLS unless you explicitly pass an “Effective Identity” and a specific RLS role during the embed token generation process.
Frequently Asked Questions about Power BI RLS Default Roles
Can you set a default role for all users in Power BI?
No, Power BI does not support setting a native, automatic default role for all users. If a user is not explicitly assigned to an RLS role (either directly or via a group mapping in the Power BI Service), they will receive a model load error and see no data. To manage this efficiently at scale, you should map your RLS roles to Microsoft Entra ID (formerly Azure Active Directory) security groups, mail-enabled security groups, or distribution groups, rather than assigning individual users one by one.
Why do unassigned users see all data during testing?
If an unassigned user can see all data when opening a report, it is almost always due to workspace permissions. If that user is an Admin, Member, or Contributor in the Power BI workspace, Power BI intentionally bypasses RLS to allow them to edit and manage the report. To enforce RLS, you must change the user’s workspace role to Viewer, or distribute the report to them via a Power BI App or an external embedded portal.
How do service principals interact with RLS roles?
Service principals themselves cannot be added directly to RLS roles in the Power BI Service interface. When a service principal is used to generate embed tokens for an “app-owns-data” embedded application, the application backend must generate an “Effective Identity.” This process programmatically defines the username, the dataset ID, and the specific RLS roles that should be applied to the session, ensuring that secure, filtered data is delivered to the end-user.
Conclusion
Handling the power bi rls default role dilemma requires a proactive approach to security design. By understanding that unassigned users are blocked by default, and by leveraging dynamic RLS, star schema user mapping, and Entra ID security groups, you can ensure your data remains highly secure while providing a seamless user experience.
If you are building client-facing applications, managing these security mappings, workspace permissions, and embed tokens across multiple BI tools can quickly become a complex, time-consuming engineering challenge.
This is where Embedportal can help. We provide a powerful, white-label embedding platform designed to simplify your analytics deployment. With Embedportal, you can easily embed dashboards from Power BI, QuickSight, and Metabase into your own application with unified branding, robust row-level security, and single sign-on (SSO) integration — all configured in under an hour.
Ready to simplify your embedded analytics and secure your user data? Secure your embedded analytics with Embedportal and see how we can streamline your deployment.