Row-Level Security in Power BI Report Server: Step-by-Step Setup
Why Power BI Report Server RLS Is Critical for Secure On-Premises Reporting
Power BI Report Server RLS (Row-Level Security) is the mechanism that restricts which rows of data each user can see inside a published Power BI report — enforced entirely on your on-premises server, without sending data to the cloud.
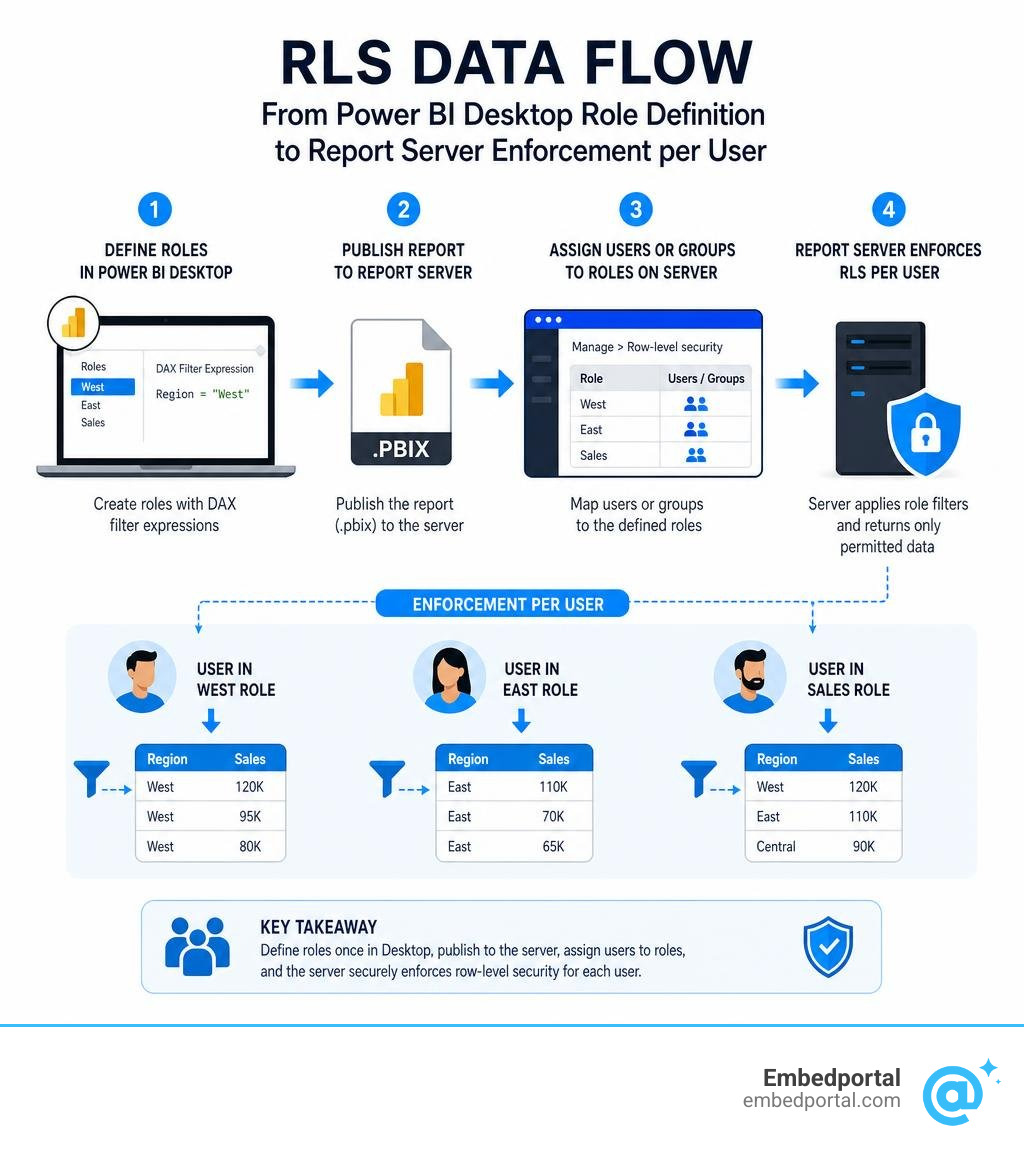
Here is a quick summary of how it works:
- Define roles in Power BI Desktop using DAX filter expressions (e.g.,
[Region] = "West") - Publish the report (.pbix) to Power BI Report Server
- Assign users or groups to those roles in the Report Server web portal under Manage > Row-level security
- Validate that filters apply correctly using the View As Roles feature in Power BI Desktop
A few things to know upfront:
- RLS only applies to Viewer-level users — admins and content managers bypass it entirely
- Dynamic RLS uses
USERNAME()orUSERPRINCIPALNAME()— but the format returned differs between Desktop and Report Server (more on that below) - RLS does not work with live connections to Analysis Services or DirectQuery using integrated authentication
- Roles are additive — a user in multiple roles sees the union of all permitted rows
This sounds straightforward. But in practice, a surprisingly common scenario plays out: RLS works perfectly in Power BI Desktop, then stops working after publishing to Report Server. The root cause is almost always a mismatch between how Desktop and Report Server handle user identity — Desktop returns DOMAIN\username, while Report Server returns a UPN like user@company.com.
If you’re managing dozens or hundreds of reports across an on-premises environment, getting RLS right — and keeping it consistent — is one of the harder operational challenges in enterprise BI.
What is Power BI Report Server RLS and How Does It Work?
To understand how row-level security functions in an on-premises setup, we must first look at the core infrastructure. As detailed in the official guide What Is Power BI Report Server? – Power BI | Microsoft Learn, this platform is an on-premises report server with a web portal where we display and manage reports and KPIs. It is a superset of SQL Server Reporting Services (SSRS), designed to keep highly sensitive data entirely behind your corporate firewall.
Within this environment, implementing Row Level Security in Power BI allows us to create a single report that serves multiple audiences. Instead of building and maintaining ten separate reports for ten regional managers, we build one report. When a manager opens it, the server dynamically filters the underlying data so they only see rows associated with their region.
While cloud-based RLS in the Power BI Service relies on Microsoft Entra ID (formerly Azure Active Directory) and cloud gateways, Power BI Report Server relies heavily on your local Active Directory, Windows Authentication, and local network protocols.
Here is how the core mechanisms of Power BI Report Server RLS operate:
- Additive Filtering: If a user is assigned to multiple security roles, Power BI Report Server combines those roles using a logical OR. This means filtering is additive: a user assigned to both the North Region and South Region roles will see the union of all permitted data rows for both regions.
- Role Limits: Power BI Report Server supports up to 250 roles per semantic model. This is plenty for most organizations, but it highlights the importance of using dynamic RLS patterns instead of creating hundreds of individual static roles.
- Identity Resolution Functions: The behavior of the DAX functions USERNAME() and USERPRINCIPALNAME() is a frequent source of confusion. In Power BI Desktop, USERNAME() typically returns the local domain and username in the format DOMAIN\username. However, once published to Power BI Report Server, both USERNAME() and USERPRINCIPALNAME() return the User Principal Name (UPN) format, such as user@company.com. We must design our security tables around this UPN format to avoid broken filters.
Step-by-Step Guide to Setting Up Row-Level Security
Setting up row-level security requires a coordinated workflow that starts in Power BI Desktop and finishes in your web browser. According to the technical documentation on Row-level security (RLS) in Power BI Report Server – Power BI | Microsoft Learn, we must define the roles and rules in Power BI Desktop before we can assign any members to them on the server.
Before we begin the steps, there are two key configurations to keep in mind:
- Bidirectional Cross-Filtering: If you are implementing dynamic RLS using a user-mapping table, you will need to establish a relationship between your security table and your main data tables. For the security filter to propagate correctly, you must manually check the box to Apply security filter in both directions on that relationship.
- Authentication Requirements: To assign Active Directory groups to roles on the Report Server, your server must be configured with NTLM or Kerberos authentication. This ensures the web portal can resolve group memberships when a user attempts to view a report.
Step 1: Define Roles and Rules for Power BI Report Server RLS in Desktop
First, open your report in the version of Power BI Desktop optimized for Power BI Report Server.
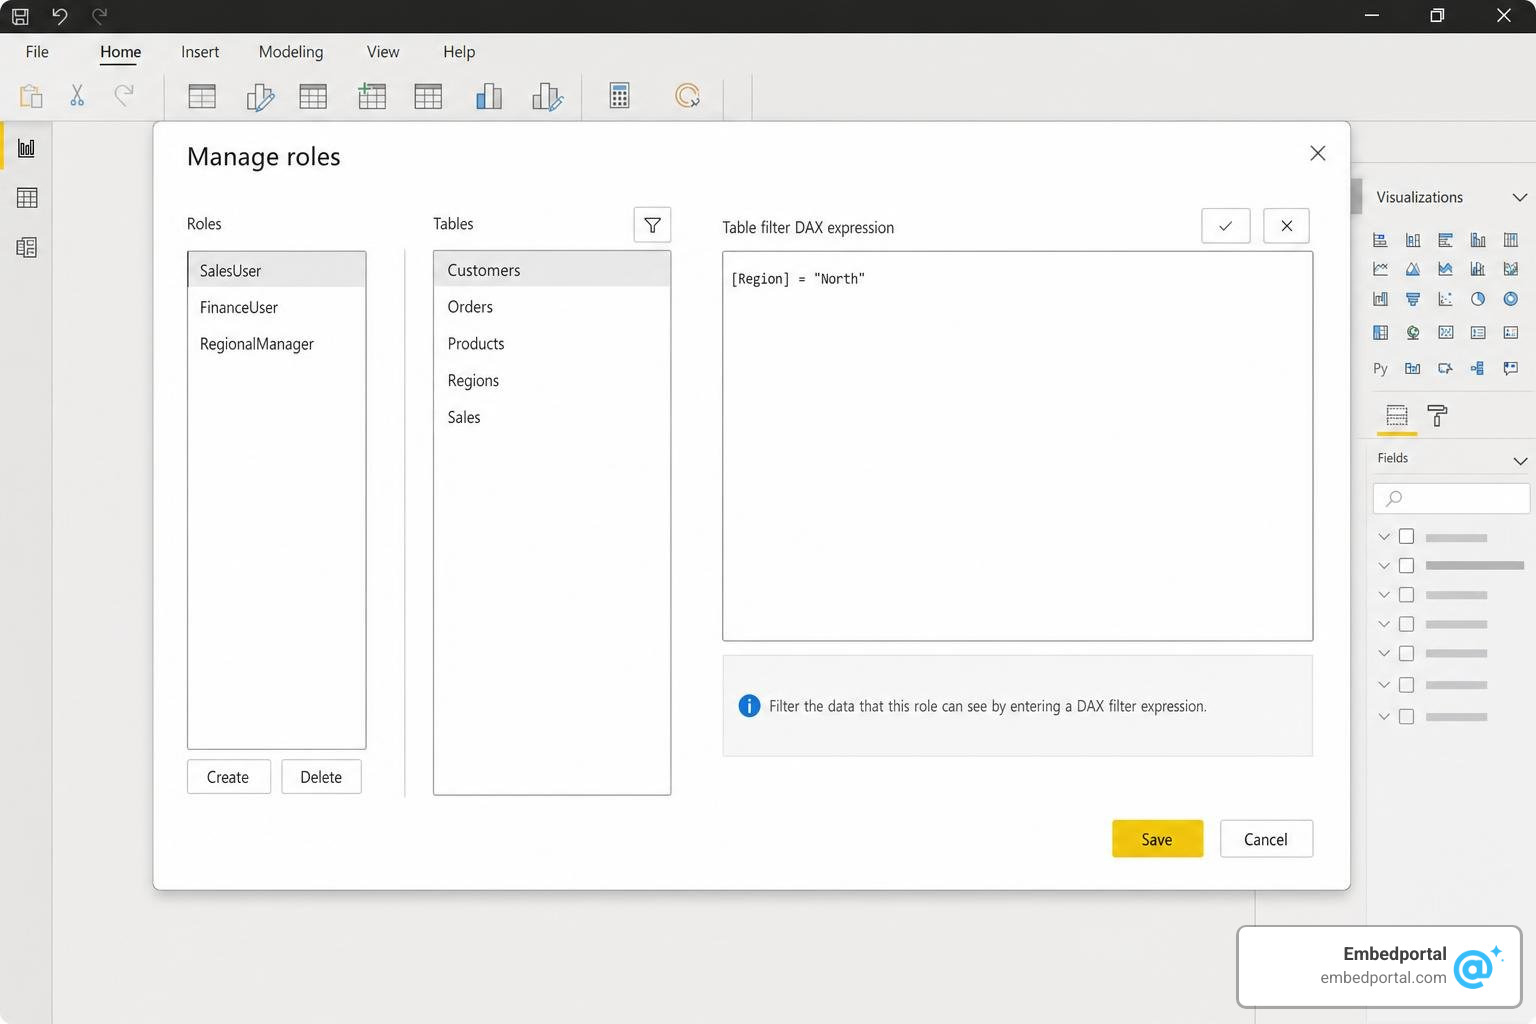
To set up a static RLS role:
- Navigate to the Modeling tab in the top ribbon and select Manage Roles.
- Click Create to add a new role and give it a descriptive name, such as West Region.
- In the Tables list, select the table you want to filter (for example, Sales).
- In the Table filter DAX expression box, enter your filter rule. For a static filter, you might write: [Region] = “West”
- Click Save to store the role definition.
To set up a dynamic RLS role:
Dynamic security is much more scalable. Instead of hardcoding regions, we map users dynamically using their login identity.
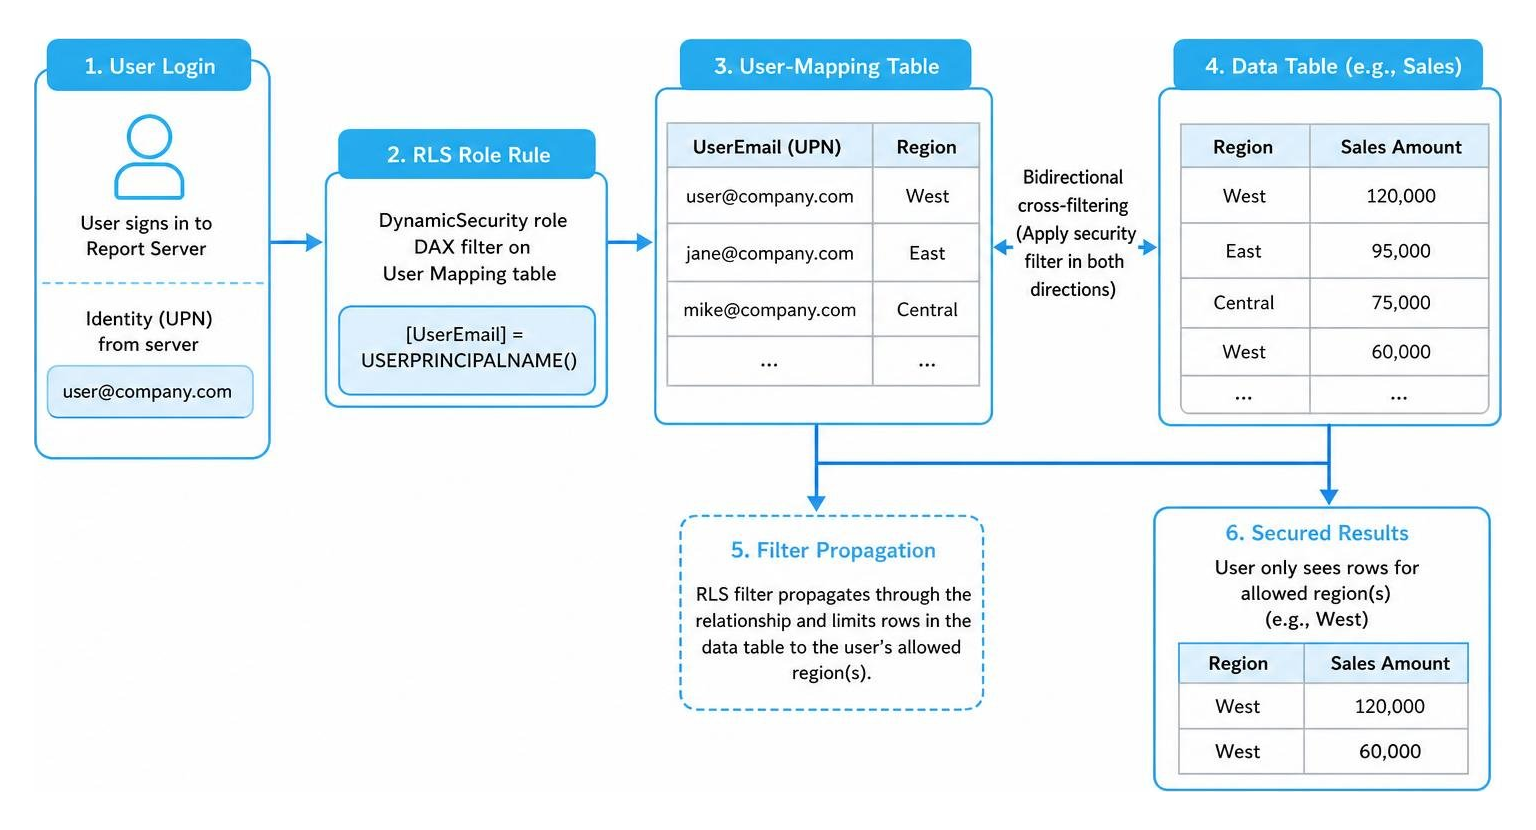
- Import a user-mapping table into your model. This table should contain at least two columns: the user’s UPN (e.g., email address) and the region or department they are allowed to see.
- Create a relationship between this user-mapping table and your main data table. Ensure you check the Apply security filter in both directions option.
- Go to Manage Roles and create a new role, naming it something like DynamicSecurity.
- Select your user-mapping table in the list.
- In the DAX editor, enter a filter rule that compares the login identity to your UPN column: [UserEmail] = USERPRINCIPALNAME()
- Click Save.
Step 2: Assign Members to Power BI Report Server RLS Roles in the Web Portal
Once you have defined your roles and saved your report, publish it to your Power BI Report Server. Now we must map our real-world Active Directory users to the roles we just built.
- Open your web browser and navigate to your Report Server web portal.
- Find your published report, click the ellipsis (…) on the report tile, and select Manage.
- In the left-hand menu, select the Row-level security page.
- You will see a list of the roles you defined in Power BI Desktop. Select a role (such as West Region).
- Click Add member.
- Enter the accounts of the users or Active Directory security groups you want to assign to this role. You can enter them in either the DOMAIN\username format or as email addresses, depending on how your Active Directory is configured.
- Click Save to apply the assignments.
Limitations and Compatibility Constraints
While RLS is incredibly powerful, it behaves differently depending on how your report connects to its data sources. Understanding these boundaries prevents unexpected security gaps where users see data they should not have access to.
| Connection Type | RLS Configuration Location | Supports Report Server RLS? | Notes |
|---|---|---|---|
| Import Mode | Power BI Desktop | Yes | Fully supported; filters applied in memory. |
| DirectQuery (Stored Credentials) | Power BI Desktop | Yes | Supported; filters appended to SQL queries. |
| DirectQuery (Integrated Auth) | Source Database | No | Bypassed; data returned based on source credentials. |
| Live Connection (SSAS Tabular) | SSAS Model | No | Defined in the on-premises Analysis Services model. |
| Excel Datasets | N/A | No | RLS cannot be applied to local Excel files. |
When planning your data architecture, keep in mind the Row Level Security Best Practices. One major pitfall is assuming that RLS works universally across all custom authentication setups. If your Report Server uses a custom security extension instead of standard Windows Authentication, you must manually handle user principal mapping during role assignments.
Analysis Services Live Connections
If your report connects to an on-premises SQL Server Analysis Services (SSAS) tabular or multi-dimensional database via a live connection, you cannot configure RLS inside Power BI Desktop or on the Report Server web portal.
Instead, security roles must be defined directly within the SSAS database model. When a user opens the report, Power BI Report Server passes their identity through to SSAS using EffectiveUserName. SSAS then evaluates its own internal roles and filters the data before sending it back. If you try to define roles in Desktop on a live connection, those roles will not propagate to the server.
DirectQuery and Integrated Authentication
If you configure a DirectQuery report to use integrated Windows authentication (using Kerberos delegation), RLS in Power BI Report Server does not apply.
Because the report passes the viewer’s personal Windows credentials directly to the underlying SQL database, the database itself controls what data is returned. In this scenario, all data is returned to report readers based on their database-level permissions, completely bypassing any RLS rules you defined in Power BI Desktop. To use Report Server RLS with DirectQuery, you must configure the data source connection to use stored credentials.
Troubleshooting and Auditing RLS Deployments
When RLS fails, it usually errs on the side of caution by either showing blank visuals or displaying too much data to a user who should be restricted. Developing a systematic approach to validation and auditing is key to maintaining a secure environment. We highly recommend adopting a Centralized Row Level Security strategy to keep your security tables clean and easy to test.
Why RLS Works in Desktop but Fails on the Server
The most common support ticket we see is: “My RLS works perfectly when I test it in Power BI Desktop, but as soon as I publish it to the Report Server, users can see everything!”
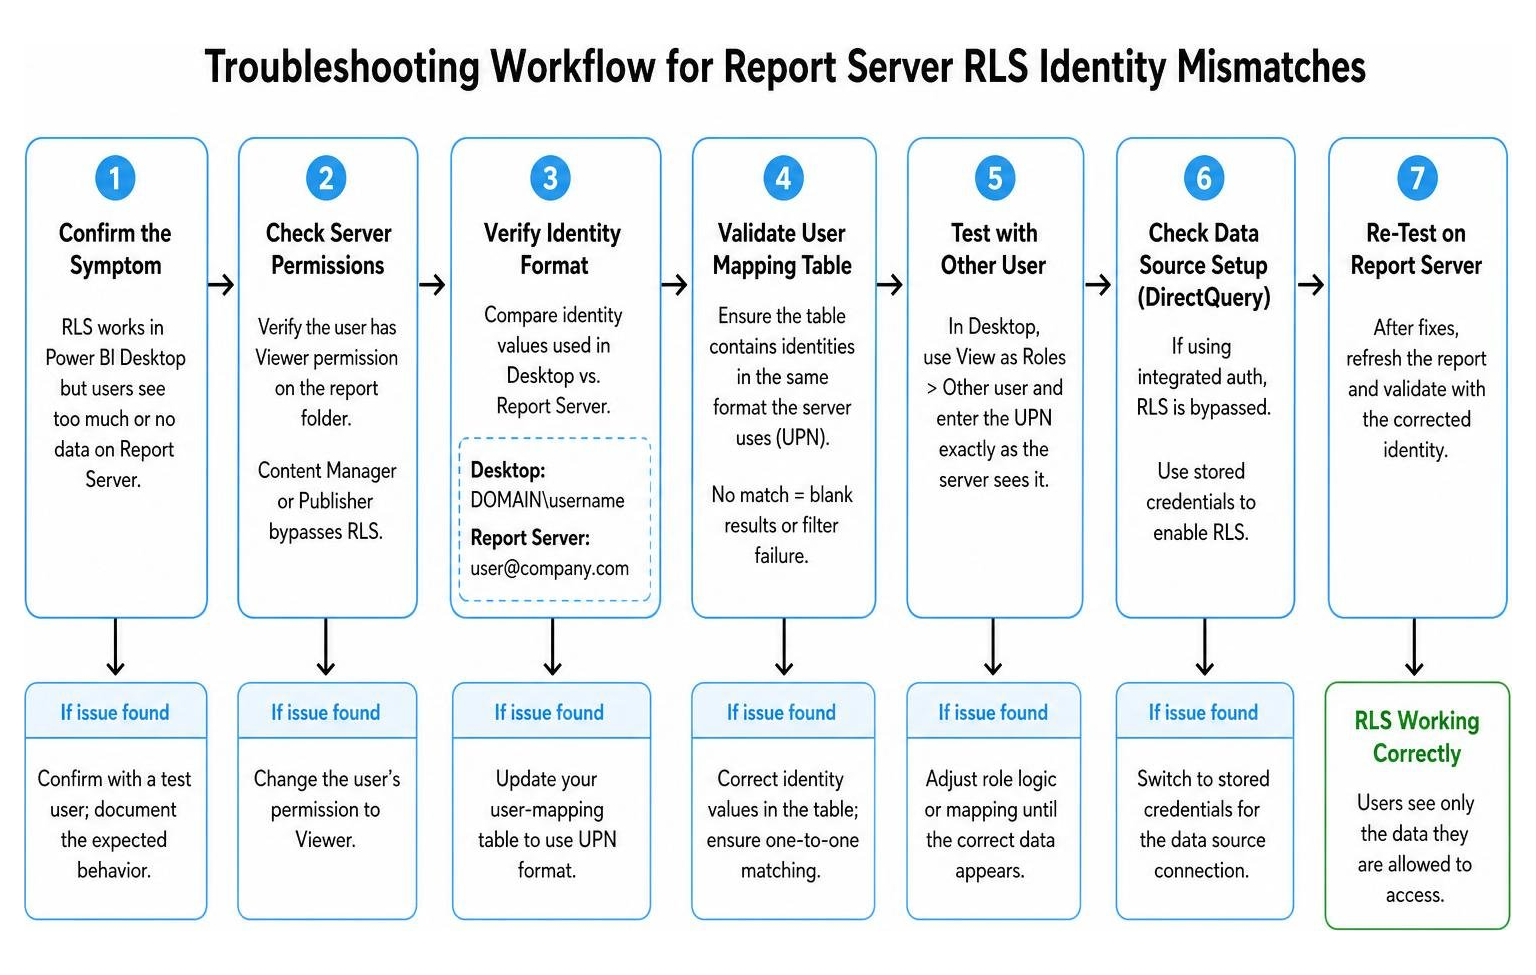
Here is a troubleshooting checklist to run through when this happens:
- Check the User’s Server Permissions: Power BI Report Server RLS is enforced only for users with Viewer permissions. If a user has been granted Content Manager or Publisher permissions on the report folder, they bypass RLS entirely and will see all data.
- Verify the Identity Format: In Power BI Desktop, testing with the USERNAME() function often evaluates to your local corporate domain format (e.g., CORP\jdoe). However, on the Report Server, it evaluates to the UPN format (e.g., john.doe@company.com). If your user-mapping table is filled with DOMAIN\username values, the server-side comparison will fail to find a match and return empty results or break the filter.
- Use “Other User” to Validate: When testing in Power BI Desktop using the View as Roles feature, do not just check the role name box. Check the Other user box as well, and type in the exact UPN format (user@company.com) that the Report Server will see.
Programmatically Auditing RLS via REST API
If you are managing a large-scale deployment with hundreds of reports, manually checking each one to see if RLS is enabled is highly inefficient. Fortunately, Power BI Report Server exposes a REST API that we can query to audit our reports.
We can use a PowerShell script to loop through our report inventory and check for role assignments. The script calls the Report Server REST API to pull all Power BI reports, then queries the DataModelRoleAssignments endpoint for each report.
To perform this audit, you can run a script structure similar to this:
- Send a GET request to your server’s report endpoint:
http:///reports/api/v2.0/PowerBIReports - For each report returned in the payload, extract its unique ID.
- Send a subsequent GET request to:
http:///reports/api/v2.0/PowerBIReports( )/DataModelRoleAssignments - If the returned array is not empty, it means RLS roles have been mapped to Active Directory users or groups on the server. You can export these mappings to a CSV file for compliance reviews.
Frequently Asked Questions about RLS on Report Server
Can I use RLS to restrict access to specific columns or measures?
No. Row-level security is strictly designed to filter rows of data within a table. If a user has permission to view a specific row, they will be able to see every column and measure associated with that row. If you need to hide sensitive columns (like salary or social security numbers) while keeping other columns visible, you must implement Object-Level Security (OLS) in your model or split the data into separate reports.
How many security roles can I define per semantic model?
You can define up to 250 roles per semantic model in Power BI Report Server. If your organization requires thousands of different data access combinations, do not try to build a static role for each one. Instead, implement a dynamic RLS design using a single security role linked to a user-mapping table.
Does RLS apply to users with Content Manager permissions?
No. RLS rules are only enforced for users who access the report with Viewer permissions. Users assigned to Content Manager or Publisher roles on the Report Server are treated as administrators for that content; they bypass all RLS filters and see the complete, unrestricted dataset.
Conclusion
Implementing power bi report server rls ensures your sensitive corporate data remains secure and accessible only to authorized personnel, all within your on-premises firewall. By understanding the differences in username formats, managing role assignments in the web portal, and auditing your reports regularly, you can build a highly secure and scalable reporting environment.
If you are looking to simplify your analytics architecture further, we at Embedportal can help. We are based in California, USA, and we provide a white-label embedding platform for BI dashboards. Our unique platform allows teams to embed multi-vendor analytics with unified branding, robust Row Level Security, and single sign-on (SSO) in under an hour. This means you can deliver secure, beautifully branded dashboards to your clients and internal teams without the headaches of managing complex, fragmented security models across multiple tools.