QuickSight Row-Level Security: Keep Your Dashboards on a Need-to-Know Basis
Why Row-Level Security in QuickSight Is Critical for Secure Data Sharing
Row-level security in QuickSight is a feature in Amazon QuickSight’s Enterprise edition that lets you restrict which rows of data each user or group can see — without building separate dashboards or datasets for every user.
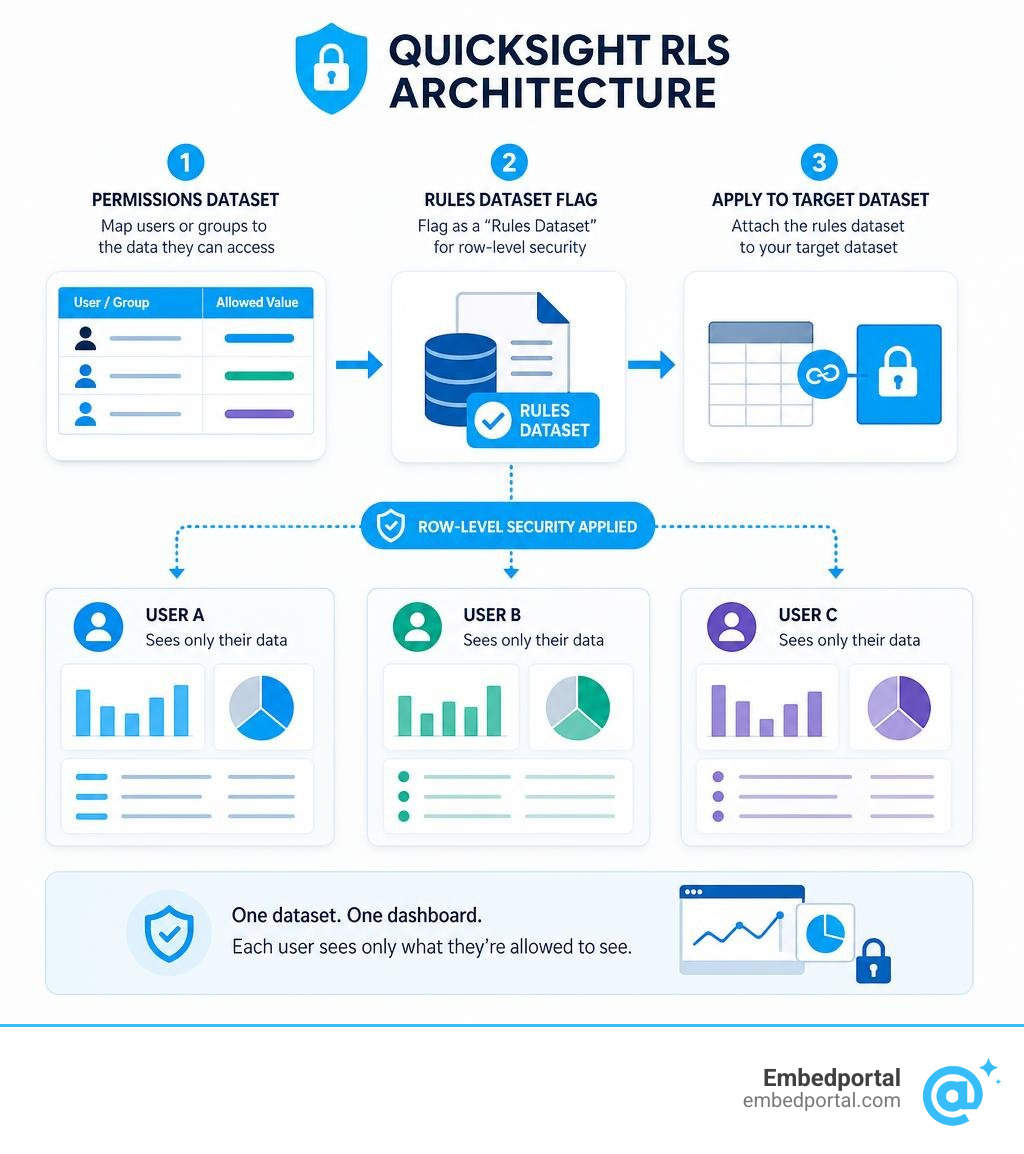
Quick answer: How does QuickSight row-level security work?
- Create a permissions dataset that maps usernames or group names to the data values they’re allowed to see
- Flag that dataset as a “Rules Dataset” in QuickSight
- Apply it to your target dataset
- QuickSight automatically filters each user’s view based on their rules — they only ever see their slice of the data
That’s the core of it. One dashboard, one dataset, many users — each seeing only what they should.
Think about the alternative. Without RLS, enforcing data access in a shared dashboard means building separate datasets per user group, maintaining views in your database, or relying on data masking. That’s a lot of overhead, especially if you’re embedding dashboards for dozens — or hundreds — of customers.
This is a real pain point for SaaS teams. When you’re serving multiple tenants from a single QuickSight deployment, fragmented security across users can quietly become a compliance risk. One misconfigured dashboard and a customer sees another customer’s data.
QuickSight’s row-level security solves this at the dataset level. Rules apply consistently, whether a user opens the dashboard directly or through an embedded portal. And because the restriction lives in the dataset itself, it travels with the data — not the dashboard.
Terms related to row-level security quicksight:
What is Row-Level Security in Amazon QuickSight?
When building modern, interactive business intelligence dashboards, you often run into a common security challenge: you have a single, unified dataset containing data for your entire business, but your viewers should only see a specific slice of it. For example, a regional sales manager in California should only see West Coast transactions, while your corporate leadership needs a global view.
If you do not have an elegant way to filter this data dynamically, you are forced to build and maintain dozens of distinct dashboards or write complex custom SQL views for every single user role. This is where Row Level Security (RLS) comes in.
In Amazon QuickSight Enterprise edition, RLS allows us to restrict access to a dataset based on the identity of the user or group accessing it. Instead of creating physical duplicates of your data, you apply a set of security rules to a single parent dataset. When a reader logs in, QuickSight evaluates their identity against your rules and dynamically filters the underlying query. The user only sees the rows they are explicitly permitted to view. This approach keeps your data architecture clean, minimizes SPICE consumption, and simplifies dashboard maintenance.
How QuickSight RLS Works Under the Hood
To understand how row-level security quicksight operates, we have to look at the relationship between the target dataset (the one containing your business data) and the permissions dataset (the rules engine).
When a user opens a dashboard or interacts with a visual, QuickSight does not just run a generic query. It intercepts the request and checks if there is an active RLS policy applied to the underlying dataset. If an RLS policy is present, QuickSight joins the target dataset with your permissions dataset behind the scenes using the columns you designated as restricted fields.
For example, if your target dataset has a column called SalesRegion, and your permissions dataset maps the username AlejandroRosalez to the SalesRegion value of California, QuickSight appends a WHERE clause to the query under the hood: WHERE SalesRegion = ‘California’. If a user is not listed in your permissions dataset, QuickSight defaults to a secure posture: it denies access entirely, showing the user an empty visual or an authorization error.
This mechanism is explained in detail in the Applying row-level and column-level security on Amazon QuickSight dashboards | AWS Big Data Blog , which highlights how RLS acts as a robust gateway directly at the dataset layer, ensuring that no unauthorized rows ever reach the presentation layer.
User-Based vs. Tag-Based Row-Level Security QuickSight Approaches
Depending on how your users authenticate and access your dashboards, QuickSight offers two main flavors of RLS: user-based rules and tag-based rules. Choosing the right one is critical for building a scalable Multi Tenant Row Level Security architecture.
- User-Based RLS: This approach is designed for registered QuickSight users and groups (such as those provisioned directly in QuickSight, synced via Active Directory, or federated through an identity provider). You define a rules dataset that explicitly maps a QuickSight UserName or GroupName to specific field restrictions. This is the most secure and auditable method for internal dashboards or corporate portals where every viewer has a recognized identity within your AWS account.
- Tag-Based RLS: This approach is designed specifically for embedded dashboards with unregistered (anonymous) users. Instead of mapping rules to a persistent username, you define session tags in your application code. When your backend requests an embedded dashboard session URL from AWS, it passes these tags (such as TenantID or Region) dynamically. QuickSight then matches these runtime session tags against the columns in your dataset to filter the rows on the fly.
If you are managing an internal team with dedicated logins, user-based RLS is your best bet. If you are a SaaS provider embedding dashboards into an external software portal for thousands of anonymous clients, tag-based RLS is the industry standard.
Implementing Row-Level Security QuickSight Rules: A Step-by-Step Guide
Implementing user-based RLS in QuickSight involves a structured workflow. We will walk through the exact process to configure and apply these rules securely.
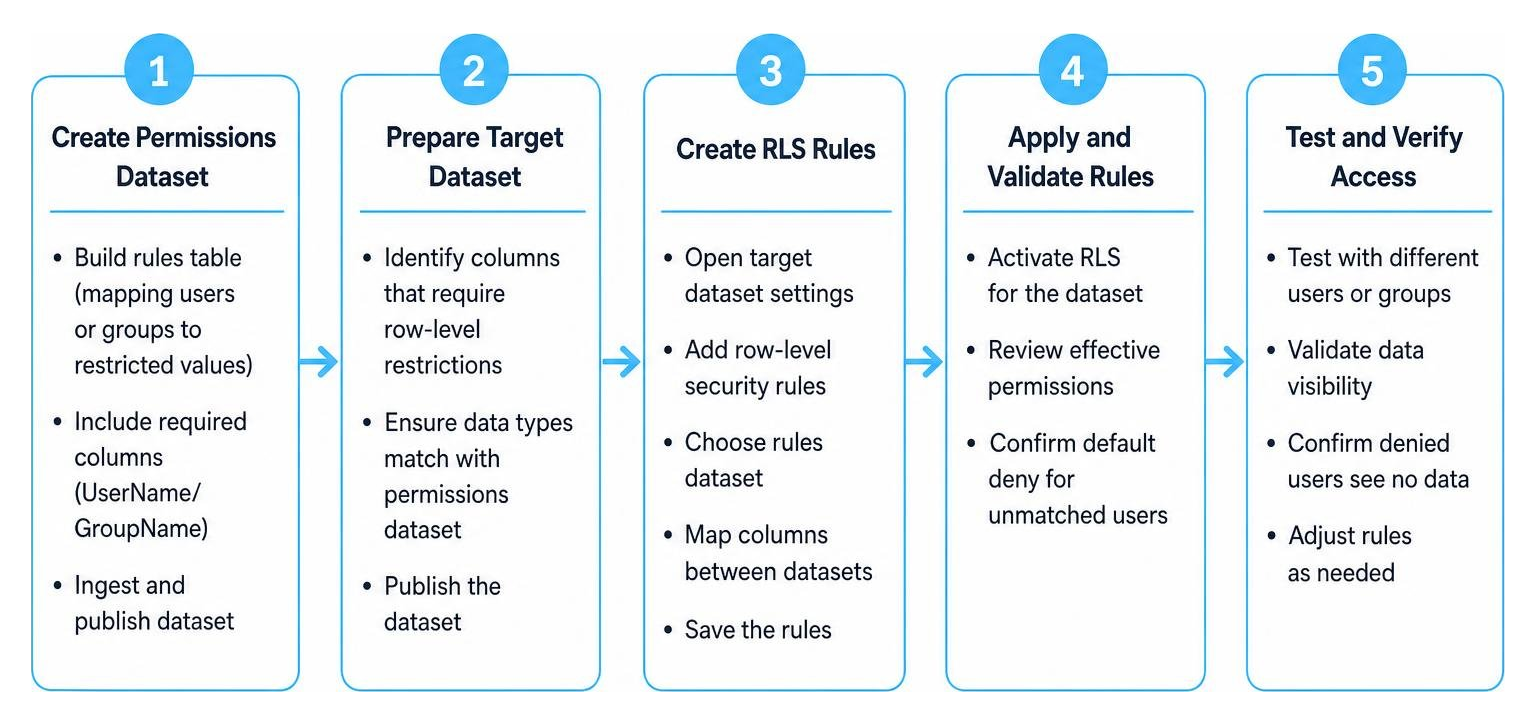
Step 1: Creating and Configuring the Permissions Dataset
The foundation of your RLS setup is the permissions dataset. This is a separate table or file that tells QuickSight who can see what. You can create this rules table using a CSV upload, an Excel sheet, or a direct SQL query against your database.
To build a valid user-based permissions dataset, you must include at least one identifying column and one or more restriction columns. The identifying columns must be named exactly as follows (and are case-sensitive):
- UserName: The registered QuickSight username.
- GroupName: The name of a QuickSight group or Microsoft AD group.
- UserARN: The Amazon Resource Name of the QuickSight user.
- GroupARN: The Amazon Resource Name of the QuickSight group.
The restriction columns must match the exact column names of the fields you want to filter in your target dataset. For example, if your target dataset contains a column named Segment and another named SalesRegion, your permissions dataset should look like this:
| UserName | SalesRegion | Segment |
|---|---|---|
| AlejandroRosalez | California | Enterprise |
| AlejandroRosalez | Texas | Mid-Market |
| SaanviSarkar | Texas | NULL |
| MarthaRivera | NULL | NULL |
In this configuration, AlejandroRosalez can see Enterprise data in California and Mid-Market data in Texas. SaanviSarkar can see all segments in Texas (using a NULL value as a wildcard). MarthaRivera can see all data across all regions and segments because both restriction fields are set to NULL.
If you prefer to manage these rules dynamically, you can write a SQL query to generate this table from a database. For instance:
SELECT User as UserName, Region as SalesRegion, CustomerSegment as Segment FROM corporatepermissionstable
Once your permissions file or query is ready, import it into QuickSight as a new dataset. This dataset will serve as your centralized security registry. For more on managing these structures, read our guide on Centralized Row Level Security.
Step 2: Applying the Rules and Flagging the Dataset
Once your permissions dataset is created, you must apply it to your target dataset. To do this, follow the official workflow outlined in the AWS documentation for Using row-level security with user-based rules to restrict access to a dataset :
- In the QuickSight console, navigate to the Datasets tab and select the target dataset you want to protect.
- Click on Row-level security (or RLS) from the dataset details page.
- Select User-based rules and choose the permissions dataset you created in Step 1.
- QuickSight now utilizes a dedicated Rules Dataset Flag to explicitly declare this dataset as a security rules file. Enable this flag to proceed.
- Choose your Permission Policy. You will typically select Grant access to data set. This acts as a default-deny policy: any user or group not explicitly listed in your permissions dataset will have zero access to the target data.
- Click Apply to save the changes.
If your target dataset is stored in SPICE, QuickSight will prompt you to refresh the dataset. The RLS rules will become active immediately after the refresh completes.
Step 3: Handling Multi-Tenant Scenarios and Anonymous Embedding
In multi-tenant SaaS environments, ensuring strict tenant isolation is a non-negotiable requirement. When embedding dashboards for external clients, you cannot risk data leakage.
If you are using anonymous embedding, you will rely on tag-based RLS. When your application server generates the embedded dashboard URL using the QuickSight API, it calls the GenerateEmbedUrlForAnonymousUser action. In this API call, you must define the dynamic session tags:
- TagKey: TenantID, TagValue: Tenant_A
- TagKey: UserRole, TagValue: Manager
Inside QuickSight, you configure your target dataset to map these session tags to your dataset columns (e.g., mapping the TenantID tag to your customerid column). When the anonymous dashboard loads, QuickSight automatically filters the visuals to only show rows where customerid equals Tenant_A.
This multi-tenant security model also extends to advanced BI features like natural language querying. As detailed in Implementing Secure, Multi-Tenant Q&A Dashboards with Amazon Q in QuickSight | by Hareesh Iyer | Medium , Amazon Q in QuickSight natively respects dataset-level RLS rules. This means that if a tenant asks a natural language question (e.g., “What were my sales last month?”), Amazon Q will filter the generative answer using the underlying RLS rules, ensuring that users can never query data outside their assigned tenant boundary.
QuickSight RLS Limitations, Quotas, and Data Source Interactions
Before designing your security architecture, you should understand how row-level security quicksight interacts with different data engines and the quotas imposed by AWS.
| Feature / Limit | SPICE Datasets | Direct Query Datasets |
|---|---|---|
| Max Rules per User | 999 rule records (including group rules) | No hard limit (governed by database performance) |
| Max Filter Values | 192,000 filter values per restricted field | Governed by target database SQL query limits |
| Field Type Support | Textual fields only (string, char, varchar) | Textual fields only (string, char, varchar) |
| Performance Impact | Minimal (evaluated rapidly in-memory) | Dependent on database indexing and join speeds |
| Child Dataset Inheritance | Supported, but child must use Direct Query | Supported natively |
Key Quotas and Field Constraints
When configuring user-based rules, you must design your permissions dataset around several strict technical guardrails:
- Rule Records Quota: The full set of rule records applied to a single user must not exceed 999. This count includes rules directly assigned to their username plus any rules assigned to them through their GroupName memberships.
- SPICE Filter Value Quota: For SPICE datasets, the total number of filter values applied per user cannot exceed 192,000 for each restricted field. If your user-group mappings expand beyond this, SPICE ingestion or evaluation will fail.
- Field Length Limits: Each field in SPICE datasets can contain up to 2,047 Unicode characters. Any field in your permissions dataset exceeding this quota will be truncated during ingestion, which can break your security mappings.
- Data Type Restrictions: Row-level security works only for fields containing textual data (string, char, varchar, etc.). It does not work directly on date or numeric fields. If you need to restrict data based on a year or a numeric ID, you must convert that field to a string in your data preparation stage.
- Feature Incompatibilities: Anomaly detection is not supported for datasets that use row-level security. If your business dashboard relies on QuickSight’s native ML-powered anomaly detection, you cannot apply RLS to that specific dataset.
Handling Edge Cases: NULLs, Empty Strings, and Commas
To prevent security gaps or ingestion failures, you must handle special characters and empty values with care:
- Using NULL for Wildcards: In QuickSight RLS, a NULL value in a permissions column does not mean “filter for empty database records.” Instead, it acts as a wildcard. If you set a user’s SalesRegion permission to NULL, that user is granted access to all regions.
- Empty Rules Behavior: If a user is listed in your permissions dataset but has completely blank or empty rules for a specific field, QuickSight skips that empty rule to prevent accidental exposure of all data. The user will simply see no data for that field.
- Handling Commas in Values: If your restricted field values contain commas (e.g., a city name like “Portland, OR”), you must wrap the entire value in double quotes within your CSV permissions file. Otherwise, QuickSight’s parser will split the string, leading to invalid rule matching.
- Case Sensitivity: All usernames, group names, and field values are strictly case-sensitive. If your target dataset contains “Enterprise” and your permissions dataset lists “enterprise”, the match will fail, and the user will see no data.
Best Practices and Troubleshooting for RLS at Scale
Managing RLS for a handful of users is straightforward, but scaling it to thousands of users across multiple dashboards requires a structured approach.
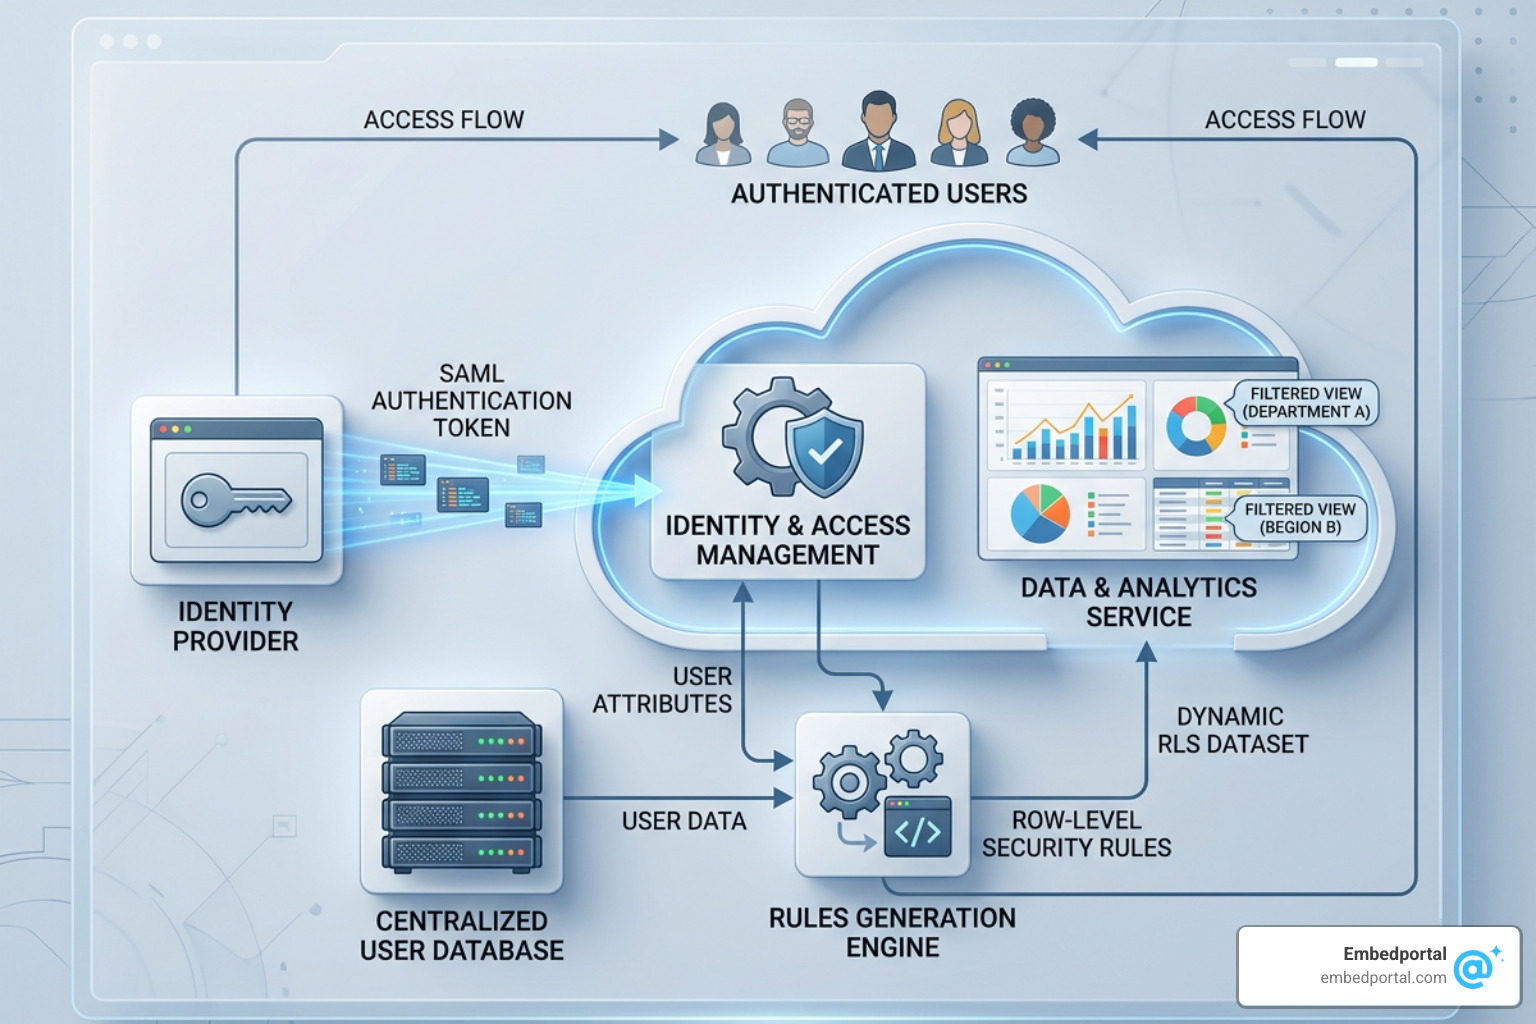
- Prefer Group-Based Rules Over User-Based Rules: Assigning rules to individual usernames creates a massive administrative burden. Instead, map your RLS rules to QuickSight GroupName values. When a new employee joins a regional team, simply add them to the corresponding QuickSight or AD group, and they will automatically inherit the correct data filters.
- Use Direct Query for Your Permissions Dataset: While your target business data can be stored in SPICE for lightning-fast performance, we recommend keeping your permissions dataset on Direct Query. This ensures that any changes to your security rules (such as a sales rep changing territories) take effect immediately without waiting for a SPICE refresh.
- Integrate with SSO Providers: If your organization uses Okta, Ping Identity, or Azure AD, you can pass group memberships during the SAML assertion process. As discussed in [How to use RLS (Row-Level Security) with Quicksight which is integrated with Okta for SSO | AWS re:Post ], you can configure QuickSight to automatically place users into corresponding groups upon login, allowing your Okta directory to drive your dashboard security dynamically.
- Centralize Your Rules Database: Do not maintain static CSV files for security. Store your permissions in a relational database table and build a simple admin UI for your operations team to manage access. This table can then be exposed to QuickSight as a centralized direct-query dataset.
Troubleshooting and Testing Your Row-Level Security QuickSight Setup
Before sharing dashboards with stakeholders, you must thoroughly test your RLS rules. A single misplaced row in your permissions dataset can block a user from doing their job or, worse, expose sensitive data.
- Test with Dedicated Test Accounts: Create several test users in your QuickSight account representing different security profiles (e.g., “TestWestManager”, “TestEastViewer”, “TestGlobalAdmin”). Log in as these users to verify that the visuals display the correct filtered data.
- Observe Error Behaviors: If a user is not listed in your permissions dataset, they will see an error message stating that they are unauthorized to view the dataset. If a visual displays “No Data Available” instead, this usually indicates that the user’s name is listed, but the field values in the permissions dataset do not match the casing or spelling of the target dataset.
- Understand Dashboard-Level Scope: QuickSight applies RLS at the dataset level, not the dashboard level. As discussed in the [How to Apply Role-Based Row-Level Security (RLS) Differently Across Multiple Dashboards in Quick Sight? – Q&A – Amazon Quick Community ], if you need to apply different security rules to the same underlying data across two different dashboards, you must duplicate the dataset, apply different RLS permissions datasets to each, and build your dashboards on top of those separate datasets.
Frequently Asked Questions about QuickSight RLS
Can I apply row-level security to date or numeric fields in QuickSight?
No. Amazon QuickSight’s row-level security engine only supports textual data fields (such as string, char, and varchar). If you need to filter your data based on numeric IDs or specific dates, you must convert those columns into string data types within your data preparation or ETL stage before applying your RLS rules.
What happens if a user is not listed in the RLS permissions dataset?
If you configure your row-level security policy to “Grant access to data set” (which is the default-deny and highly recommended setting), any user or group not explicitly listed in your permissions dataset will see no data. Their visuals will display an authorization error or appear completely blank.
Does Amazon Q in QuickSight respect row-level security rules?
Yes. Amazon Q in QuickSight natively respects dataset-level row-level security rules. When users ask natural language questions in Q&A dashboards, the generative answers and visuals returned by Amazon Q are strictly filtered based on the active RLS rules applied to the underlying datasets.
Conclusion
Enforcing robust data access controls is essential for any modern data organization. By utilizing row-level security quicksight, you can build unified, highly scalable dashboards that dynamically adapt to the identity of each viewer.
However, managing RLS configurations, database connections, and SSO integrations across multiple BI tools can quickly become overwhelming — especially if your team is trying to embed these dashboards into external SaaS products.
This is where Embedportal comes in. As a white-label embedding platform, we enable teams to embed multi-vendor analytics (including QuickSight, Tableau, Power BI, and Metabase) with unified branding, centralized row-level security, and SSO in under an hour. Whether you are scaling Row Level Security Power Bi setups, Row Level Security Tableau configurations, or QuickSight dashboards, we provide a unified portal to manage all your embedded analytics.
Ready to simplify your embedded dashboard security? Explore our resources on Category/Row Level Security or get started today by visiting the Embedportal Row Level Security Platform.