Tableau RLS Best Practices for Secure Workbooks
Why RLS in Tableau Is Critical for Secure, Multi-Tenant Dashboards
RLS in Tableau (Row-Level Security) is a method of controlling which rows of data each user can see — without building separate dashboards for every person or team.
Here’s the quick answer:
- What it does: Filters data at the row level so each user sees only the records they’re authorized to view
- Why it matters: By default, every user with access to a published Tableau workbook can see all the data in it
- How it works: Tableau matches the signed-in user’s identity (via
USERNAME()or group membership) against a security rule, then filters the underlying data accordingly - Main methods: Manual user filters, dynamic security fields, data policies on virtual connections, native database RLS, and JWT-based user attributes for embedding
- Who needs it: Any team sharing dashboards across multiple customers, regions, roles, or business units
If you’re building a product where customers log in and see dashboards, this is non-negotiable. Showing Company A’s data to Company B — even accidentally — is a serious breach of trust.
The challenge is that Tableau’s default sharing model is open. Publish a workbook, grant access, and every viewer gets the full dataset. RLS is what closes that gap.
For analytics and product leads embedding Tableau into a customer portal, RLS becomes especially complex. You’re not just filtering by region — you’re often filtering across multiple dimensions (company, department, role), across multiple workbooks, and needing it to hold up whether users connect via live query or extract.
This guide walks through every major approach, from simple manual filters to scalable entitlements tables and JWT-based embedding security.
Rls in tableau terms explained:
What is Row-Level Security (RLS) in Tableau?
Row-Level Security is a data filtering mechanism that restricts data access at the row level based on the identity or characteristics of the user viewing the dashboard. When a user opens a workbook, Tableau dynamically evaluates who they are and filters the underlying database query or extract so they only see the records they are permitted to view.
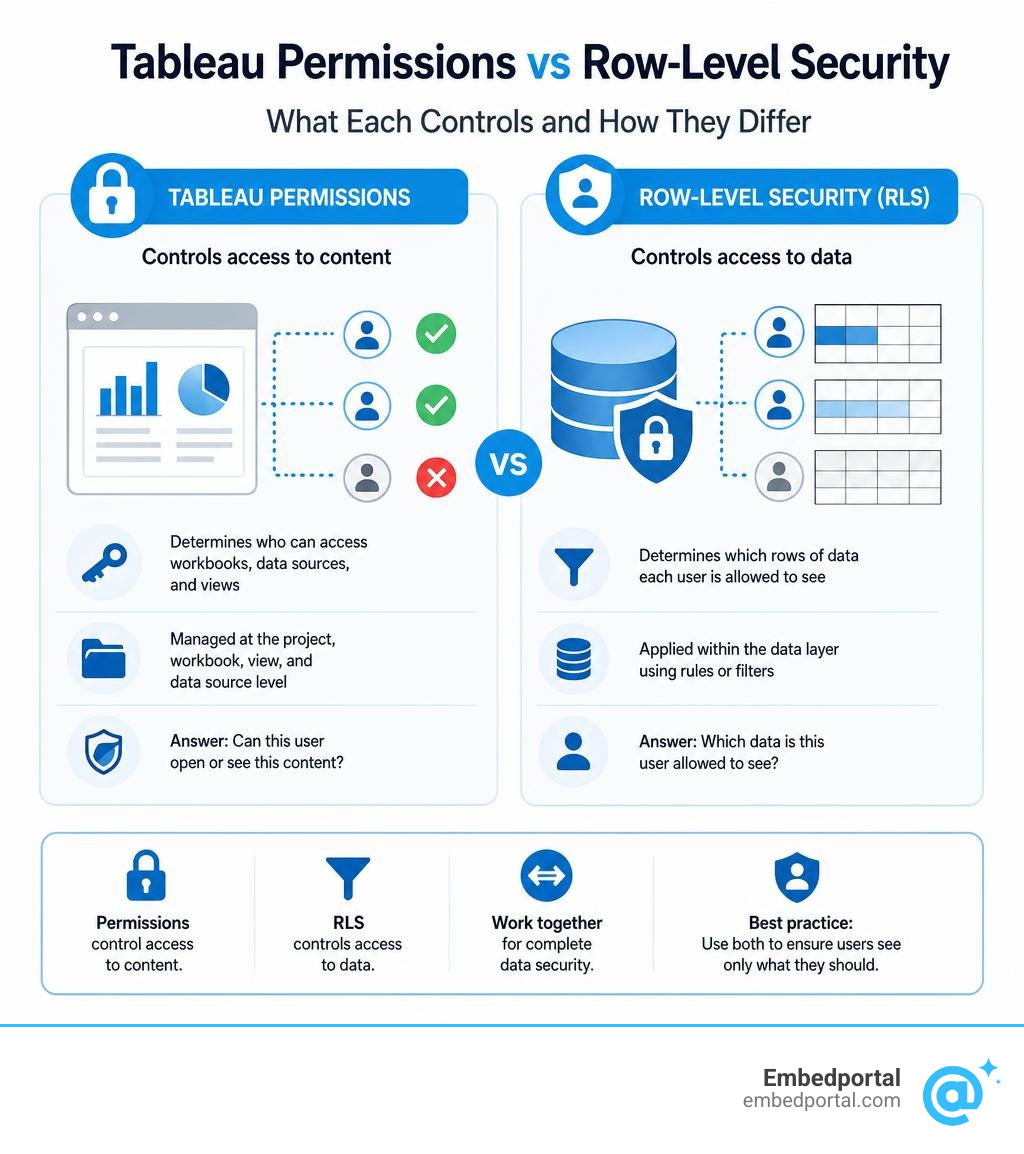
This is fundamentally different from standard Tableau content permissions. Content permissions control whether a user can open a workbook, download a PDF, or edit a sheet. RLS controls the actual data rows that populate the visualizations once that workbook is open. Two users can look at the exact same dashboard URL, but because of RLS, one might see only West Coast sales while the other sees East Coast sales.
For a deeper look at the various native options available, you can refer to the Overview of Row-Level Security Options in Tableau – Tableau.
The Role of RLS in Modern Data Governance
In modern, decentralized business environments, data governance is a delicate balancing act between agility and control. We want to empower teams with self-service analytics while keeping strict boundaries around sensitive information. RLS is the cornerstone of this balance.
With the rise of strict compliance frameworks like GDPR, CCPA, and industry-specific regulations, data privacy is no longer optional. RLS ensures that compliance is built directly into the data layer. If your organization is building multi-tenant analytics for external clients, RLS guarantees complete isolation between tenant data. It prevents data leakage and ensures that client administrators can only see their own organization’s metrics, preserving trust and data integrity.
For a broader overview of how these concepts fit into your overall security strategy, you can read More info about row level security services.
How User-Based Filtering Works Under the Hood
When a user logs into Tableau Server, Tableau Cloud, or an embedded portal, Tableau captures their identity. This identity is typically represented by their username or the security groups they belong to.
Under the hood, Tableau translates your RLS rules into a standard SQL WHERE clause when querying the database. For example, if you set up a rule stating that a user can only see data where the region matches their assigned region, Tableau dynamically appends a filter to the generated SQL query:
WHERE [Region] = ‘West’
To achieve this, Tableau relies on built-in system functions:
- USERNAME(): Returns the exact username of the signed-in Tableau user (or the local system user if offline in Desktop).
- ISMEMBEROF(): Checks if the current user belongs to a specific security group defined on Tableau Server or Tableau Cloud.
By embedding these functions into calculated fields and applying them as data source filters, you ensure that every query sent to your database or extract is securely scoped before the visualization is rendered.
Core Methods for Implementing RLS in Tableau
Implementing rls in tableau is not a one-size-fits-all process. Depending on your licensing, database architecture, and user scale, you can choose from several distinct approaches.
Below is a comparison of the five primary methods we will explore:
| Method | Best For | Maintenance | Performance | Licensing Required |
|---|---|---|---|---|
| Manual User Filters | Quick POCs, static teams | Very High | Excellent | Standard |
| Dynamic User Filters | Growing teams, standard databases | Medium | Good to Excellent | Standard |
| Centralized Data Policies | Enterprise-wide governance | Low | Excellent | Data Management |
| Database-Level RLS | Pre-existing DB security | Low | Dependent on DB | Standard (Live Only) |
| JWT User Attributes | Embedded SaaS applications | Very Low | Excellent | Connected Apps |
1. Manual User Filters with Static Mapping
Manual user filtering is the most basic form of row-level security in Tableau. With this approach, you manually map specific Tableau users or groups to dimension values directly inside Tableau Desktop.
To set this up, you navigate to the Server menu, choose Create User Filter, and select the field you want to filter on. Tableau then presents a dialog box where you can select a user on the left and check the boxes for the specific dimension values (like Country or Department) they are allowed to see on the right.
While simple to understand, this method is static and high-maintenance. Every time a new employee joins the team, or an existing user changes roles, you must open the workbook in Tableau Desktop, update the manual mapping, and republish the workbook. Because of this overhead, manual user filters are only recommended for quick proofs of concept, basic testing, or static workbooks with unchanging user bases.
For detailed step-by-step instructions on setting up manual filters, check out the official guide on how to Restrict Data Access with User Filters and Row Level Security – Tableau.
2. Dynamic User Filters Using Security Fields
If your user base changes frequently, manual mapping is out of the question. Instead, you should use dynamic user filters. This method automates the mapping process by comparing the logged-in user’s identity against a security field already present in your data source.
For instance, if your sales data table contains a column named Salesperson Email, you can create a simple calculated field:
[Salesperson Email] = USERNAME()
You then drag this calculated field to the Data Source Filter shelf and set it to keep only TRUE values. When a user opens the dashboard, Tableau automatically evaluates the calculation. If John Doe logs in, USERNAME() evaluates to john.doe@company.com, and Tableau filters the view to only show rows where the Salesperson Email column matches his email.
This approach is highly scalable and requires zero workbook maintenance when users are added or removed, as long as your underlying data source stays updated.
3. Centralized Data Policies on Virtual Connections
For organizations with a Tableau Data Management license, virtual connections and data policies represent the gold standard for centralized, server-enforced RLS.
Instead of defining RLS rules inside individual workbooks or published data sources, you define them once on a virtual connection. A virtual connection acts as a secure gateway to your database. Within this connection, you write data policies that map users to their data entitlements.
Once published, these data policies are enforced at the server level. Whether a user accesses the data via a curated dashboard, web authoring, or Ask Data, the security policy is applied automatically. This completely eliminates the risk of a creator accidentally deleting a data source filter and exposing sensitive data.
To see this centralized model in action, you can watch the official video on Centralized Row-Level Security.
4. Leveraging Native Database-Level RLS
If your organization has already invested heavily in building row-level security within your database (such as Snowflake, PostgreSQL, or SQL Server), you can pass the logged-in Tableau user’s identity directly to the database.
This method requires a live connection to the database. When a user opens the dashboard, Tableau uses credentials delegation (via Kerberos, OAuth, or database impersonation) to run the queries as the specific viewer. The database itself evaluates its internal security policies and only returns the authorized rows back to Tableau.
This approach is ideal for maintaining consistency across multiple business intelligence tools and clients, though it limits your ability to use offline Tableau extracts.
For a deeper dive into database-level integration, read Row-Level Security in the Database.
5. Passing User Attributes via JWT for Embedded Analytics
When building a modern SaaS product, you often need to embed dashboards directly into your application. Managing thousands of external customer accounts as individual Tableau Server users is incredibly tedious and expensive. This is where JSON Web Tokens (JWT) and Tableau Connected Apps come in.
With this method, when a user logs into your SaaS portal, your application generates a secure JWT. Inside this token, you can pass custom user attributes—such as TenantID, Region, or Role—directly to Tableau Cloud or Server.
Inside Tableau, you write dynamic calculations that reference these passed attributes. This allows you to build a single dashboard that automatically filters itself based on the secure token generated by your web application, providing seamless multi-tenant analytics without complex database joins.
If you are planning to build this type of architecture, we recommend reading our detailed developer walkthrough: Embed Tableau RLS Complete Guide.
Designing and Implementing Entitlements Tables
When your security rules are more complex than a simple one-to-one mapping, you need an entitlements table. An entitlements table is a reference table that maps usernames to their specific data permissions.
For example, a basic entitlements table might look like this:
- Username: alice@company.com | Allowed_Region: West
- Username: bob@company.com | Allowed_Region: East
- Username: bob@company.com | Allowed_Region: Central
By joining this reference table to your primary data table, you can build a highly flexible security model. For a comprehensive overview of this approach, refer to the Whitepaper – Row Level Security in Tableau with Entitlements Tables.
Entitlements Table Models: Deepest Granularity vs. Sparse Entitlements
There are two primary ways to design your entitlements table:
- Deepest Granularity Model: In this model, you map users to the absolute lowest level of your data hierarchy. If you filter by Store ID, your entitlements table must list every single Store ID a user can see. This model is incredibly precise, but it can lead to massive entitlements tables if a manager is allowed to see thousands of stores.
- Sparse Entitlements Model: This model uses wildcard logic or higher-level groupings to represent broad access. Instead of listing 500 stores for a regional manager, you simply list “Region: West” or use NULL values to represent “All Access.” This keeps the entitlements table small and manageable, but requires slightly more complex calculation logic to handle the wildcards and NULL values.
Step-by-Step: Setting Up RLS in Tableau with an Entitlements Table
Let’s walk through how to set up an entitlements-based RLS model in Tableau using physical joins.
Step 1: Connect Your Data and Entitlements Tables
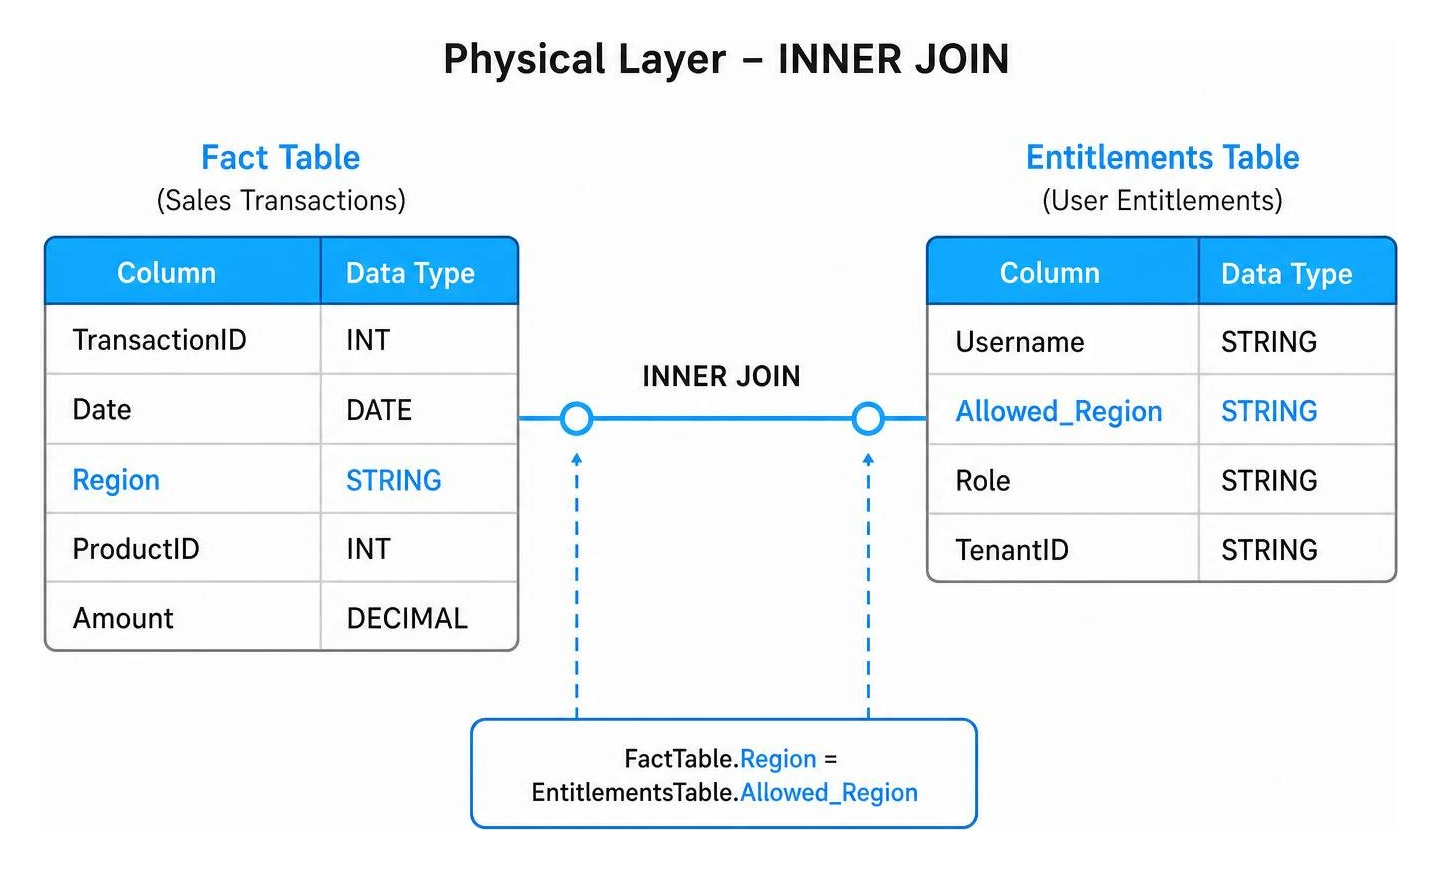
Open Tableau Desktop and connect to your primary fact table (e.g., Sales Transactions). Double-click the logical table to enter the physical join layer. Drag your Entitlements table into the canvas and configure an INNER JOIN.
Join on the dimension you want to restrict (e.g., FactTable.Region = EntitlementsTable.Allowed_Region).
Step 2: Create Your Security Calculated Field
Create a new calculated field in Tableau named “RLS Filter”. Write the following calculation:
[Username] = USERNAME()
This calculation will return TRUE if the logged-in user matches the username row in the joined entitlements table.
Step 3: Apply as a Data Source Filter
Right-click your data source in the top-left corner and select Edit Data Source Filters. Click Add, select your “RLS Filter” calculated field, and check the box for TRUE.
Now, when a user views the dashboard, Tableau will join the tables, filter the rows based on the logged-in username, and only display the matching data records.
For more details on setting up these joins, see Quick Explanation of Row Level Security in Tableau | Tableau and Behold.
Performance Optimization and Extract Considerations
Implementing RLS can sometimes impact dashboard performance. Because RLS dynamically appends query filters for every single user, it is essential to optimize your data structure to keep your dashboards running fast.
For a complete list of performance recommendations, review the RLS Best Practices for Data Sources and Workbooks – Tableau.
Live Connections vs. Extracts with RLS
When choosing between live connections and extracts for RLS, keep these performance characteristics in mind:
- Live Connections: Tableau passes the RLS filters directly to your database. If your database is well-indexed and optimized, this can work beautifully. However, if hundreds of users are opening dashboards simultaneously, it can put a heavy load on your database.
- Extracts: Storing your data as extracts often provides much faster load times. However, standard single-table extracts materialize joins, which can cause massive data duplication (join explosion) if your entitlements table has a many-to-many relationship with your data.
To get the best of both worlds, Tableau supports multi-table extracts, which store tables as separate physical entities inside the extract and perform the join at query time.
Best Practices for Multi-Table Extracts
If you are using extracts with an entitlements table, always configure your extract to store data as “Multiple Physical Tables”.
Tableau recommends keeping the number of tables in these extracts to exactly two: one primary data table and one reference/entitlements table. This prevents the extract from duplicating rows during creation, keeping file sizes small and extract generation times fast, while still allowing secure, dynamic filtering when a user opens the dashboard.
Handling Complex RLS in Tableau Scenarios
Real-world business requirements are rarely as simple as “User A sees Region A.” Often, you have to handle deep organizational hierarchies or multi-dimensional filtering.
Managing Hierarchical Access and Deep Org Structures
In a hierarchical structure, a regional manager needs to see all data for their region, while a district manager only sees their district, and the VP of Sales needs to see everything.
To handle this without creating a massive, flat entitlements table, you can use parent-child mapping. By structuring your entitlements table to include both the user’s role and their position in the hierarchy, you can write recursive calculated fields or use database views that automatically resolve the reporting structure. For instance, you can join on a manager ID to automatically grant managers access to all data rows owned by their direct reports.
Multi-Dimensional Filtering and Unrestricted “All Access” Users
What happens when a user needs to be filtered by multiple dimensions, such as both Company and Department? Or what about administrators who need unrestricted “All Access”?
To handle multi-dimensional filtering cleanly, you can use blank cells (or NULLs) in your entitlements table to represent unrestricted access for a specific dimension. Your security calculation can then check for these NULL values:
( [EntitlementsTable.Company] = [FactTable.Company] OR ISNULL([EntitlementsTable.Company]) ) AND ( [EntitlementsTable.Department] = [FactTable.Department] OR ISNULL([EntitlementsTable.Department]) )
This elegant approach allows you to grant broad access without having to explicitly list every single company and department combination for your executive team.
Common Mistakes to Avoid with RLS in Tableau
Implementing rls in tableau is highly rewarding, but there are a few common pitfalls that can lead to slow dashboards or, worse, data exposure.
1. Using Extract Filters Instead of Data Source Filters
One of the most dangerous mistakes is confusing an Extract Filter with a Data Source Filter.
If you apply your RLS calculated field as an Extract Filter, Tableau will evaluate the filter using the developer’s credentials at the time the extract is created. This bakes the developer’s personal permissions directly into the static extract file, making it identical for every user who views it and completely breaking security. Always apply RLS filters as Data Source Filters so they are evaluated dynamically for each viewer.
2. Embedding Data Sources in Workbooks Instead of Publishing
When you publish a workbook with an embedded data source, any user who has permission to download the workbook or use Web Edit can easily remove your RLS filters.
To prevent this, you should always publish your data sources separately to Tableau Server or Tableau Cloud, apply the RLS filters directly to the published data source, and then build your workbooks on top of that published source. This locks down the security rules at the data layer, making them impossible for end-users to bypass.
3. Overcomplicating the Logical Relationship Layer
With the introduction of Tableau’s logical relationships (the “noodle” model), it can be tempting to simply relate your entitlements table to your fact table.
However, relationships evaluate joins dynamically based on the dimensions used in your viz. In complex RLS scenarios, this can lead to unexpected row duplication or performance lag. For strict security enforcement, performing an INNER JOIN in the physical layer is often the most reliable way to guarantee that the security mapping is applied consistently across every single worksheet.
Frequently Asked Questions about Tableau RLS
What is the difference between Tableau permissions and RLS?
Tableau content permissions control access to assets (like who can view or download a workbook). RLS controls access to the actual data rows inside those assets, ensuring different users see different data within the same dashboard.
Can I use RLS with Tableau extracts?
Yes. You can use RLS with extracts by configuring them to store data as multiple physical tables, joining your data and entitlements tables, and using dynamic data source filters.
How do I handle “All Access” or admin overrides in RLS?
You can handle overrides by adding a check for a specific Tableau Server group (like Administrators) using the ISMEMBEROF() function in your security calculation, allowing members of that group to bypass the standard RLS filters entirely.
Conclusion
Implementing robust rls in tableau is essential for protecting sensitive data and maintaining governance in modern analytics environments. Whether you choose simple dynamic filters, centralized virtual connection policies, or sophisticated entitlements tables, the key is to design a model that is both highly secure and optimized for performance.
If you are building a customer-facing SaaS application, managing complex BI security and embedding setups can quickly become a full-time job. That is where we can help.
Embedportal provides a powerful, white-label embedding platform designed for BI dashboards. With Embedportal, you can easily embed multi-vendor analytics (including Tableau, Power BI, QuickSight, and Metabase) into your SaaS application with unified branding, centralized row-level security, and seamless single sign-on (SSO)—all set up in under an hour.
Ready to secure and simplify your embedded analytics?