Row Level Security Power BI Explained Like You Are Five
What Is Role Level Security in Power BI (And Why Should You Care)?
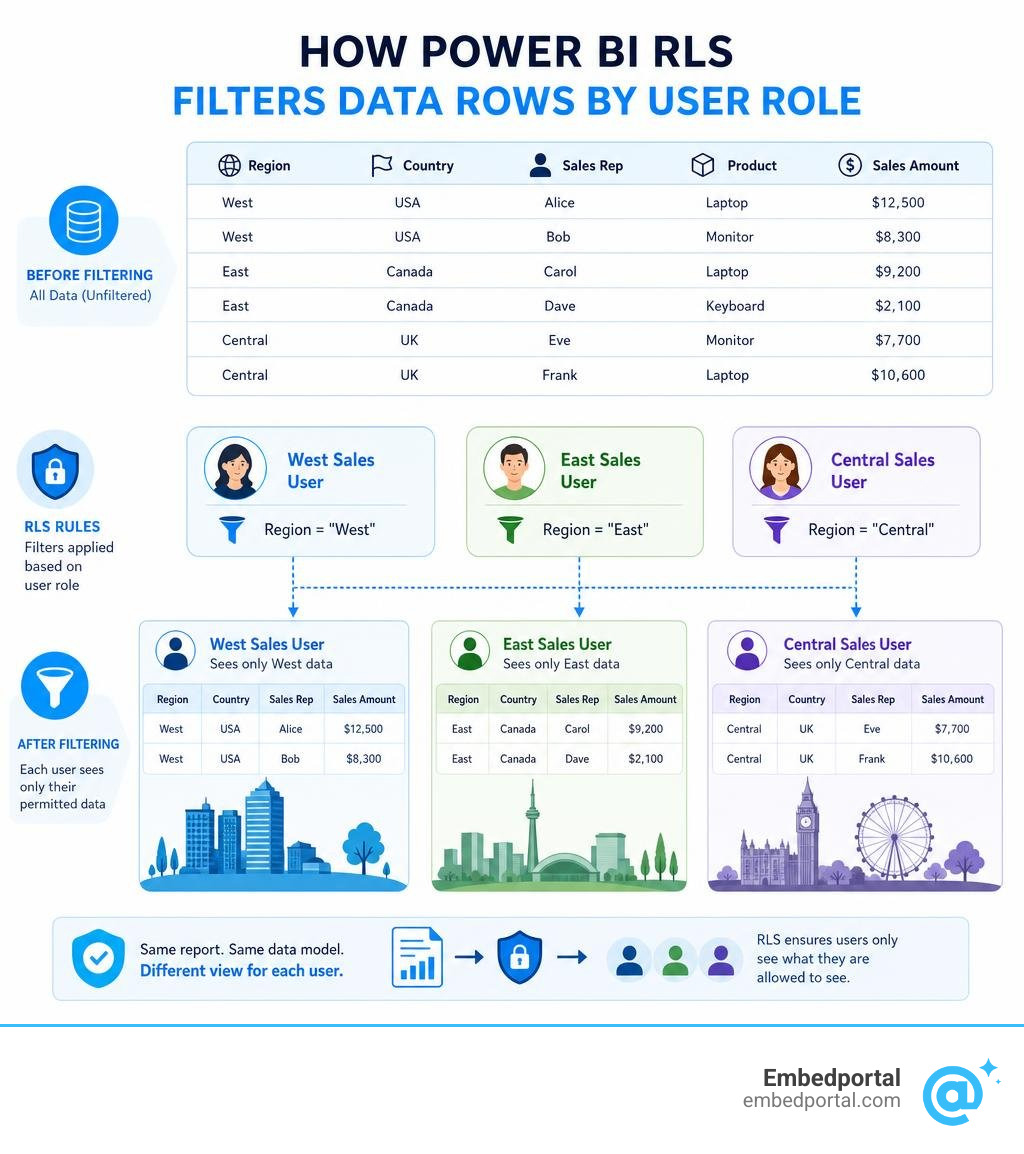
Role level security in Power BI — often called RLS — is a feature that controls which rows of data each user can see inside a report or dashboard. Instead of building separate reports for every team, you build one report and let RLS filter the data automatically based on who is logged in.
Quick answer: Here is how RLS works in Power BI at a glance:
| Concept | What it means |
|---|---|
| Role | A named set of rules that controls data access |
| DAX filter | The expression that decides which rows are visible |
| Static RLS | Hardcoded filters — e.g. show only “West” region |
| Dynamic RLS | Filter based on who is logged in using USERPRINCIPALNAME() |
| Where it is enforced | At the semantic model level, after publishing |
| Who it affects | Only users with Viewer permissions — not Admins, Members, or Contributors |
Think of it like a bouncer at a club. Everyone walks through the same door, but the bouncer checks your name and only lets you see the section you are allowed into. Everyone else’s section stays invisible to you.
For SaaS teams embedding Power BI dashboards into a customer portal, this matters a lot. Without RLS, every customer could potentially see every other customer’s data — a serious problem. With RLS, one shared report can safely serve hundreds of tenants, each seeing only their own slice of data.
The catch? Setting it up correctly has more moving parts than most tutorials admit. Workspace permissions can silently override your security rules. Dynamic filters can leak data if written carelessly. And testing it properly requires a specific workflow that many teams skip.
This guide walks through all of it — in plain language.
Role level security power bi word list:
Demystifying Role Level Security Power BI: What Is It?
To truly grasp how role level security power bi works, we must look under the hood of the Power BI semantic model. RLS is not about hiding visual pages or masking text boxes on a canvas. True security happens at the data level.
By default, a data model has no security roles configured. This means anyone with query or read permission can access every single row in your tables. When you implement RLS, you define security filters that restrict data access at the database query level.
These filters are driven by Data Analysis Expressions (DAX). When a user opens a report, Power BI injects your DAX filter directly into the query’s row context. For instance, if you write a DAX expression that evaluates to [Region] = "West", Power BI evaluates this expression for every row. Only rows that return TRUE are loaded into memory and displayed in the report visuals. If a row evaluates to FALSE, it is completely ignored, as if it never existed in the database.
This is a critical distinction: RLS is a backend security mechanism. Obfuscation techniques, such as hiding report pages or using conditional visibility on visuals, are not secure. A tech-savvy user can still query the underlying dataset and extract the hidden rows. By enforcing security directly on the semantic model, you ensure that no unauthorized data ever leaves the cloud. For a deeper dive into this architectural concept, check out our guide on Row Level Security.
To set up these restrictions properly, you must learn how to Restrict access to Power BI model data – Training | Microsoft Learn, which lays the groundwork for both simple and complex security environments.
Static vs. Dynamic RLS: Choosing Your Security Architecture
Before writing a single line of DAX, you must choose between two primary architectures: Static RLS and Dynamic RLS. The right choice depends entirely on the size of your organization and how often your user permissions change in 2026.
| Feature | Static RLS | Dynamic RLS |
|---|---|---|
| Setup Complexity | Very Low | Moderate to High |
| Maintenance Effort | High (Requires republishing on changes) | Extremely Low (Data-driven) |
| DAX Complexity | Simple constants (e.g., [Region] = "East") |
System functions (e.g., USERPRINCIPALNAME()) |
| Scalability | Poor (Best for < 10 roles) | Excellent (Scales to thousands of users) |
| User Mapping | Manual assignment in Power BI Service | Dynamic lookup from a security mapping table |
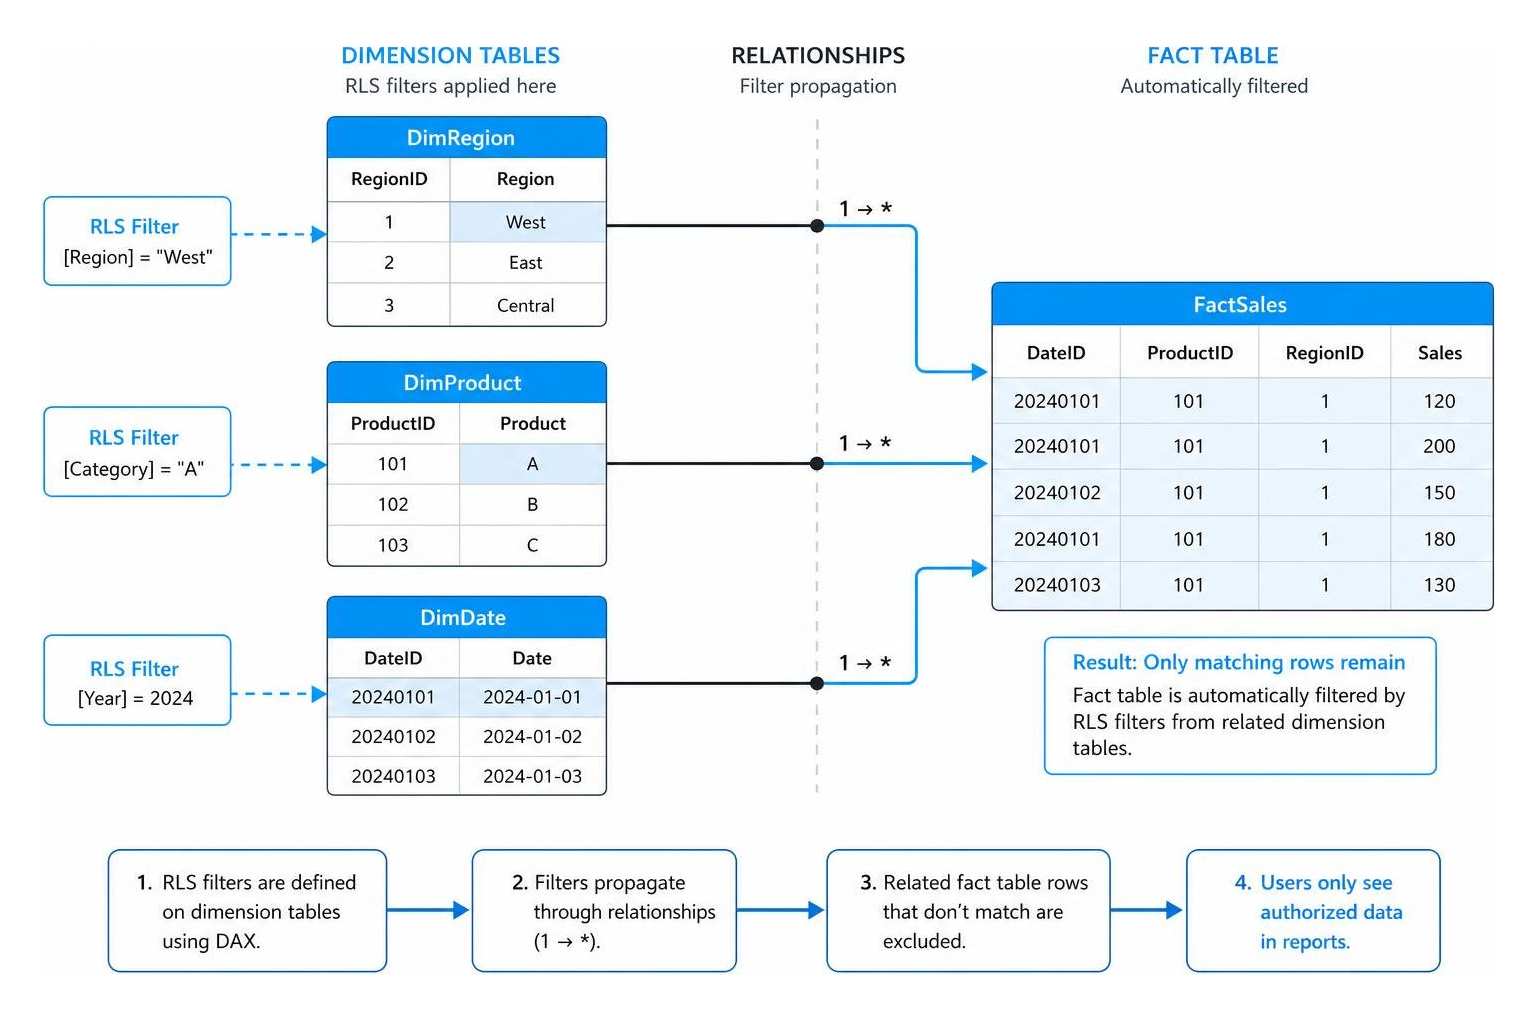
To make either architecture perform well, you must apply star schema design principles. In a star schema, your data model is split into fact tables (which store numeric metrics like sales and transactions) and dimension tables (which store descriptive attributes like geography, products, and employees).
When implementing RLS, always apply your DAX filters to the dimension tables rather than the fact tables. Because of relationship propagation, a filter applied to a dimension table will automatically flow down and filter the related fact tables. This keeps your DAX expressions incredibly simple and highly optimized.
Setting Up Static Role Level Security Power BI Roles
Static RLS is the simplest way to restrict data. It is perfect when you have a small, fixed number of roles that rarely change — such as “US East Coast” and “US West Coast.”
To set up static roles in Power BI Desktop:
- Open your report in Power BI Desktop and navigate to the Modeling tab.
- Click on Manage Roles in the Security group.
- In the Manage Roles window, click Create and give your role a clear, descriptive name (for example,
Region_East). - Select the dimension table you want to filter (such as
GeographyorSales Territory). - In the Table Filter DAX Expression editor, enter your filter. For example:
[Region] = "East". - Click Save.
Because static roles rely on hardcoded values, they can quickly become a maintenance nightmare. If your company expands into ten new regions, you must manually create ten new roles in Power BI Desktop, write ten new DAX filters, and republish the report. For long-term success, refer to the official Row-level security (RLS) guidance in Power BI Desktop – Power BI | Microsoft Learn to avoid common modeling mistakes.
Implementing Dynamic RLS with DAX
If your organization has hundreds of employees, dozens of shifting territories, or if you are building a multi-tenant SaaS application, static RLS is not viable. You need Dynamic RLS.
Dynamic RLS uses a single security role to filter data dynamically based on the identity of the user currently viewing the report. This is achieved using two essential DAX functions: USERNAME() and USERPRINCIPALNAME().
USERNAME()typically returns the domain and username in local Power BI Desktop environments (e.g.,DOMAIN\username), but returns the User Principal Name (email format) in the cloud Power BI Service.USERPRINCIPALNAME()always returns the user’s authenticated email address (e.g.,user@company.com) across both Desktop and Service. For consistency, always useUSERPRINCIPALNAME().
To implement dynamic RLS, you must design a user security mapping table in your data source. This table maps each user’s email address to the specific dimension key they are allowed to see.
For example, your UserSecurity table might look like this:
| UserEmail | TerritoryKey |
|---|---|
| alice@company.com | 1 (North America) |
| bob@company.com | 2 (Europe) |
In your Power BI data model, you relate this UserSecurity table to your main dimension table (like SalesTerritory) using a 1-to-many relationship. Crucially, you must configure this relationship to use bidirectional filtering and check the option to Apply security filter in both directions. This ensures that when the security table is filtered to a single user, that filter propagates backward to the dimension table, and subsequently down to the fact table.
To write the dynamic DAX filter:
- Go to Manage Roles and create a single role named
UserSecurityRole. - Select your
UserSecuritymapping table. - Enter the following DAX expression:
[UserEmail] = USERPRINCIPALNAME() - Click Save.
Now, when Alice logs in, USERPRINCIPALNAME() returns alice@company.com. The mapping table filters to her row, which propagates to only show Territory 1. For a step-by-step walkthrough of setting up this architecture on Analysis Services or SQL databases, see the tutorial on Dynamic row-level security with Analysis services tabular model – Power BI | Microsoft Learn. To ensure your model remains fast and secure as your data grows, make sure to follow established RLS Best Practices.
Step-by-Step: Configuring and Testing RLS in Power BI
Once you have defined your roles and DAX rules in Power BI Desktop, you are only halfway there. RLS is not fully active until you publish the report, configure user mappings in the cloud, and validate that the security rules work exactly as expected.
Assigning Users and Groups in the Power BI Service
After designing your roles, publish your .pbix file to an active workspace in the Power BI Service.
Once published, you must map actual users to the roles you created. Power BI does not automatically notify users when they are assigned to a security role, so this administrative step must be done manually or programmatically.
Here is how to assign users to your roles in the Power BI Service:
- Navigate to the workspace where your report is published.
- Locate the Semantic Model (previously called Dataset) associated with your report.
- Click the three dots (More Options) next to the semantic model name and select Security.
- In the Row-Level Security page, you will see a list of the roles you created in Power BI Desktop.
- Select a role, then enter the email addresses or security groups of the users who should belong to that role.
- Click Add, then click Save.
To make management easier, we highly recommend mapping roles to Microsoft Entra (formerly Azure AD) security groups, mail-enabled groups, or distribution lists rather than individual user accounts. This way, when a new employee joins the team, your IT department can simply add them to the correct Entra group, and they will automatically inherit the correct Power BI security filters without you having to touch the Power BI Service.
Note: Microsoft 365 groups are not supported for RLS role membership. For more details on cloud-based role management, check out our guide on Power BI Row Level Security.
Testing and Validating Your Security Roles
Never release a secured report to production without testing it thoroughly. If your DAX expression contains a typo, users might see a blank screen — or worse, they might see data they are not authorized to view.
Fortunately, Power BI provides excellent tools to simulate user experiences.

To test roles in Power BI Desktop:
- On the Modeling tab, click View as.
- In the View as roles window, select the role you want to test (e.g.,
Region_East). - To test dynamic RLS, check Other user and enter a test email address (e.g.,
bob@company.com), then select your dynamic role. - Click OK. The report canvas will now display a yellow warning bar indicating which role you are currently simulating.
- To return to normal view, click Stop viewing on the yellow bar.
To test roles in the Power BI Service:
- Go to the Security settings of your semantic model.
- Hover over the role you want to test, click the three dots, and select Test as role.
- This opens the report in a simulation mode. You can change the simulated user by clicking the drop-down menu at the top and entering any user’s email address.
For hands-on practice setting up and verifying these security configurations, you can follow the structured labs in the DP-500-Azure-Data-Analyst course materials.
Common Pitfalls, Limitations, and Workspace Interactions
Implementing RLS is rarely a completely smooth ride. There are several technical limitations and architectural nuances that catch even seasoned BI developers off guard.

Here are the most common pitfalls you need to watch out for:
- DirectQuery and Single Sign-On (SSO): The “Test as role” feature does not work for DirectQuery semantic models if Single Sign-On (SSO) is enabled. In these cases, the source database itself is often responsible for enforcing the row-level security, bypassing Power BI’s internal engine.
- Direct Lake Fallback: If you are using Microsoft Fabric’s Direct Lake mode, RLS is supported. However, if your DAX queries use unsupported features, the query will fall back to DirectQuery mode. This fallback can significantly alter your report’s performance characteristics.
- B2B Guest Users: External guest users can access RLS-filtered reports, but their User Principal Names (UPNs) are resolved differently. A guest UPN often contains
#EXT#(e.g.,john_externaldomain.com#EXT#@yourtenant.onmicrosoft.com). If your user mapping table contains their standard email (john@externaldomain.com), the dynamic DAX filter will fail, and they will see absolutely no data. To resolve this, you must store the exact UPN format or use a customized mapping approach. Learn more about managing external users in our guide on Power BI Guest Access. - Service Principals: Service principals cannot be added to RLS roles. If you are embedding reports using an “App Owns Data” scenario with a service principal as the final effective identity, standard RLS will not apply. You must pass a custom effective identity string using the
CUSTOMDATA()DAX function instead.
Why Workspace Roles Can Bypass Role Level Security Power BI
By far, the most common troubleshooting question we hear is: “I set up RLS, but my colleague can still see all the data! Why isn’t it working?”
The answer almost always lies in their workspace permissions.
RLS is only enforced for users with Viewer permissions in a Power BI workspace.
If a user is assigned any of the following roles in a workspace, they will bypass RLS entirely and see all data:
- Admin
- Member
- Contributor
These three roles grant edit or write access to the semantic model. Because these users have permission to modify the model, Power BI assumes they are trusted developers. Enforcing security rules against model editors is a false sense of security — like giving someone a key to every room in a building but expecting them to only enter through the front door.
To ensure your security filters are active, always publish your reports to a workspace where end-users are strictly assigned the Viewer role. If you need to share a dashboard with write-access developers while restricting their data visibility, you must split your work into separate development and production workspaces. For a complete breakdown of how workspace roles interact with report security, read our deep dive on Dashboard Data Access.
Frequently Asked Questions about Power BI RLS
Can I use RLS to restrict access to specific columns or measures?
No. RLS is strictly designed to filter rows of data. If a user is granted access to a specific row, they will be able to see every column and measure associated with that row.
If you need to hide entire columns or tables (for example, hiding a Salary column from standard employees while letting them see other employee details), you must use Object-Level Security (OLS). OLS is configured using external tools like Tabular Editor and completely metadata-restricts unauthorized objects, resulting in query errors if an unauthorized user attempts to access them.
Can a single user belong to multiple RLS roles?
Yes. A user can be assigned to multiple RLS roles in the Power BI Service. When this happens, Power BI treats the security filters as additive.
This means the roles are combined using a logical OR (a union of the rows). For example, if User A is in a US_East role (which filters to East Coast data) and a US_West role (which filters to West Coast data), they will see the combined data for both the East and West coasts. Be careful when designing overlapping roles to avoid accidentally granting broader access than intended.
Does RLS work with live connections to Analysis Services?
Yes, but you cannot configure the RLS roles or DAX filters within the Power BI Service or Power BI Desktop.
When using a live connection to an on-premises SQL Server Analysis Services (SSAS) or Azure Analysis Services tabular model, the security roles must be defined directly in the source Analysis Services model. When a user views the report, Power BI passes the user’s identity to the on-premises gateway using the EffectiveUserName property, and Analysis Services enforces the security rules on its end.
Conclusion
Implementing role level security power bi is the gold standard for protecting sensitive data and delivering personalized, clean report experiences to your users. Whether you choose the simplicity of static roles or the enterprise-grade scalability of dynamic DAX filters, setting up RLS correctly ensures your data remains locked down at the source.
However, managing workspaces, mapping Entra security groups, and troubleshooting B2B guest access in Power BI can consume countless engineering hours.
If you are building a SaaS application and need to share dashboards with external customers, there is an easier way. At Embedportal, we provide a powerful white-label embedding platform designed to simplify this entire process. Based in California, USA, we help software teams embed multi-vendor analytics — including Power BI, Tableau, QuickSight, and Metabase — into their customer portals in under an hour.
With Embedportal, you get unified branding, seamless Single Sign-On (SSO), and simplified Row Level Security management without wrestling with complex cloud configurations. Let us handle the bouncer duties so you can focus on building your core product.