
If you want to embed Power BI report views inside your app, the hard part usually is not the iframe or the JavaScript snippet. It is picking the right embed model, setting up auth correctly, and avoiding the classic mistake of exposing something sensitive in the browser. This walkthrough takes you from report to secure in-app embed, with the parts that usually break called out before they waste your afternoon.
What you’re actually setting up when you embed a Power BI report
Embedding a Power BI report means placing an interactive report inside your product so users can explore data without leaving your app. That sounds simple, and in one sense it is. The report still lives in Power BI, but your app becomes the place where it is rendered, filtered, and used.
Here’s the thing: people often mix up three very different paths.
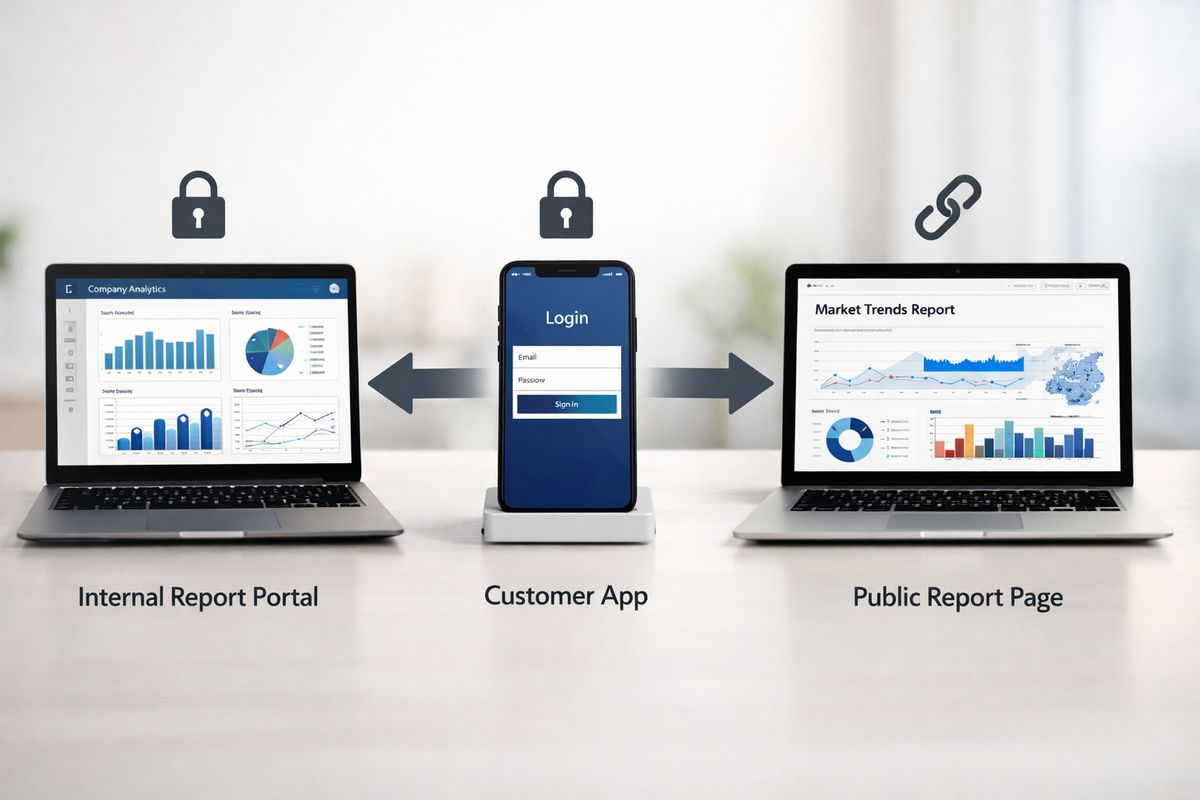
Secure embed is the broad idea of showing Power BI content inside an app with authentication and permissions in place. Embed for your organization is the internal route, where users sign in with their own organizational Power BI access. Embed for your customers is the external route, where your app handles the experience and Power BI runs behind the scenes. Publish to Web is the public route, which is basically for information you would be comfortable posting on a billboard.
That distinction matters more than the code. A lot more.
Choose the right embed method before you touch any code
Choosing the wrong path early creates pain later: licensing surprises, failed customer access, ugly permission workarounds, and security reviews that go nowhere. Since more than 60% of new business apps are expected to ship with embedded analytics soon, this decision is becoming a product design choice, not just a developer detail.
Embed for your organization
Use this when your users are inside your organization and already have Power BI accounts and access to the content. In this model, each user signs in with an organizational identity and views the report based on that identity.
This is often the simplest route for internal portals, team dashboards, and line-of-business apps. If your finance team already lives in Microsoft 365 and your app is just a cleaner place to view the same reporting, this can be a fast win.
The catch is that it stops being convenient when your audience is external. Customer portals, partner apps, and SaaS products usually do not want every viewer managed as a Power BI user inside your tenant.
Embed for your customers
This is the app-owns-data model, and it is the standard choice for customer-facing apps. Your app authenticates behind the scenes, requests an embed token, and shows the report to external users in a controlled in-app experience.
This model gives you the polished, branded setup most businesses actually want. Viewers do not need to bounce into the Power BI Service, and with capacity-based licensing, viewers typically do not need individual Power BI licenses either. For secure external analytics, this is usually the right answer.
Publish to Web and why it’s not for sensitive data
Publish to Web creates a public embed that anyone with the link can access. No sign-in. No controlled data access. No real protection.
So here is the direct rule: if the data matters, do not use Publish to Web. Microsoft and industry guidance treat it as public sharing, not secure embedding, and Publish to Web is public and insecure for production analytics. It is fine for a public demo, a marketing stats page, or a harmless sample dataset. It is not fine for customer revenue, operational KPIs, or anything tied to privacy obligations.
What you’ll need before you start
Think of this part like setting ingredients on the counter before cooking. You can skip it, but then you will be halfway through token generation wondering where your workspace ID went.
Power BI account, workspace, and report
You need a finished report, published to a Power BI workspace you can access. The report should already work properly in the Power BI Service before you try to embed it. If the report is broken there, embedding will not magically fix it.
You also need the right workspace permissions. Shared ownership, admin rights, or member access usually matter during setup, especially when you start connecting service principals and generating tokens.
Azure subscription and app registration
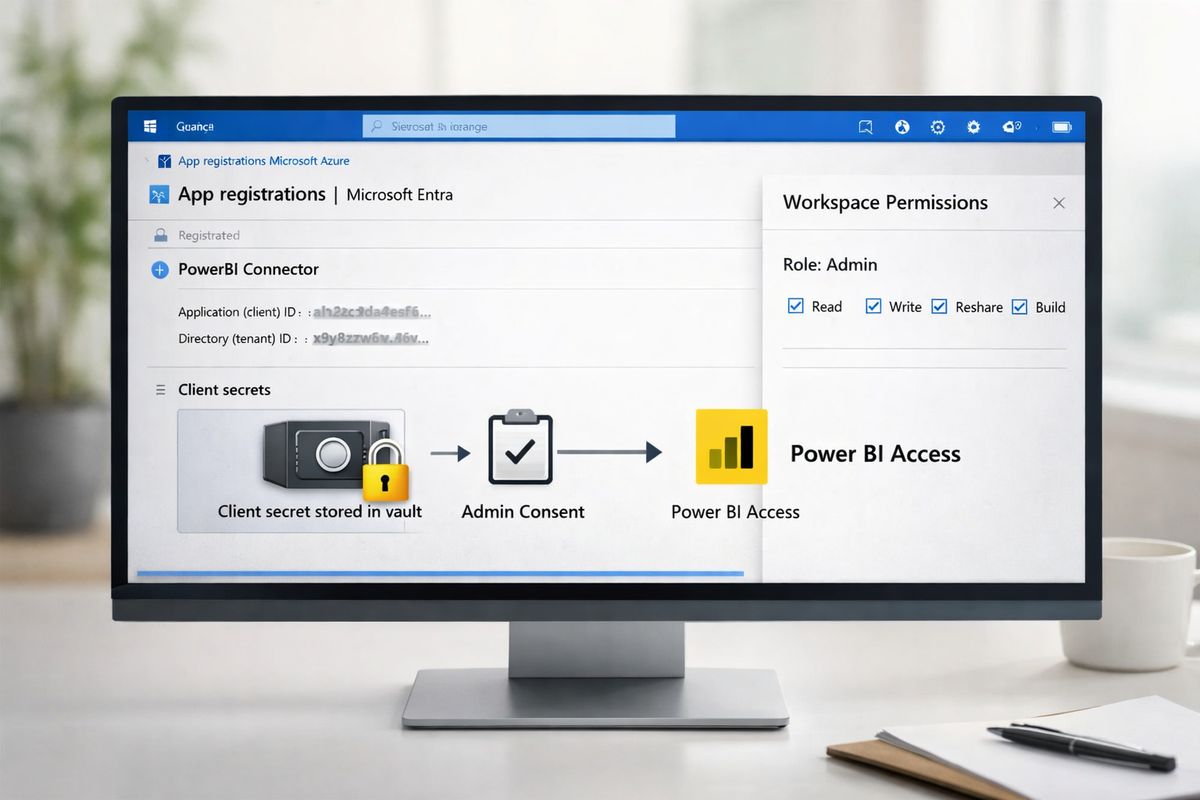
For secure embedding, you need an Azure subscription and a Microsoft Entra app registration. That app registration is your app’s identity in Microsoft’s auth system. It gets an application ID, lives in a tenant, and can be given permission to call Power BI APIs.
You will also need credentials for that app, usually a client secret or certificate. Keep the jargon simple: the app registration is the identity, and the secret or certificate proves that identity from your backend.
A web app and a backend that can mint tokens
You need a frontend page where the report will appear and a backend service that can request tokens securely. This part is non-negotiable for protected customer data.
Do not generate embed tokens in browser code. Client secrets, admin credentials, and backend API calls belong on the server. The browser should receive only the short-lived embed information needed to render the report.
Licensing and capacity basics
Before building, know the licensing shape. Power BI Pro is per-user and commonly used for internal scenarios. Premium and Embedded are capacity-based models. Power BI Embedded uses Azure-based A SKUs, which is what many external-facing apps use to scale without assigning a license to every viewer.
That “works fine in dev” moment often ends when real traffic shows up. Capacity planning belongs at the start, not after launch.
Step 1: Build and publish the Power BI report you want to embed
- Open the report in Power BI Desktop and review it as if it were already inside your app.
- Publish it to the correct workspace in the Power BI Service.
- Gather the IDs and URLs you will need for embedding.
If the report itself feels clunky, the embedded version will feel clunky too.
Create or finalize the report in Power BI Desktop
Use Power BI Desktop to clean up visuals, filter behavior, page names, and model design before publishing. Keep page names readable, because those names often surface in embedded navigation. Check that slicers make sense in a smaller app layout, and trim visuals that add noise without helping decisions.
Reports built for a giant analyst monitor often feel cramped inside a portal. A good embedded report is lighter, easier to scan, and less dependent on side panes. Think less “BI workbench,” more “useful screen inside your product.”
Publish the report to a workspace
- In Power BI Desktop, select Publish.
- Choose the workspace where the report should live.
- Open the Power BI Service and confirm the report and dataset appear in that workspace.
The workspace matters because permissions, capacity assignment, and API access all hang off it. Power BI Desktop is for building, while Power BI Service is the cloud platform where your published content is managed and shared.
Checkpoint: open the report in the Power BI Service and confirm it loads without errors before moving on.
Collect the report and workspace details
- Open the report in the Power BI Service.
- Copy the report ID from the URL or via the API.
- Copy the workspace ID.
- Save the embed URL for the report.
Store these values somewhere safe in your app config or deployment secrets system. This is one of those tiny tasks that saves a weird amount of time later.
Step 2: Set up Azure and register your application
https://www.youtube.com/watch?v=NC3pospVrgU
- Register an app in Microsoft Entra ID.
- Create credentials for that app.
- Add Power BI API permissions.
- Enable Power BI-side access for the app.
This is where boring setup pays off. Small auth mistakes here often turn into vague “forbidden” errors later.
Register the app in Microsoft Entra ID
- Open the Azure portal.
- Go to Microsoft Entra ID and select App registrations.
- Click New registration.
- Give the app a name and choose the appropriate supported account type.
- Save the application ID and tenant ID after creation.
If your flow needs a redirect URI, add it now. Some server-side embed flows barely use it, but other auth scenarios do. Save every ID as you go. Hunting for one missing GUID later is like losing one screw while assembling furniture, annoyingly expensive in time.
Create a client secret or certificate
- Open the app registration.
- Go to Certificates & secrets.
- Create a new client secret, or upload a certificate if your security policy prefers certificates.
- Store the resulting value in a secure secret store.
A client secret is easier to set up. A certificate is stronger for long-term production use. Either way, do not hardcode credentials into your repo, frontend bundle, or example config.
Add the Power BI API permissions
- In the app registration, open API permissions.
- Add the Power BI Service permissions your backend needs.
- Grant admin consent if your environment requires it.
Missing API permissions are sneaky because authentication can still succeed while Power BI API calls fail. If you can get a token but cannot generate an embed token, this is one of the first places to check.
Enable service principal access in Power BI
- Open the Power BI admin portal.
- Enable service principal access in tenant settings if it is not already enabled.
- Add the app or its security group to the target workspace with the right role.
This is the classic catch. Your Azure app can be perfectly configured and still fail because Power BI itself has not been told to trust it. Do both sides.
Checkpoint: verify that your service principal can see the workspace content it needs before writing frontend embed code.
Step 3: Choose your authentication and authorization model
- Decide whether your app owns the data or the user owns the data.
- Map that choice to your user base.
- Plan row-level security before you go live.
This is not paperwork. It defines who can see what.
App owns data for external customers
In app-owns-data, your app authenticates to Power BI and serves external users inside your own login experience. This is the common SaaS pattern because it gives you control over branding, access flow, and customer onboarding.
If you are building a customer portal, this is usually the model to use. It keeps Power BI in the engine room instead of making customers interact with tenant-level Microsoft access.
User owns data for internal users
In user-owns-data, each signed-in person uses individual Power BI access and permissions. This works well for internal users who already exist in your organizational identity system and already have Power BI rights.
It is simple when your audience is controlled and internal. It gets awkward fast when you try to stretch it into a broader external product.
Plan row-level security early
Row-level security, or RLS, filters data so each user sees only the slice meant for that account, region, customer, or role. Build this into the dataset model early.
That matters because permission mistakes in embedded analytics are not rare. One cited report found 38% of SaaS vendors had at least one data leakage incident tied to misconfigured embedded dashboard permissions. If you are serving multiple customers from one model, RLS is not optional polish. It is the lock on the door.
Step 4: Generate an access token and embed token on the server
- Use your backend to request an Azure AD access token.
- Call the Power BI REST API to generate an embed token.
- Return only safe embed details to the browser.
- Plan for token refresh.
This is the heart of secure embedding.
Get an Azure AD access token
Your backend authenticates using the app registration credentials and requests an access token from Microsoft identity services. That token allows your server to call the Power BI REST API.
Focus on the sequence: authenticate app, get access token, call Power BI. If step one fails, nothing later matters.
Call the Power BI REST API to generate an embed token
Use the access token to call the Power BI API endpoint that generates an embed token for the report, and if needed, the dataset and RLS identity details.
The embed token is temporary permission for your app to render that content. It is not the same thing as your Azure app secret, and it is not something to keep around forever.
Pass only the safe embed details to the frontend
Your browser app should receive the embed token, embed URL, report ID, and any display settings needed to initialize the report. That is enough.
Do not send client secrets, tenant admin credentials, or raw service principal credentials to the frontend. Ever.
Handle token expiration cleanly
Embed tokens expire, so plan for renewal from the beginning. If your app sessions run long, add logic to request a fresh token before the current one dies.
A broken report after twenty minutes feels like your product is flaky, even when the cause is just token lifetime. Treat refresh as part of the design, not a later patch.
Step 5: Add the Power BI JavaScript client to your web app
- Add the Power BI JavaScript client to your frontend.
- Create a container element for the report.
- Build the embed configuration object.
You can use a plain iframe in some cases, but the JavaScript SDK gives you much better control.
Install or load the client library
Install the Power BI JavaScript client through npm if your app uses a build system, or load it from a CDN if you want a simpler setup. The exact package wiring changes with React, Angular, Vue, or plain JavaScript, but the concept stays the same.
The SDK is what lets you embed, listen for events, apply filters, and manage the report programmatically instead of just dropping a rectangle on the page.
Create the container for the embedded report
- Add a div where the report should render.
- Give it a stable ID or selector.
- Set width and height clearly in CSS.
Do not leave sizing to chance. If the container has no height, the report has nowhere to appear. For responsive layouts, use a sensible minimum height so the report does not end up squeezed like a spreadsheet viewed through a mail slot.
Build the embed configuration object
Your config usually includes the content type, token type, access token, embed URL, and report ID. It can also include settings for panes, page navigation, filter visibility, and background style.
Keep this object tidy and predictable. Bad config values, especially mismatched report IDs and URLs, are behind a huge share of “token worked but nothing shows” bugs.
Step 6: Render the report and verify that it loads
- Call the embed method from the client library.
- Listen for lifecycle events.
- Test using a realistic account and scenario.
This is the satisfying part. It is also where hidden setup mistakes finally show themselves.
Call the embed method
Use the Power BI client library to target your container and call the embed method with your configuration object. If your page re-renders, reset or reuse the embedded instance instead of blindly embedding again.
Duplicate embeds can create weird behavior, especially in component-based frontends.
Listen for load, render, and error events
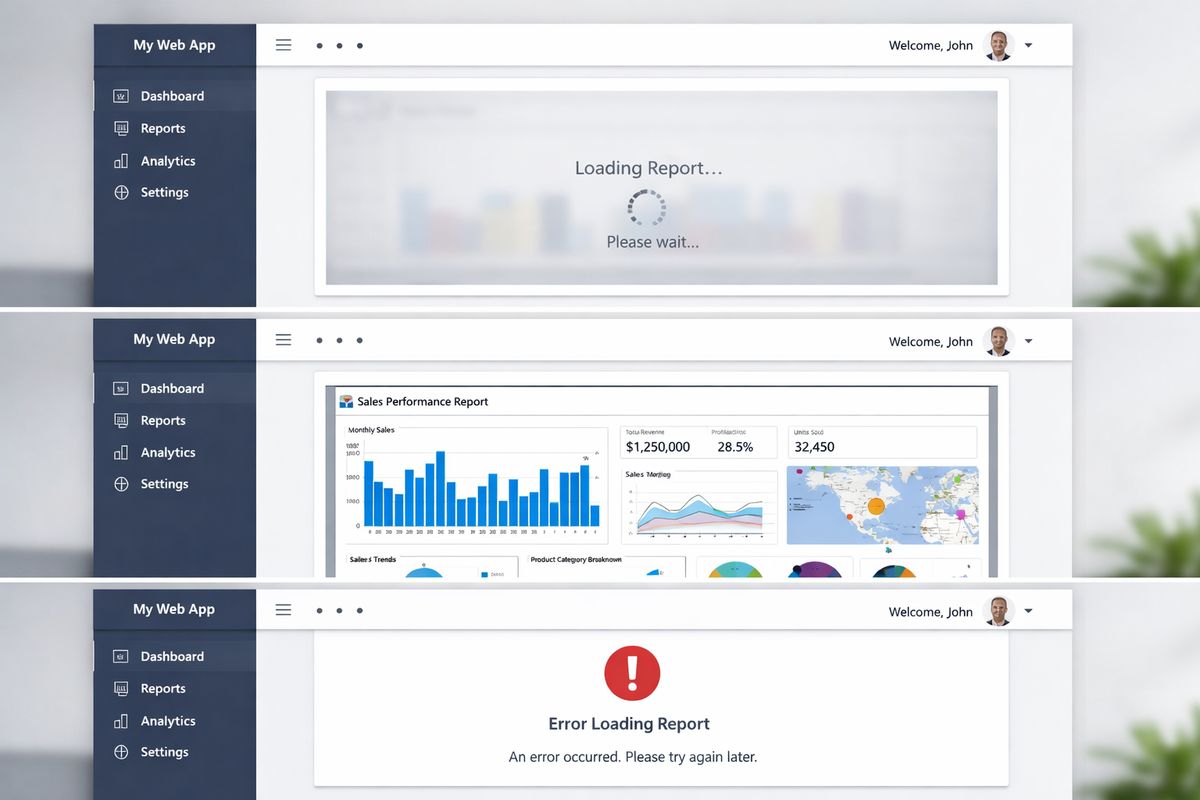
Hook into events such as loaded, rendered, and error so you can show a loading state, log failures, and confirm success. These events make debugging much easier.
Checkpoint: success means more than “the frame exists.” The report should load, render, and respond to interaction without errors.
Test with a real user scenario
Use a non-admin account, realistic customer data, and a normal browser session. 76% of organizations already use embedded analytics internally, which means expectations are high. A local admin test at 11:40 p.m. is not enough.
If your app is multi-tenant, test with at least two tenant contexts and confirm each sees only the right data.
Step 7: Customize the embedded experience for your app
- Remove Power BI UI pieces your users do not need.
- Set a smart default landing state.
- Add filters or bookmarks where helpful.
- Fit the report cleanly into your app layout.
This is where the report starts to feel like part of your product instead of a guest widget.
Hide panes, commands, and Power BI UI elements
Use embed settings to hide the filter pane, navigation pane, or action bar if those parts distract from the task. Simpler is usually better.
If your users only need to review account health and export a page, do not hand over the whole BI toolbox.
Set the default page, filters, and bookmarks
Choose the first page intentionally. Preload useful filters. Use bookmarks when you want a saved view with a specific story or workflow state.
This is especially helpful in customer portals, where each person should land on something immediately relevant instead of a generic overview.
Apply URL filters and programmatic filters
URL filters are quick and easy for simple cases. Programmatic filters through the SDK are stronger when you need richer control or dynamic interactions.
Use the simple option when it stays simple. Switch to SDK filtering when your app logic starts to outgrow query-string tricks.
Match the report to your app layout
Size the report so it fits the surrounding UI, works in modals or full-screen views, and does not create awkward nested scrolling. Embedded analytics works best when users forget it came from another tool.
A little spacing, a sensible height, and a proper mobile plan go a long way.
Step 8: Secure the embedded report for real-world use
- Enforce row-level security.
- Protect secrets and token endpoints.
- review privacy and governance expectations before launch.
Security is not a wrapper you add at the end. It is part of the embed architecture.
Use row-level security for tenant or customer isolation
Define RLS roles in the dataset and pass the right identity context during embed token generation. Then test it with real tenant boundaries.
The dangerous failure mode is not a report crash. It is a report that loads beautifully and shows the wrong customer’s numbers.
Lock down secrets, tokens, and backend endpoints
Keep secrets in environment variables or a managed secret store. Use HTTPS everywhere. Protect the backend endpoint that generates embed details, because that endpoint effectively controls access to your analytics.
Frontend-only setups are not enough for protected data. If someone can inspect your app and extract long-lived credentials, the design is broken.
Understand compliance, privacy, and data residency concerns
Embedding customer analytics often triggers legal and procurement questions before launch. Privacy expectations, data residency, and tenant governance come up fast, especially in regulated industries.
That is not theoretical. Many teams cite privacy and security as top embedded analytics concerns, so bring those stakeholders in early instead of treating review like a last-minute obstacle.
Step 9: Plan for scale, performance, and cost
- Choose a capacity model that fits your audience.
- Optimize report design before blaming the embed.
- Monitor usage and adjust as traffic grows.
Embedding is partly a frontend task. It is also a capacity and report-design task.
Pick the right capacity model
For internal audiences, per-user licensing may be enough. For customer-facing apps, capacity-based options usually fit better. Viewers of embedded content do not need separate licenses in the standard Embedded capacity model, which is one reason it works well for external portals.
Microsoft prices Embedded by node type and hourly usage, and you can scale node sizes as demand changes. That flexibility is useful, but only if you estimate traffic honestly.
Optimize report performance before blaming the embed
Slow embedded reports are often just slow reports. Reduce visual clutter, simplify measures, avoid overly heavy pages, and clean up queries and model relationships.
If one page loads twelve visuals, three slicers, and a monster table from a bloated dataset, no frontend trick is going to make that feel fast.
Monitor usage and capacity
Track render times, concurrency, and capacity pressure. If performance degrades at peak hours, that is a signal to resize capacity, simplify reports, or stagger heavy usage patterns.
Watch both waste and overload. Idle capacity burns budget. Overloaded capacity burns trust.
Troubleshooting common Power BI embed problems
When Power BI embedding fails, the error messages can be annoyingly vague. The fix usually comes from checking one layer at a time: Azure auth, Power BI permissions, token content, then frontend config.
“You don’t have permission” and access denied errors
Start by checking workspace access, service principal enablement, and the app’s Power BI API permissions. Then confirm the target report lives in the workspace your app expects.
If Azure looks correct but Power BI still says no, the problem is often on the Power BI side, especially tenant settings or workspace role assignment.
Token generated but report still won’t render
Check the embed URL, report ID, token expiration, and token scope. One mismatched ID is enough to make everything look fine until render time.
Also confirm your frontend is passing the right token type and that the container actually has visible dimensions. A blank box is sometimes auth. Sometimes it is just CSS.
RLS is not filtering the data correctly
Confirm the dataset contains the expected roles, the embed token request includes the intended identity context, and your test user maps to the right values.
Then test with obviously different data slices. If customer A and customer B both show the same totals, stop there and fix it before doing anything else.
The report is slow or feels broken on mobile
Mobile problems are often layout problems wearing a performance mask. Large visuals, dense tables, tiny slicers, and poor container sizing make reports feel broken even when they technically load.
Trim pages for smaller screens, simplify the default view, and consider a mobile-specific report layout if phone use matters.
What you should have working at the end
By this point, you should have a Power BI report published to the right workspace, an Azure app registration configured for Power BI API access, a backend that generates embed tokens securely, and a frontend that renders the report inside your app with the settings you want.
More importantly, you should know what “done” actually looks like. Not just a report appearing on a staging page, but a report that loads for the right user, respects permissions, handles token expiry, and feels like part of your product.
That difference matters. A demo proves possibility. A production-ready embed proves control.
Next steps to make the embed production-ready
Once the first embed works, the next layer is operational polish: audit logging, automatic token renewal, usage analytics, better tenant controls, and performance monitoring tied to real traffic. If your app serves external customers, this is also the right time to review RLS test coverage and capacity sizing before broader rollout.
Try one concrete move next: embed a single report on a staging page, sign in as a non-admin user, and fix the first permission problem you hit. That one test usually reveals more than an hour of reading ever will.